Booking.com: Import Properties from Booking.com to Beds24
This page is about the menu (SETTINGS) CHANNEL MANAGER > BOOKING.COM > IMPORT and explains how to import properties from Booking.com to Beds24.
Contents
1 What you should know and do before getting started
As a longstanding Booking.com Premier Partner Beds24 can offer you advanced functionality and many convenience functions. Once set up you can manage everything directly from Beds24 which will save you time and make working with Booking.com really easy.
Learn how the channel manager works.
Importing a property is a quick way to get started but be informed that not everything will import so you will need to make adjustments after you have imported.
2 Step by Step Guide to create a new property in Beds24 via import from Booking.com
Importing a property is a complex process so the instructions need to be followed carefully. Click on "Expand" to view the details for each step.
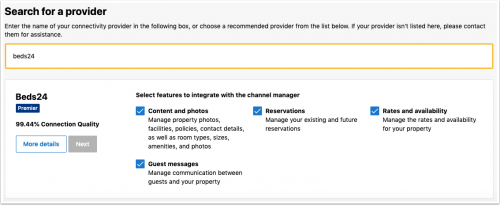
- Go to (SETTINGS) CHANNEL MANAGER > BOOKING.COM > IMPORT
- Enter your Booking.com hotel ID in the Booking.com Hotel ID field
If you do not see a "Connect to Booking.com" button or another message you can move to step 2
If you see a "Connect to Booking.com" button you need to initiate the XML connection from the property menu within the Booking.com extranet:
- Click on the "Connect to Booking.com" button.
- Click the Start button and search for BEDS24.
- Tick all tick boxes.
- When ready you will receive a notification from Booking.com.
- Click on the "Import a property from Booking.com" button
- Enter the Booking.com hotel ID of the property you want to import then click on "Import from Booking.com"
- Go to (SETTINGS) CHANNEL MANAGER > BOOKING.COM > VIEW CONTENT. You will see what imported in the right column and next to it the setting in Beds24 where you can enter missing content or change content
- Go to the CALENDAR and check that your prices are imported properly. Up to 10 prices will import as daily prices. Minimum stays will not import and will need to be set in Beds24 if required.
- Go to PRICES > DAILY PRICE RULES
- Click on "Edit" and adjust the "Minimum Stay" and "Maximum Stay" values if required.
The property import will not import bookings and closed dates. Before you can activate the automatic synchronisation between with Booking.com you will need to make sure you have all bookings in Beds24 and closed all dates in the Calendar on which you do not want to sell.
- Go to (SETTINGS) CHANNEL MANAGER > BOOKING.COM
- Click on the "Import Existing Bookings" button in to import upcoming bookings from Booking.com
- If you have bookings from Airbnb and/or Expedia you can import them directly from the channel as well after you have set the connection up
- If you have bookings from other sources you can add these manually in the Calendar, via the "Add booking" button at the top or import them from a .csv file in (SETTINGS) > PROPERTIES
- If you want to close additional dates you can do this in the Calendar by changing the inventory or via the the "Override" function. This function also allows you to limit check-in and/or check-out.
- Go to (SETTINGS) CHANNEL MANAGER >BOOKING.COM > MAPPING scroll down to the Rooms/listings and click on the "Price Data" button to check which prices and availability will send to Booking.com for each.
When you activate the connection Booking.com will remove your prices and availability from their system and replace them with the prices and availability sent from the channel manager.
You can activate the connection when your mapping and prices are correct and you have added all upcoming bookings, blocked all dates you do not want to sell and have applied your restrictions in the Calendar.
- Press "Activate Connection" and then "Activate Connection Now".
Beds24 will automatically reopen rooms when you have availability. If you have Auto-Replenishment enabled, Booking.com will not wait for the update sent from Beds24 but will automatically re-open the closed room when a guest cancels even if you have a booking from another source. You can opt-out of the feature by following these steps:
- Log into your Booking.com account
- Click on the Rates & Availability tab
- Go to the Settings symbol on the top-right corner of your Calendar
- Click on Auto-Replenishment
- Under Calendar Settings, click "No" to turn off the Auto-Replenishment feature
Click "Refresh" for the Connection Status to check the status of your property at Booking.coms end.
The connection is working and your property is selling if
- you see Connection Status: XML Active and Hotel Status: Open / bookable
- you are not receiving error messages
- the display in the channel is correct.
If you are receiving error messages click on the link in the Email to see why you are receiving the error and how to fix it.
3 After the connection is activated
You can now enjoy the convenience of managing everything centrally from Beds24. Click here for more information.