Make: Difference between revisions
No edit summary |
|||
| (13 intermediate revisions by 4 users not shown) | |||
| Line 1: | Line 1: | ||
[[Category: | [[Category:Marketplace]] | ||
[[Category:Automation]] | [[Category:Automation]] | ||
[[Category:Use_Cases]] | [[Category:Use_Cases]] | ||
<div class="heading">Make (formerly Integromat)</div> | <div class="heading">Make (formerly Integromat)</div> | ||
This page is about the menu {{#fas:cog}} (SETTINGS) | This page is about the menu {{#fas:cog}} (SETTINGS) MARKETPLACE > MAKE and explains how to connect and what you can do with the connection. | ||
To use this service you will need an account with [https://www.make.com/en/register?pc=beds24 Make]. | To use this service you will need an account with [https://www.make.com/en/register?pc=beds24 Make]. | ||
| Line 16: | Line 16: | ||
= Set Up = | = Set Up = | ||
=== Beds24 === | === Beds24 === | ||
*Set up an Auto Action | *Set up an Auto Action {{#fas:cog}} (SETTINGS) GUEST MANAGEMENT > AUTO ACTIONS which selects the bookings which will be sent to Make. Set "Trigger Action" = automatic. | ||
*Select the Auto Action which you want to use for Make. The Auto Action must be created by the Account which owns the property, actions linked from other accounts cannot be used. | *Select the Auto Action which you want to use for Make. The Auto Action must be created by the Account which owns the property, actions linked from other accounts cannot be used. | ||
*Tick the rooms for which you want to send bookings. Only bookings from rooms enabled for Make and which meet the trigger conditions in the Auto Action will be sent. | *Tick the rooms for which you want to send bookings. Only bookings from rooms enabled for Make and which meet the trigger conditions in the Auto Action will be sent. | ||
| Line 71: | Line 71: | ||
If the data fields setting is used, only the booking number, modifiedTime and the fields specified are sent to Make. | If the data fields setting is used, only the booking number, modifiedTime and the fields specified are sent to Make. | ||
Data field values must be specified one per line. | Data field values must be specified one per line. | ||
Possible values are: | Possible values are: | ||
| Line 264: | Line 262: | ||
5. Now we will need to add another module, add the | 5. Now we will need to add another module, add the “JSON” module and set it to “Create JSON” | ||
| Line 273: | Line 271: | ||
b) “Name the data structure” and click on “Generator” | b) “Name the data structure” and click on “Generator” | ||
c) Leave the “Content Type = | c) Leave the “Content Type = JSON | ||
d) On the Sample Data insert | d) On the Sample Data insert | ||
| Line 303: | Line 301: | ||
[[Media:integromat_subaccount4.png|view large]] | [[Media:integromat_subaccount4.png|view large]] | ||
*You need to set the API key you have set under | *You need to set the API key you have set under {{#fas:cog}} (SETTINGS) ACCOUNT > ACCOUNT ACCESS | ||
*Click on “Add Items” under Create Account in Make, here you will need to add the variables into the correct fields. | *Click on “Add Items” under Create Account in Make, here you will need to add the variables into the correct fields. | ||
| Line 452: | Line 450: | ||
5. Now we will need to add another module, add the | 5. Now we will need to add another module, add the “JSON” module and set it to “Create JSON” | ||
[[Image:Guestinfofromdoc5.png|650px|link=]] | [[Image:Guestinfofromdoc5.png|650px|link=]] | ||
| Line 463: | Line 461: | ||
b. “Name the data structure” and click on “Generator” | b. “Name the data structure” and click on “Generator” | ||
c. Leave the “Content Type = | c. Leave the “Content Type = JSON | ||
d. On the Sample Data insert | d. On the Sample Data insert | ||
| Line 485: | Line 483: | ||
6.1. Click on “Save”, you should now see the original “window” with your data structure and it should have a “Authentication” box where you need to insert the API key | 6.1. Click on “Save”, you should now see the original “window” with your data structure and it should have a “Authentication” box where you need to insert the API key | ||
6. | 6.2. You will also need to add the correct “Google form” variables into the corresponding fields., just like the image below | ||
[[Image:Guestinfofromdoc6.png|650px|link=]] | [[Image:Guestinfofromdoc6.png|650px|link=]] | ||
| Line 516: | Line 514: | ||
Due to a combination of some settings and or specific modules in Make sometimes Make can miss out on bookings sent to Make. | Due to a combination of some settings and or specific modules in Make sometimes Make can miss out on bookings sent to Make. | ||
If this happens on a frequent basis we recommend that you setup Beds24 to continuously send the bookings to Make, once the bookings is correctly picked up by Make you can setup a | If this happens on a frequent basis we recommend that you setup Beds24 to continuously send the bookings to Make, once the bookings is correctly picked up by Make you can setup a JSON module to create a code ans set a info code in the Booking in Beds24 using the API. | ||
This way once a booking is correctly sent it will contain the Info code and based on this info code you can filter out this booking the next time it is sent to Make stopping the bookings from going thru any other modules in Make. | This way once a booking is correctly sent it will contain the Info code and based on this info code you can filter out this booking the next time it is sent to Make stopping the bookings from going thru any other modules in Make. | ||
Each customer has its own Make module setup and so it is hard to create a scenario valid for everyone, however the only thing we need to setup is 2 modules a | Each customer has its own Make module setup and so it is hard to create a scenario valid for everyone, however the only thing we need to setup is 2 modules a JSON module to create the JSON code and a HTTP module to send the code to Beds24 to set the info code. | ||
Have a look at the following video to understand how the sequence will work, | Have a look at the following video to understand how the sequence will work, | ||
| Line 528: | Line 526: | ||
*** Beds24 Setup. | *** Beds24 Setup. | ||
1. Under | 1. Under {{#fas:cog}} (SETTINGS) MARKETPLACE > MAKE, set the "Send strategy=Continuously" | ||
In the Data fields set all the necessary fields that you need to pass from Beds24 to Make, it is required that you set a "template" field (template1), we are using this to pass the Info code to Make. | In the Data fields set all the necessary fields that you need to pass from Beds24 to Make, it is required that you set a "template" field (template1), we are using this to pass the Info code to Make. | ||
Make Setup. | Make Setup. | ||
JSON Module, | |||
You will need the following Data Structure, | You will need the following Data Structure, | ||
| Line 553: | Line 551: | ||
The HTTP module | The HTTP module | ||
You need a HTTP module after the | You need a HTTP module after the JSON module and set this to “Make a Request” | ||
Set the: | Set the: | ||
| Line 591: | Line 589: | ||
Before using API V2 with Make, we need to set up a data store to store the refresh token and the access token. We will also need to create a scenario that triggers every 24 hours to obtain a new token using the refresh token. Once this is set up, we can configure any scenario in Make using the Beds24 API V2, as we will always have an up-to-date token. | Before using API V2 with Make, we need to set up a data store to store the refresh token and the access token. We will also need to create a scenario that triggers every 24 hours to obtain a new token using the refresh token. Once this is set up, we can configure any scenario in Make using the Beds24 API V2, as we will always have an up-to-date token. | ||
== Step 1: Create a Data Store == | ==== Step 1: Create a Data Store ==== | ||
1. Log into Make and go to '''More''' (the 2 dots) > '''Data Store'''. | 1. Log into Make and go to '''More''' (the 2 dots) > '''Data Store'''. | ||
| Line 602: | Line 600: | ||
[[Media:Image3.png|view large]] | [[Media:Image3.png|view large]] | ||
''' Configure the Data Store ''' | |||
1. Give the data store a name (I suggest "Access Token"). | 1. Give the data store a name (I suggest "Access Token"). | ||
2. In the '''Data Structure''', click '''Add'''. | 2. In the '''Data Structure''', click '''Add'''. | ||
| Line 644: | Line 644: | ||
[[Media:Image9.png|view large]] | [[Media:Image9.png|view large]] | ||
== Step 2: Get Tokens from Beds24 == | ==== Step 2: Get Tokens from Beds24 ==== | ||
1. Log in to Beds24 and navigate to '''Settings > | 1. Log in to Beds24 and navigate to '''Settings > MARKETPLACE > API''' to generate a new invite code. | ||
2. After you have the invite code, visit [https://api.beds24.com/v2/#/Authentication/get_authentication_setup Beds24 API Authentication Setup]. | 2. After you have the invite code, visit [https://api.beds24.com/v2/#/Authentication/get_authentication_setup Beds24 API Authentication Setup]. | ||
3. Click '''Try Out''' and paste your invite code. | 3. Click '''Try Out''' and paste your invite code. | ||
| Line 665: | Line 665: | ||
7. Click '''Save''' at the top of the screen. You now have a data store containing your token and refresh token. | 7. Click '''Save''' at the top of the screen. You now have a data store containing your token and refresh token. | ||
== Step 3: Create a Scenario to Update the Token Every 24 Hours == | ==== Step 3: Create a Scenario to Update the Token Every 24 Hours ==== | ||
1. Create a new scenario in Make, and add the first module as '''Data Store – Search Record'''. | 1. Create a new scenario in Make, and add the first module as '''Data Store – Search Record'''. | ||
| Line 713: | Line 713: | ||
[[Media:Image19.png|view large]] | [[Media:Image19.png|view large]] | ||
== Step 4: Finalize the Scenario == | ==== Step 4: Finalize the Scenario ==== | ||
1. Edit the last module (Data Store) again, and map: | 1. Edit the last module (Data Store) again, and map: | ||
* '''Access Token''' = Token from the HTTP module. | * '''Access Token''' = Token from the HTTP module. | ||
| Line 723: | Line 723: | ||
2. Save the module and set it to trigger every 24 hours. This will make an API call every day to get a new token. | 2. Save the module and set it to trigger every 24 hours. This will make an API call every day to get a new token. | ||
== Step 5: Using the Token in API Calls == | ==== Step 5: Using the Token in API Calls ==== | ||
To make API calls to Beds24, first set the '''Data Store module – Get a Record'''. Insert your key (the number you set under Key). When you set up an HTTP module to make an API call, use the token from the data store, which will always be up to date. | To make API calls to Beds24, first set the '''Data Store module – Get a Record'''. Insert your key (the number you set under Key). When you set up an HTTP module to make an API call, use the token from the data store, which will always be up to date. | ||
</div> | </div> | ||
</div> | </div> | ||
Latest revision as of 08:59, 19 September 2025
This page is about the menu (SETTINGS) MARKETPLACE > MAKE and explains how to connect and what you can do with the connection.
To use this service you will need an account with Make.
For Beds24 the normal channel manger fees apply.
Capabilities
Within Make you can connect Beds24 to third party Apps and services. Beds24 will then send booking data to Make which will be passed on to the services you connected to
Limitations
Set Up
Beds24
- Set up an Auto Action (SETTINGS) GUEST MANAGEMENT > AUTO ACTIONS which selects the bookings which will be sent to Make. Set "Trigger Action" = automatic.
- Select the Auto Action which you want to use for Make. The Auto Action must be created by the Account which owns the property, actions linked from other accounts cannot be used.
- Tick the rooms for which you want to send bookings. Only bookings from rooms enabled for Make and which meet the trigger conditions in the Auto Action will be sent.
- Create an apiKey of 16 or more characters and save it. API access must be allowed in the menu ( (SETTINGS) ACCOUNT > ACCOUNT ACCESS).
- Choose your send strategy, bookings can be sent continuously, repeatedly, once only or after each modification.
- A default set of booking information is sent to Make, this can be customized by specifying the fields you want to send, one per line at the setting "Data fields". See below for a set of all fields.
Send Strategy
The following options are available for the booking send strategy.
- Once only - send the booking once and never again, even if modified.
- Whenever modified - send bookings if they have been modified.
- Repeated - send bookings repeatedly with the last modified time of the booking.
- Continuously - send bookings repeatedly with the last modified time set to the current time. This will force Make to re-import the bookings with every read.
Make
- Create an Make account at Make.
- Search for the Beds24 App.
- Connect the Beds24 App to your scenario and enter the apiKey you created and the Beds24 Property Id.
- Select the trigger "watch bookings" and map the data into your scenario as you require.
- Make sure to set the limit value in "watch bookings" high enough to allow Make to process all the bookings you expect to be in the data. If you leave it at 1, only the first booking in each trigger will be processed.
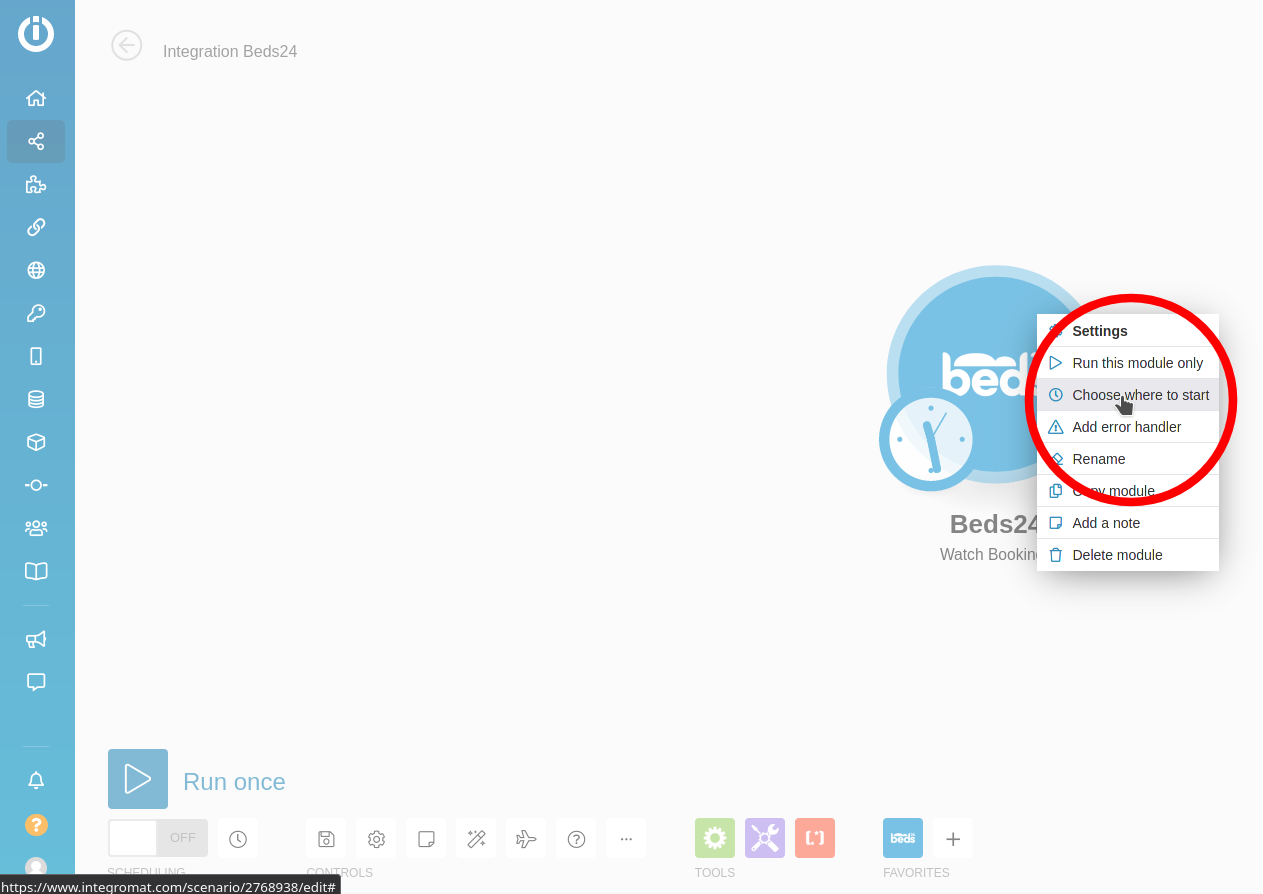
- When prompted to "Choose where to start", select the "All" option.

Send template variables to Make
The advanced section of the Make connection form has eight template fields where you can enter Beds24 Template Variables.
The matching "template" data field must be specified in Beds24 as one of the Make data fields to enable the field. (template1 etc.).
The Template Variable will be calculated and it's value sent to Make with the booking.
Make provides list of developers who can help with integrations.
- Make sure the "Make" App Limit can process the maximum number of bookings you expect to be sent for each trigger, especially if you are sending the bookings one time only, more bookings than the limit value will not be processed.
How it works
In Make you create a scenario which automates tasks for you. A scenario is comprised of a series of modules that indicate how data should be transferred and transformed between Beds24 and other apps/services.
Bookings are sent from Beds24 to Make when the room is enabled and the booking meets the trigger condition in the selected auto action. If you have multiple properties enabled for Make and the auto action applies to their bookings, those bookings will also be sent. Bookings which were sent will appear in Make via the "watch bookings" trigger.
These bookings will then be automatically transferred from Make to the apps/services in your Make scenarios.
Make triggers the booking read when the scenario runs, they are not pushed from Beds24.
Data Fields
If the data fields setting is left empty, a default set of information will be sent about each booking.
If the data fields setting is used, only the booking number, modifiedTime and the fields specified are sent to Make. Data field values must be specified one per line.
Possible values are:
groupId
roomId
roomName
unitId
unitName
status
checkIn
checkOut
lastNight
numAdult
numChild
guestTitle
guestFirstName
guestLastName
guestComments
guestArrivalTime
guestEmail
guestPhone
guestMobile
guestCompany
guestAddress
guestCity
guestState
guestPostCode
guestCountry
guestCountry2
lang
originalBooking
originalOTA
originalReferer
referer
notes
reference
custom1
custom2
custom3
custom4
custom5
custom6
custom7
custom8
custom9
custom10
offerId
voucher
flagColor
flagText
bookingTime
invoice
invoiceCharges
invoicePayments
totalCharges
totalPayments
totalBalance
price
tax
deposit
commission
rateDescription
template1
template2
template3
template4
template5
template6
template7
template8
Common Problems
Some bookings are not processed
Make sure to set the limit value in "watch bookings" high enough to allow Make to process all the bookings you expect to be in the data. If you leave it at 1, only the first booking in each trigger will be processed.
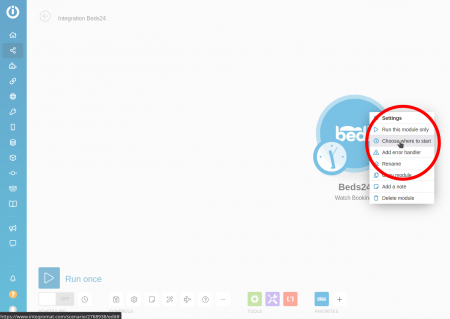
Only new/recently modified bookings are processed
Make sure the "Choose where to start" option is set to "All". This option can be changed by going to the "Scenarios" tab in Make and right clicking the Beds24 Watch Bookings module.
Disconnect
Untick "Bookings" to stop sending bookings.
Sample Scenarios
Make provides a range of sample scenarios at https://www.make.com/en/integrations/beds24?fromImt=1&pc=beds24.
Create a Subaccount from a Google Form
1. Create the Google form(https://docs.google.com/forms/u/0/) , you will need to at least “request” on the form
a)Username
b)Email
c)Password
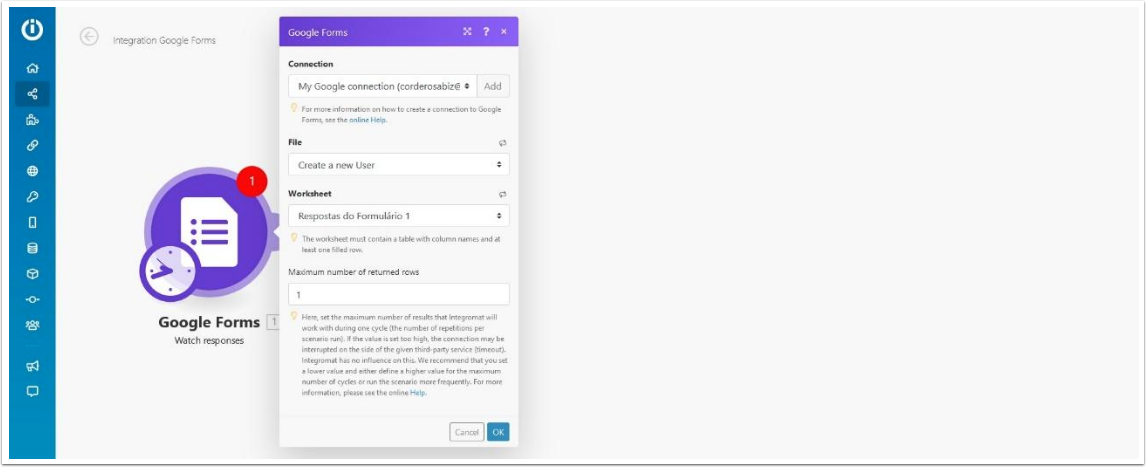
2. Go to Make and create a scenario, start with a Google Forms, and set it to “Watch Responses”
3. Set the connection ( you will need to Allow Make to access your Google account),
a) Choose the “File” this is the same name you gave your “Form” in Google forms.
b) Worksheet, Google forms should create a worksheet in your Google drive, you need to select this here.
c) Maximum number of returned rows, Here, set the maximum number of results that Make will work with during one cycle, You can set this to one, we will make this scenario constantly checking for new responses.

4. After this, it will ask you to “Select the first row” this means the row you want Make to start checking the worksheet, it should normal be set to number”2” because the first row is used for the column names.
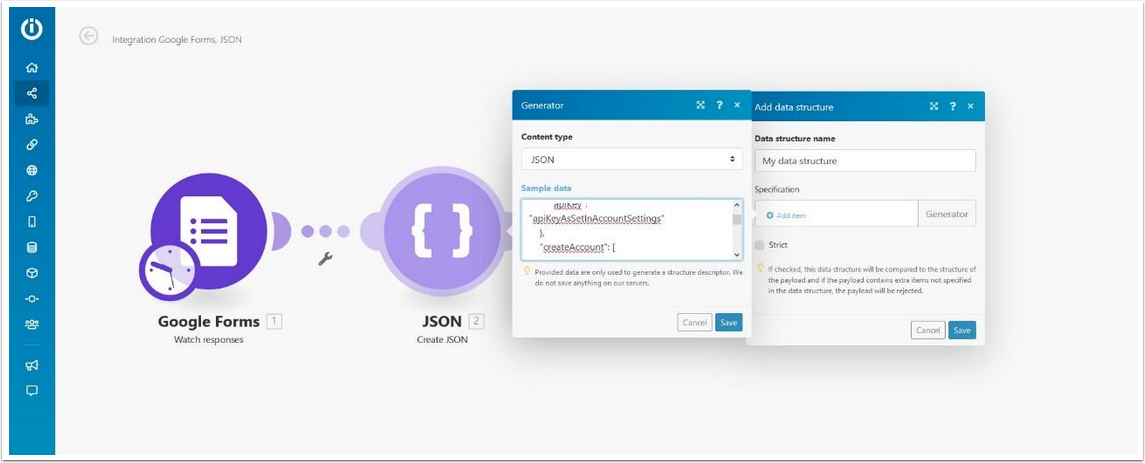
5. Now we will need to add another module, add the “JSON” module and set it to “Create JSON”
6. You will need to add a “Data Structure.
a) Click on “Add”
b) “Name the data structure” and click on “Generator”
c) Leave the “Content Type = JSON
d) On the Sample Data insert
{
   "authentication": {
       "apiKey": "apiKeyAsSetInAccountSettings"
   },
   "createAccount": [
       {
           "username": "username",
           "password": "password",
           "apiKey": "YourKeyToUseForTheNewAccount",
           "email": "[email protected]",
           "role": "0",
           "systemEmails": "0",
           "bookingEmails": "0",
           "bookingReplyto": "0"
       }
   ]
}

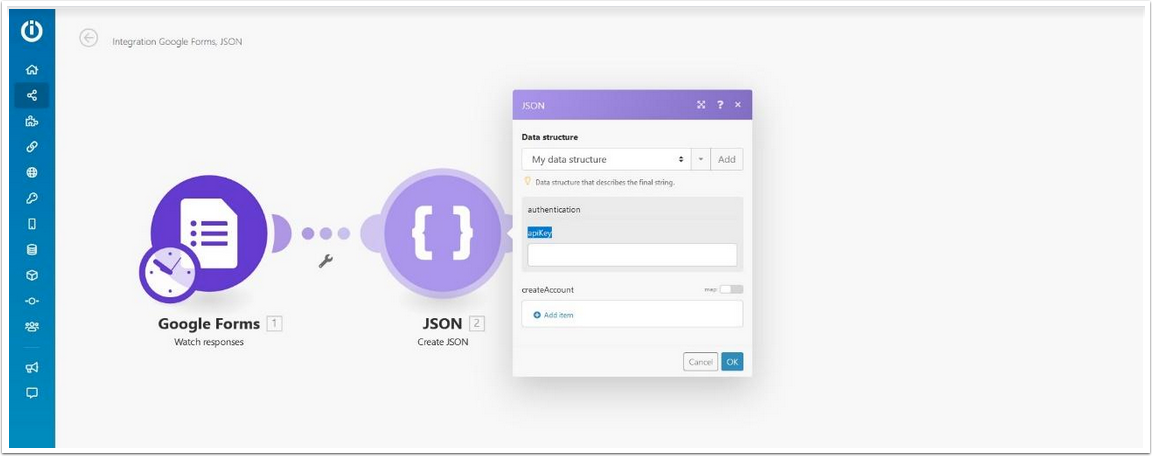
- Click on “Save”, you should now see the original “window” with your data structure and it should have a “Authentication” box where you need to insert the API key,
- You need to set the API key you have set under (SETTINGS) ACCOUNT > ACCOUNT ACCESS
- Click on “Add Items” under Create Account in Make, here you will need to add the variables into the correct fields.
- Leave the “API” field empty, the fields
- Role
- systemEmails
- bookingEmails
- bookingReplyto
- Can be manually filled by you conform your requirements, for information about this fields please have a look at this page, https://api.beds24.com/json/createAccount
- Leave the “API” field empty, the fields
After you have done this, click on “Add” and than click on “Ok”.
Now we are going to create another module.
- Set the module HTTP, and set this to “Make a Request”
- Set the:
- URL: https://api.beds24.com/json/createAccount
- Method:Post
- Header: Leave blank
- Query String: Leave blank
- Body Type: Raw
- Content Type: JSON
- Request Content: JSON String ( Its a variable you need to drag and drop).
- Set the:
Click on “OK” and you are ready to test this scenario,
Open you Google form and insert some information, “username / Email and password” this will be added to row 2 on your worksheet, go to Make and click on “Run Once” it will insert this user as a sub account into your Beds24 account.
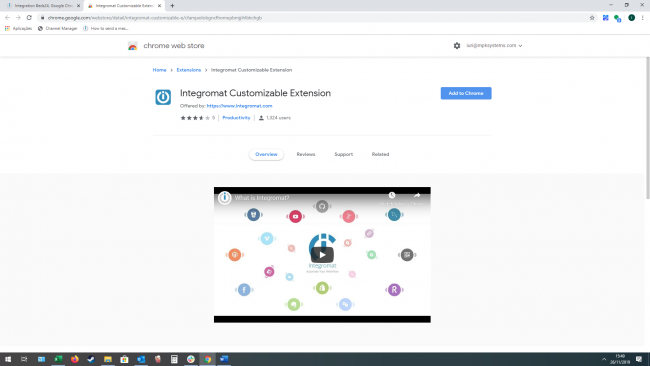
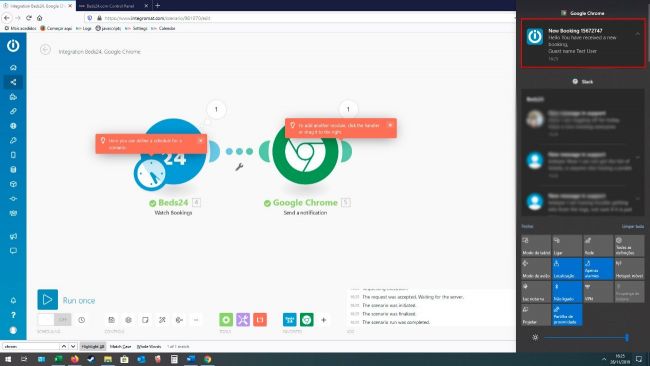
Sending Push Notifications for Bookings to your Google Chrome/Account
1. After you setup your Beds24 module in Make ( showing in this video https://wiki.beds24.com/index.php/Integromat.com#Integromat) set the Google Chrome module.

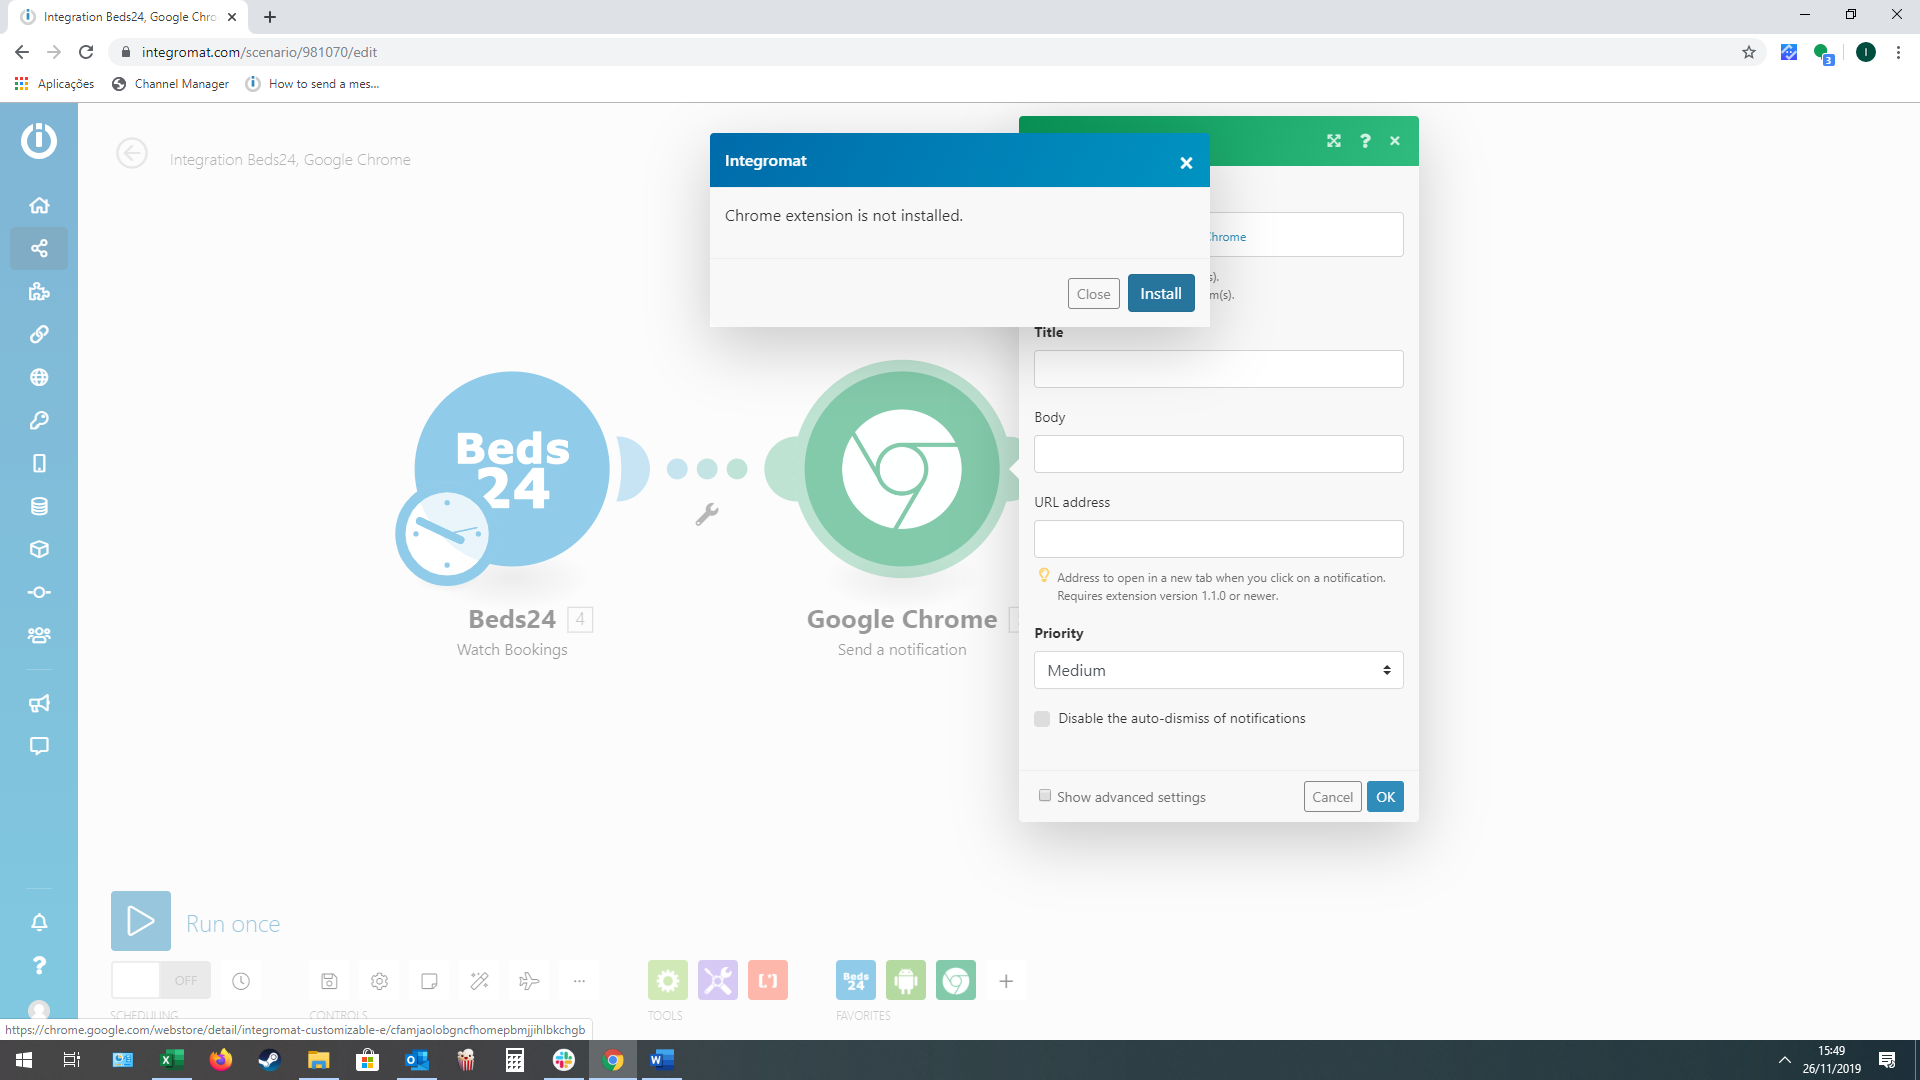
2. Click on “Add This Chrome” and install the Make google chrome plugin.

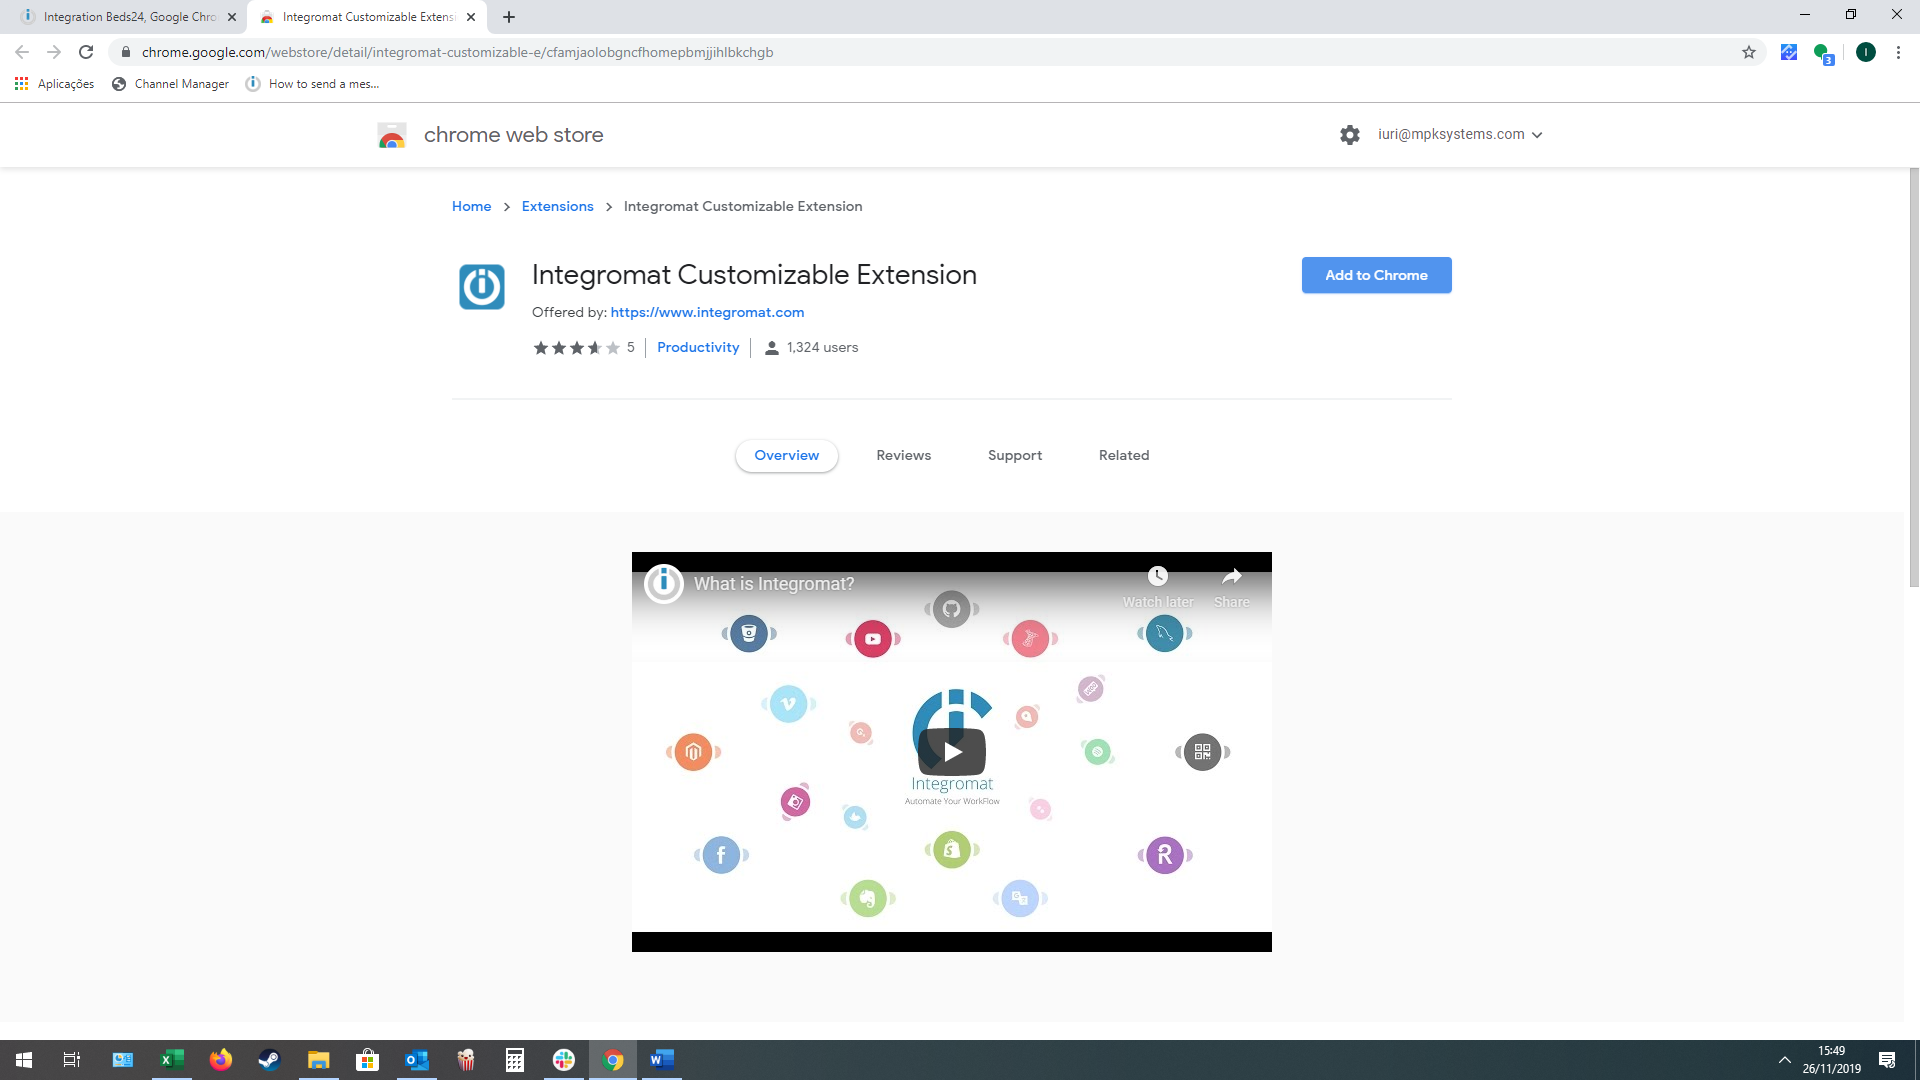
3. Click on “Add to Chrome” to install the plugin
4. Copy the Registration Code
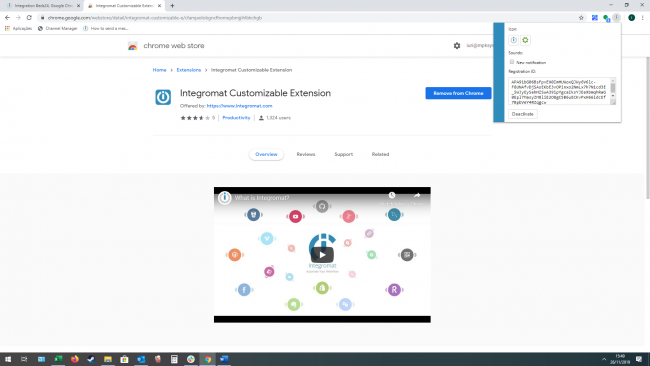
5. Paste the Registration code on the Chrome module in Make

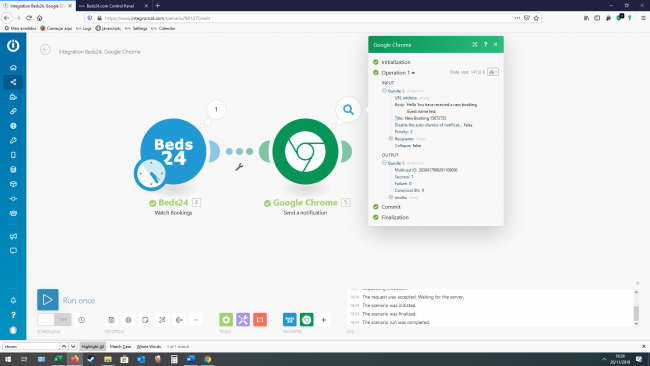
6. Create the message you want to send , you can use the Beds24 Template variables that show in Make
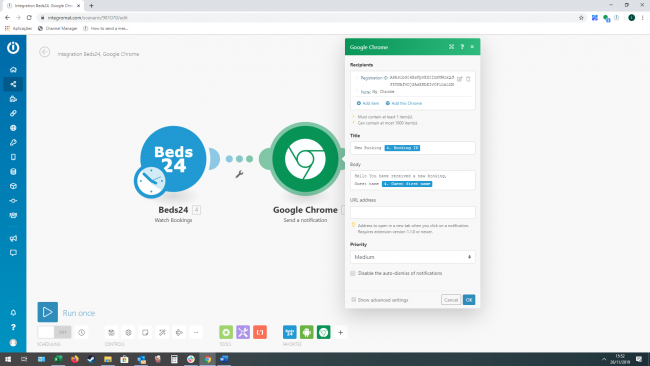
7. Once a new booking is created, Intergomat send a notification to your Google Chrome/Account
Collect Guest details from a Google Form
If you want to collect additional guest information ( or update the current information) and add this to the booking, you can do this using a Google Form and Make.
Setup a google form with the information/questions you want to collect from a guest, and using Make we will get the response from the form and insert into the correct booking.
In this example we will show you how to collect additional guests information like “First name, Last Name, address, city, postcode and country. And insert this into the corresponding field of the booking
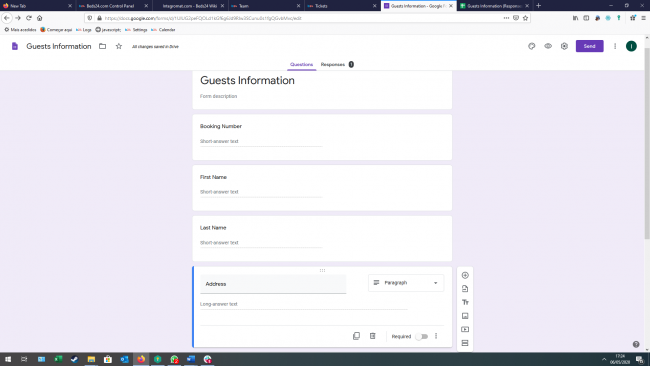
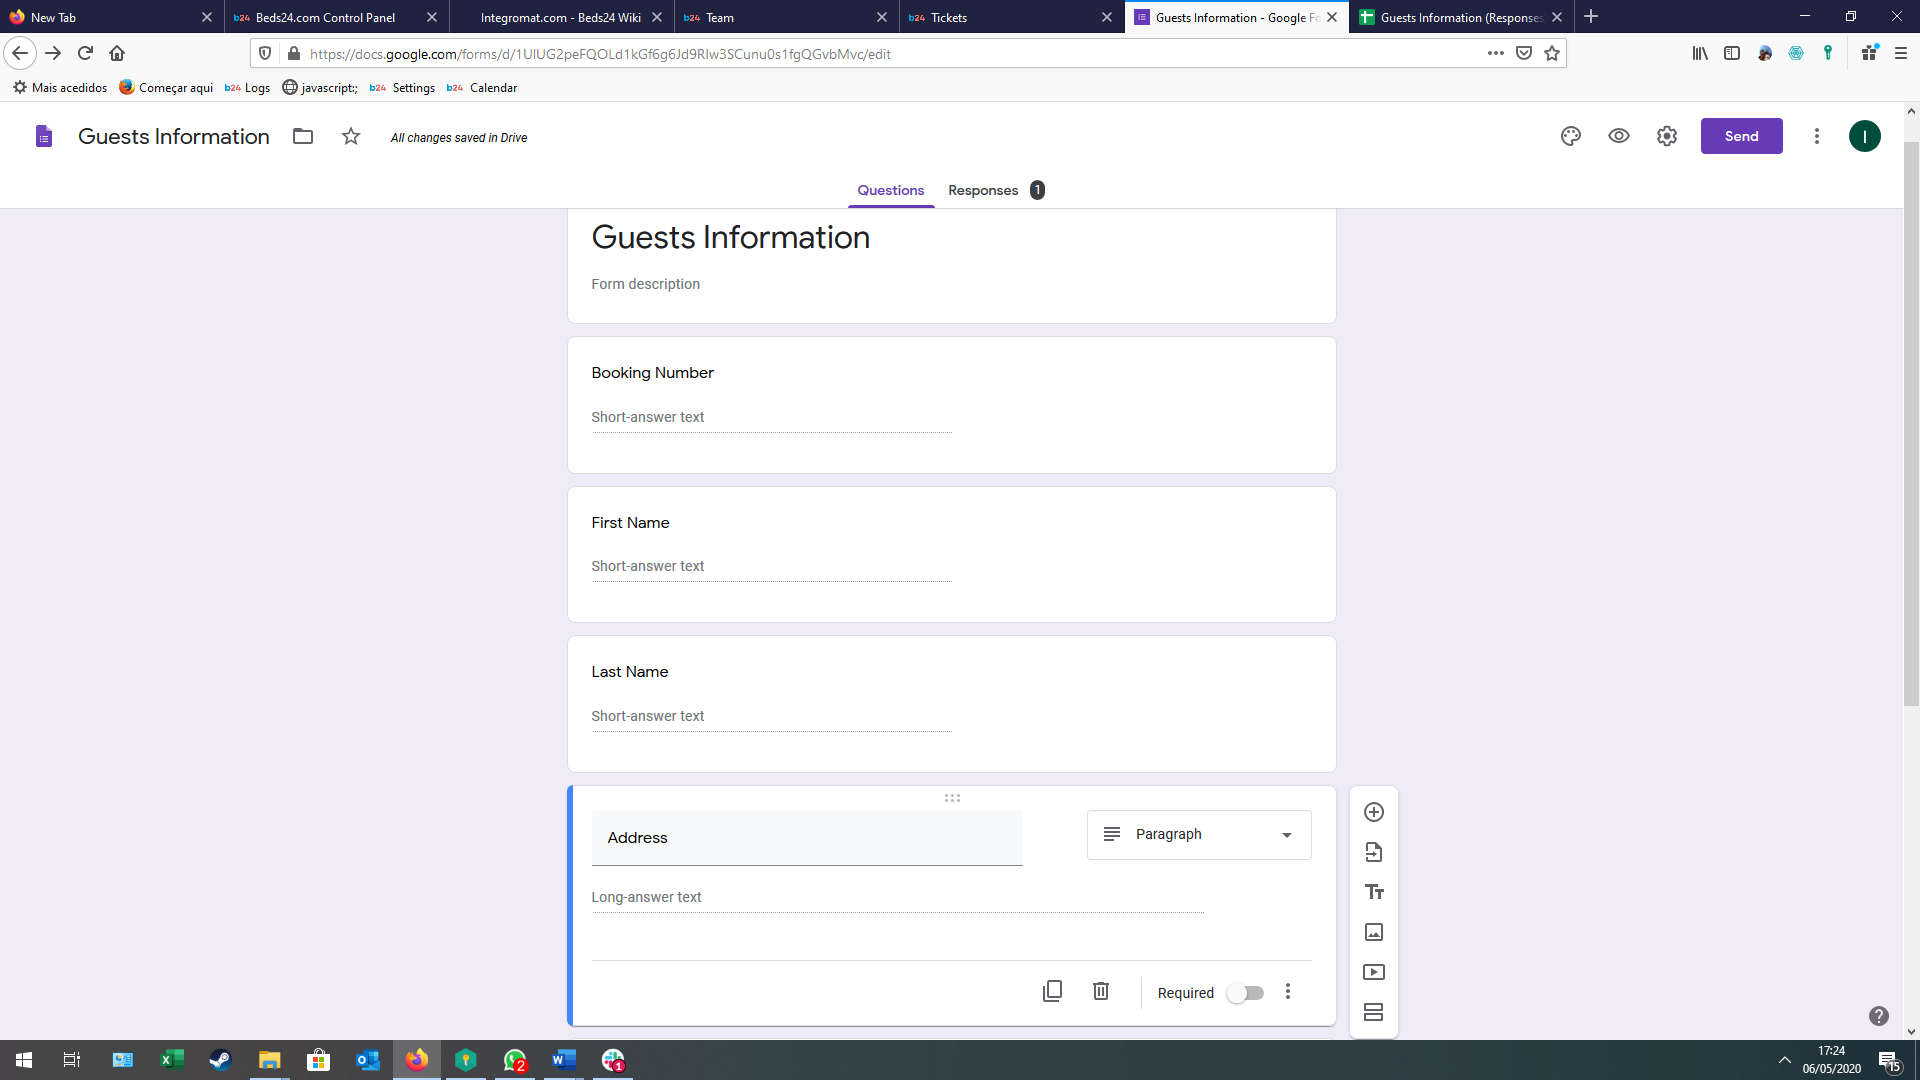
1. Setup a new google form and name this “Guests Information”
Create the questions
a. Booking ID
b. First Name
c. Last Name
d. address
e. city
f. postcode
g. country
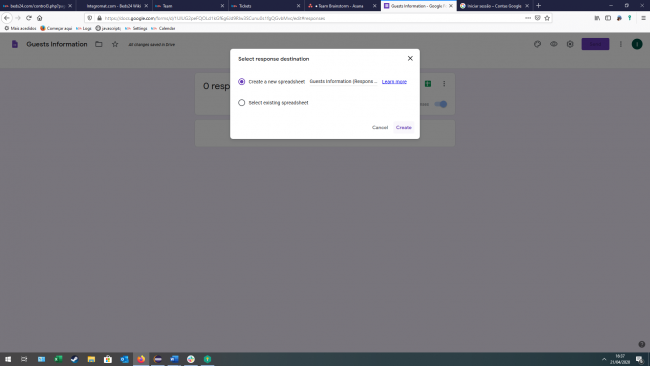
2. Click on “Responses”, and than click on the “Excel Icon”
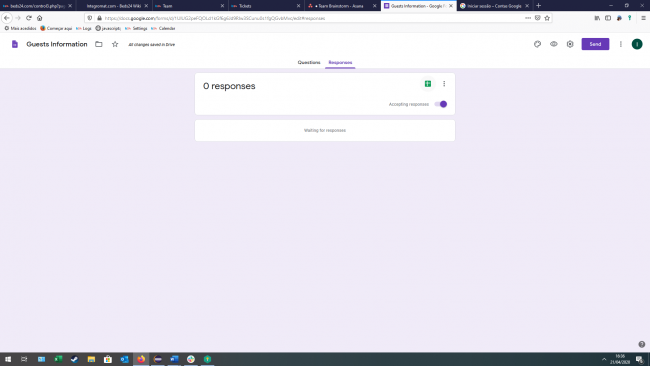
3. Select “Create a new Spreadsheet” and click on “create”
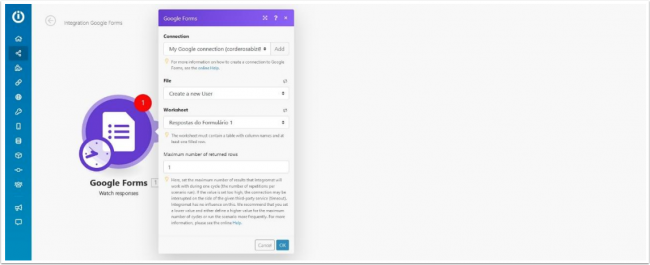
4. Log into Make, and start a new Scenario, the first module we are going to need is Google Forms and set this to “Watch Responses”.
4.1. Set the connection ( you will need to Allow Make to access your Google account),
a. Choose the “File” this is the same name you gave your “Form” in Google forms.
b. Worksheet, Google forms should create a worksheet in your Google drive, you need to select this here.
c. Maximum number of returned rows, Here, set the maximum number of results that Make will work with during one cycle, You can set this to one, we will make this scenario constantly checking for new responses
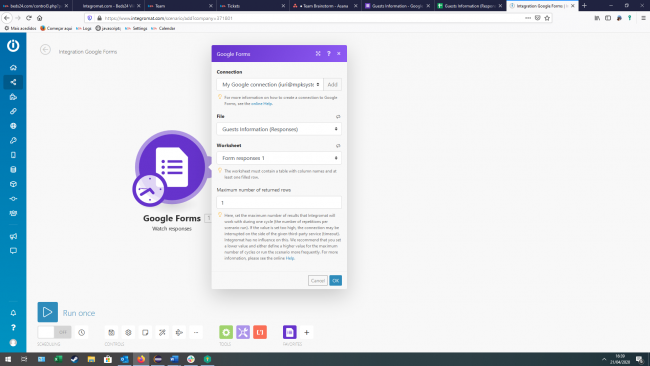
4.2. After this, it will ask you to “Select the first row” this means the row you want Make to start checking the worksheet, it should normal be set to number ”2” because the first row is used for the column names.
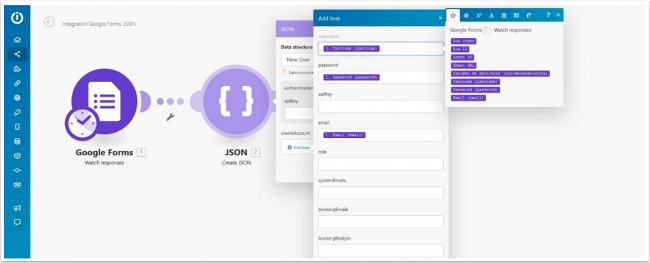
5. Now we will need to add another module, add the “JSON” module and set it to “Create JSON”
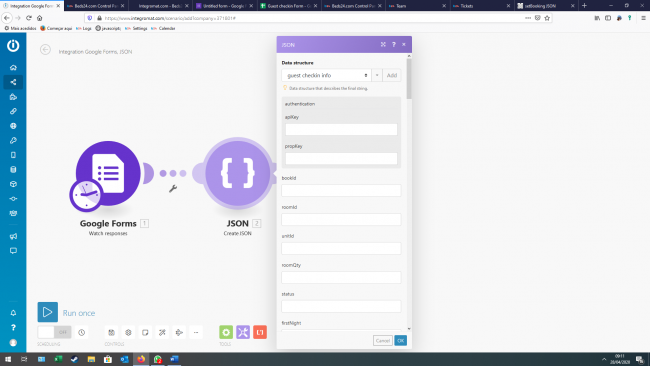
6. You will need to add a “Data Structure.
a. Click on “Add”
b. “Name the data structure” and click on “Generator”
c. Leave the “Content Type = JSON
d. On the Sample Data insert
{
   "authentication": {
       "apiKey": "apiKeyAsSetInAccountSettings",
       "propKey": "propKeyAsSetForTheProperty"
   },
"bookId": "12345678",
   "guestFirstName": "Joe",
   "guestName": "Smith",
   "guestAddress": "1 Big Street",
   "guestCity": "London",
   "guestPostcode": "EX 1234",
   "guestCountry": "United_Kingdom"
}
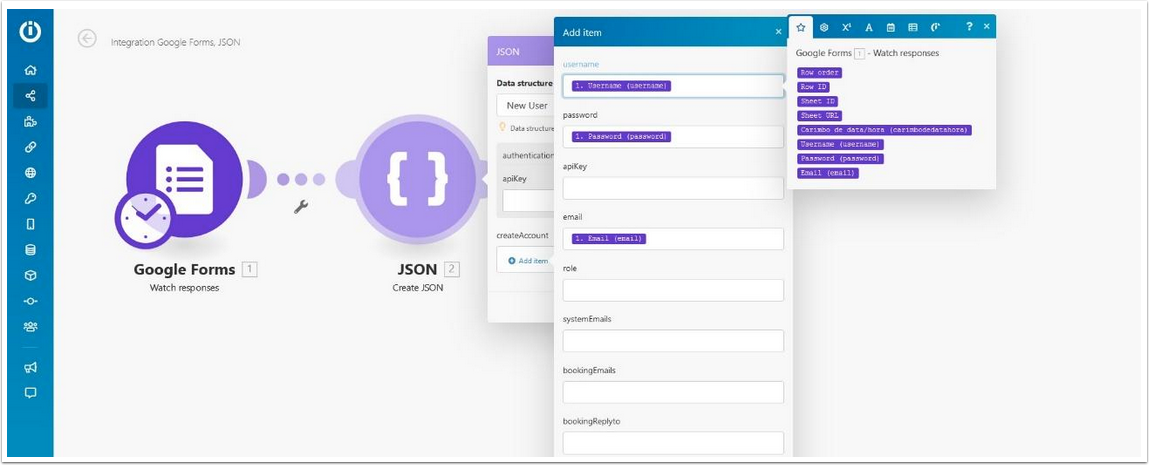
6.1. Click on “Save”, you should now see the original “window” with your data structure and it should have a “Authentication” box where you need to insert the API key
6.2. You will also need to add the correct “Google form” variables into the corresponding fields., just like the image below

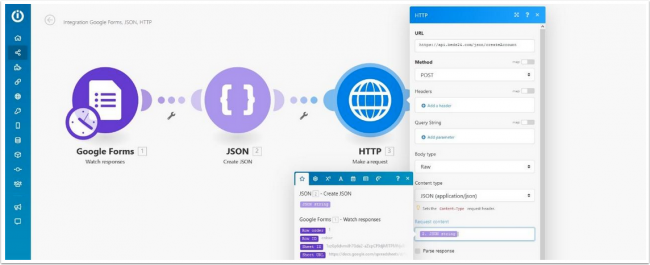
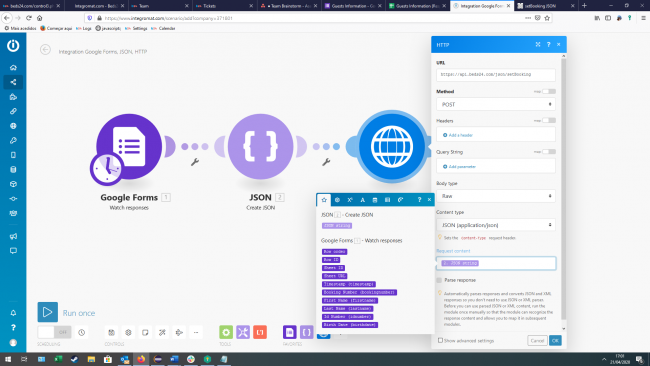
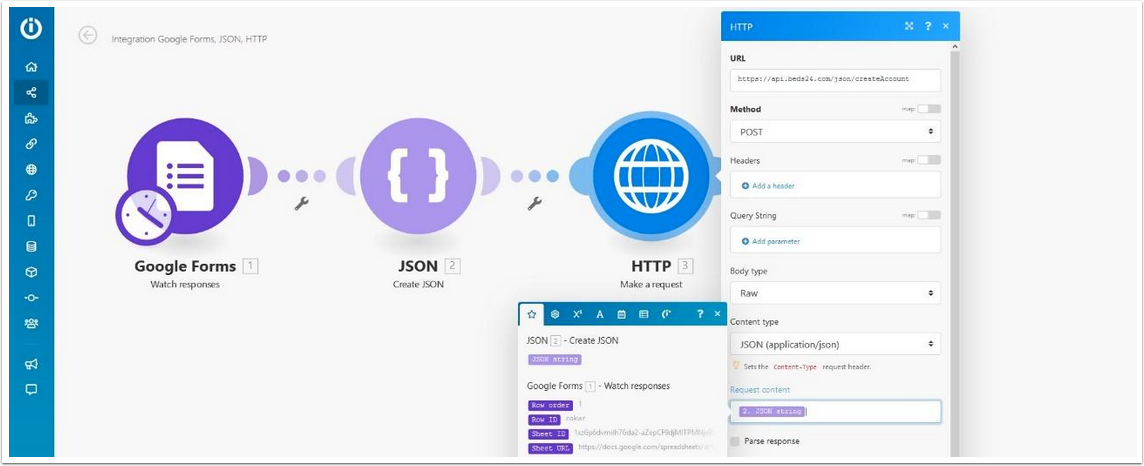
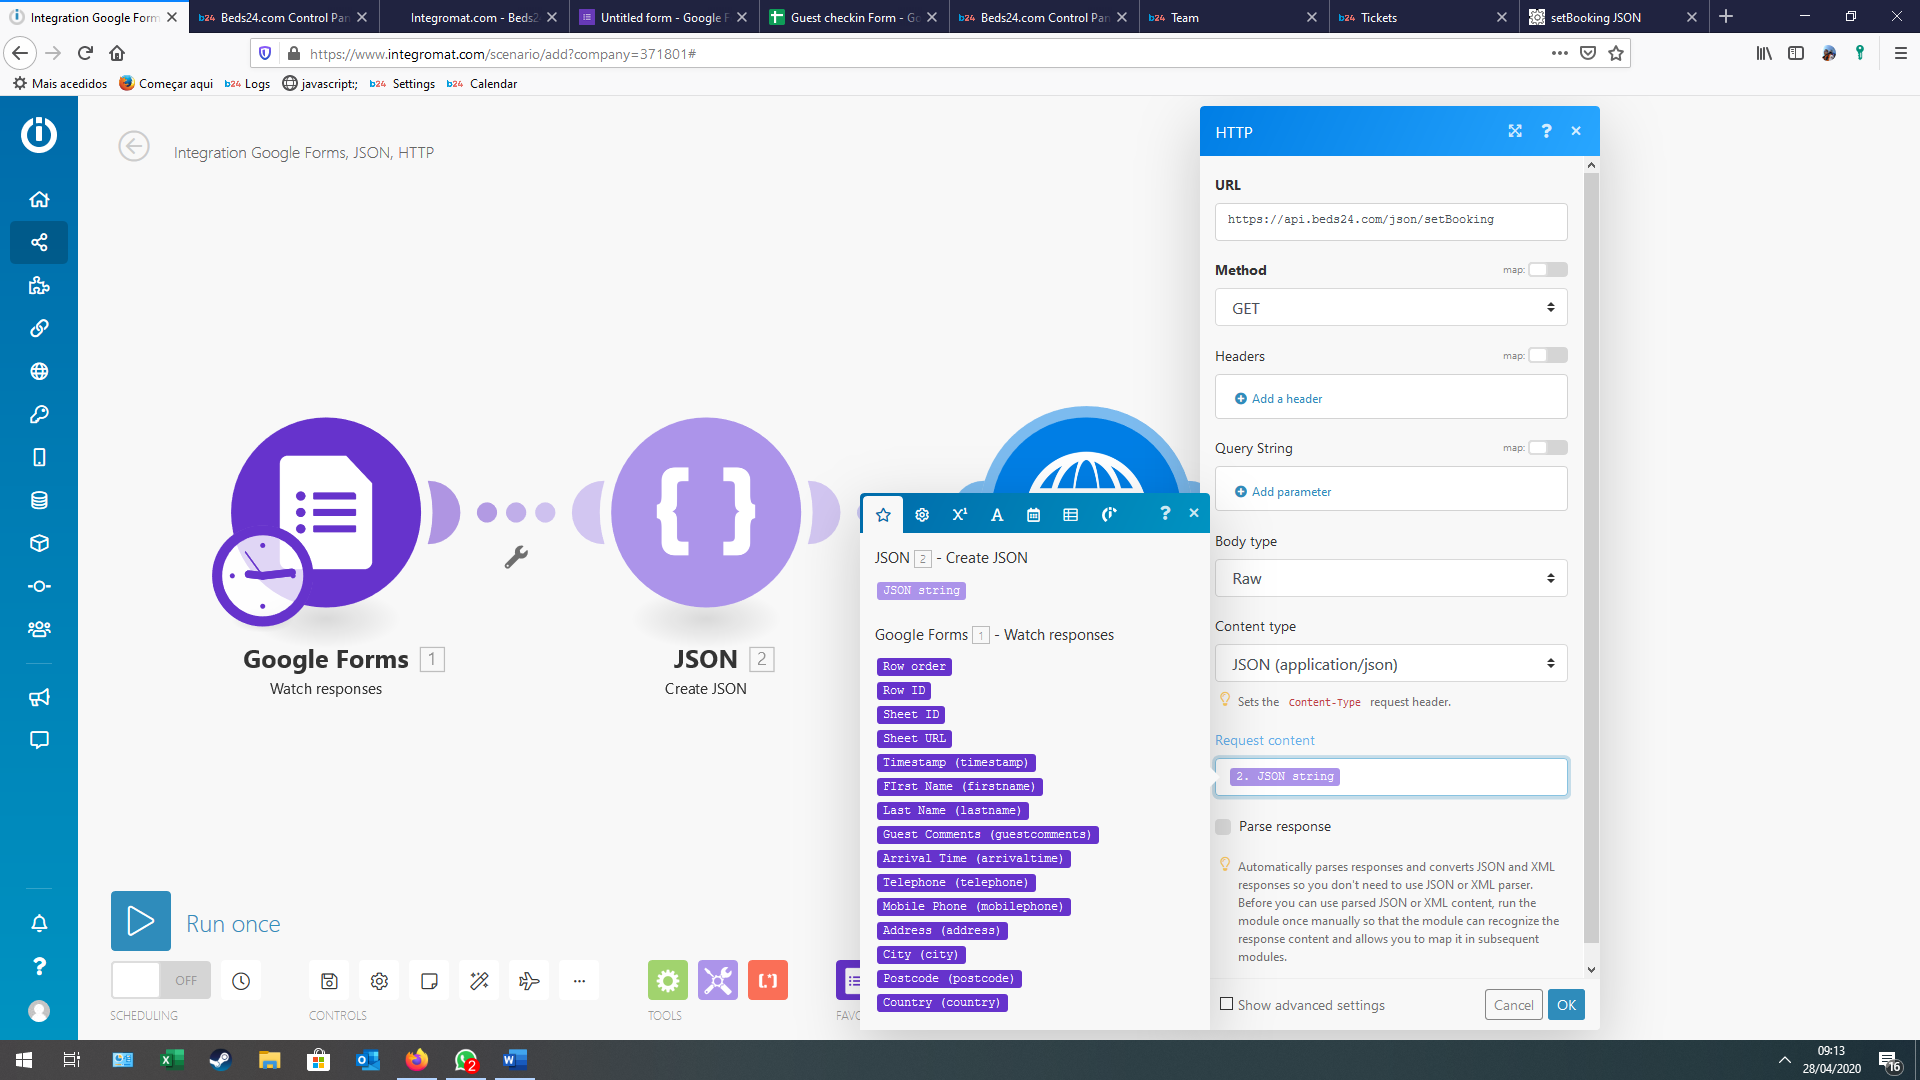
7. Next Add a new module, you need a HTTP module and set this to “Make a Request”
Set the: a. URL: https://api.beds24.com/json/setBooking b. Method:Post c. Header: Leave blank d. Query String: Leave blank e. Body Type: Raw f. Content Type: JSON g. Request Content: JSON String ( Its a variable you need to drag and drop).
7.1 Click on safe, now go to your google form, fill in the form with a actual Booking ID ( make sure it is a “test” booking) after you do this go back to Make and click on “Run Once”, it should get the responses and insert the information into the Booking.
Send a booking to Make and set a Info Code
Due to a combination of some settings and or specific modules in Make sometimes Make can miss out on bookings sent to Make.
If this happens on a frequent basis we recommend that you setup Beds24 to continuously send the bookings to Make, once the bookings is correctly picked up by Make you can setup a JSON module to create a code ans set a info code in the Booking in Beds24 using the API.
This way once a booking is correctly sent it will contain the Info code and based on this info code you can filter out this booking the next time it is sent to Make stopping the bookings from going thru any other modules in Make.
Each customer has its own Make module setup and so it is hard to create a scenario valid for everyone, however the only thing we need to setup is 2 modules a JSON module to create the JSON code and a HTTP module to send the code to Beds24 to set the info code.
Have a look at the following video to understand how the sequence will work,
- Beds24 Setup.
1. Under (SETTINGS) MARKETPLACE > MAKE, set the "Send strategy=Continuously" In the Data fields set all the necessary fields that you need to pass from Beds24 to Make, it is required that you set a "template" field (template1), we are using this to pass the Info code to Make.
Make Setup.
JSON Module,
You will need the following Data Structure,
{
   "authentication": {
       "apiKey": "apiKeyAsSetInAccountSettings",
       "propKey": "propKeyAsSetForTheProperty"
   },
   "bookId": "12345678",
           "infoItems": [
       {
           "code": "Make",
           "text": "OK"
       }
   ]
}
The HTTP module
You need a HTTP module after the JSON module and set this to “Make a Request”
Set the:
a. URL: https://api.beds24.com/json/setBooking
b. Method:Post
c. Header: Leave blank
d. Query String: Leave blank
e. Body Type: Raw
f. Content Type: JSON
g. Request Content: JSON String ( Its a variable you need to drag and drop).
Do not forget to set a filter as you saw in the video the filter will stop the booking from going further if it contains the info code,
1. Set a "Text Operator" filter "Not Equal To"
Connect to API V2
Connecting Make to Beds24 API V2
Before using API V2 with Make, we need to set up a data store to store the refresh token and the access token. We will also need to create a scenario that triggers every 24 hours to obtain a new token using the refresh token. Once this is set up, we can configure any scenario in Make using the Beds24 API V2, as we will always have an up-to-date token.
Step 1: Create a Data Store
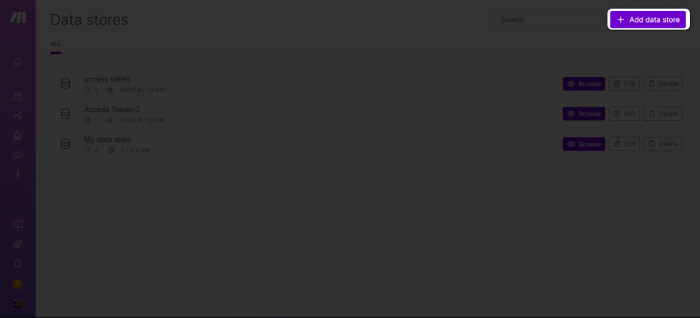
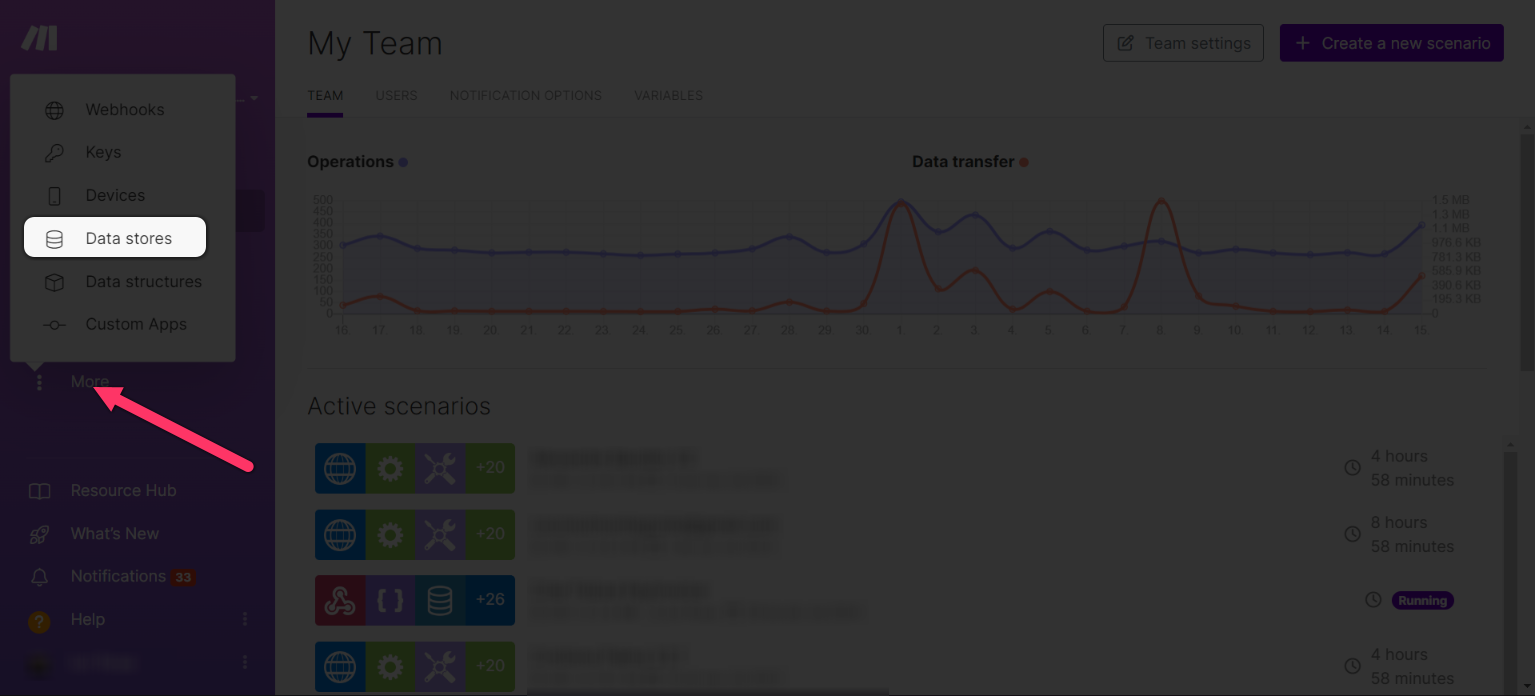
1. Log into Make and go to More (the 2 dots) > Data Store.
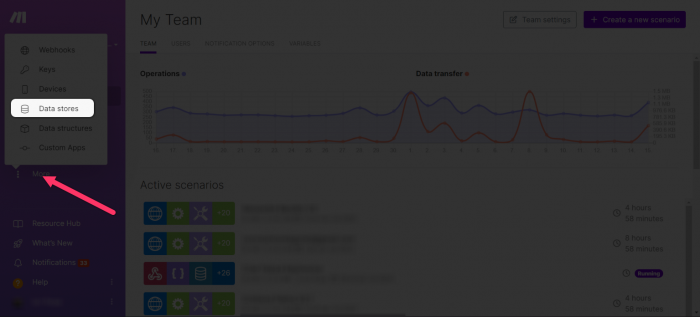
2. Click the Add Data Store button in the top right corner.
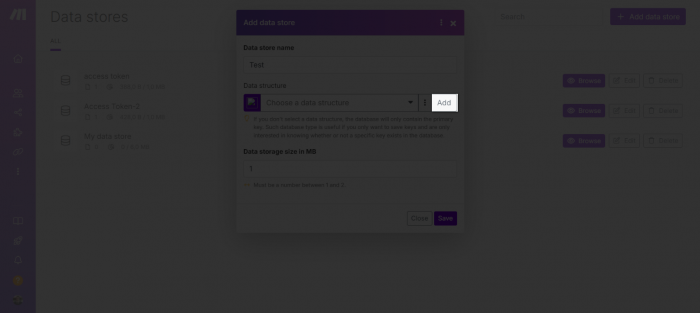
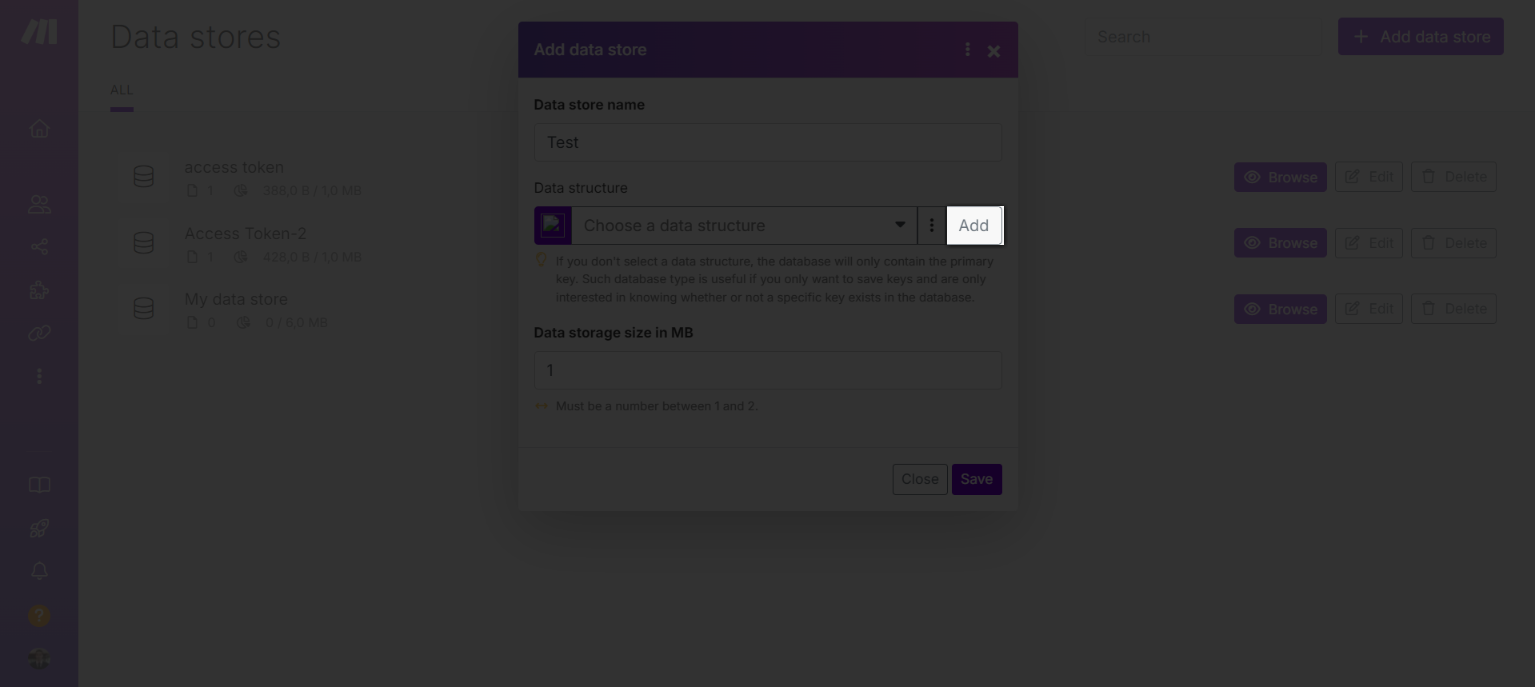
Configure the Data Store
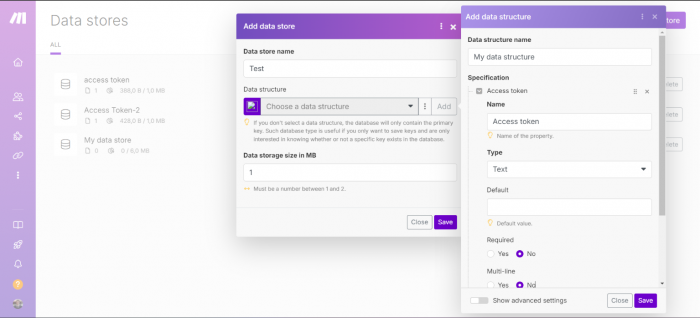
1. Give the data store a name (I suggest "Access Token"). 2. In the Data Structure, click Add.
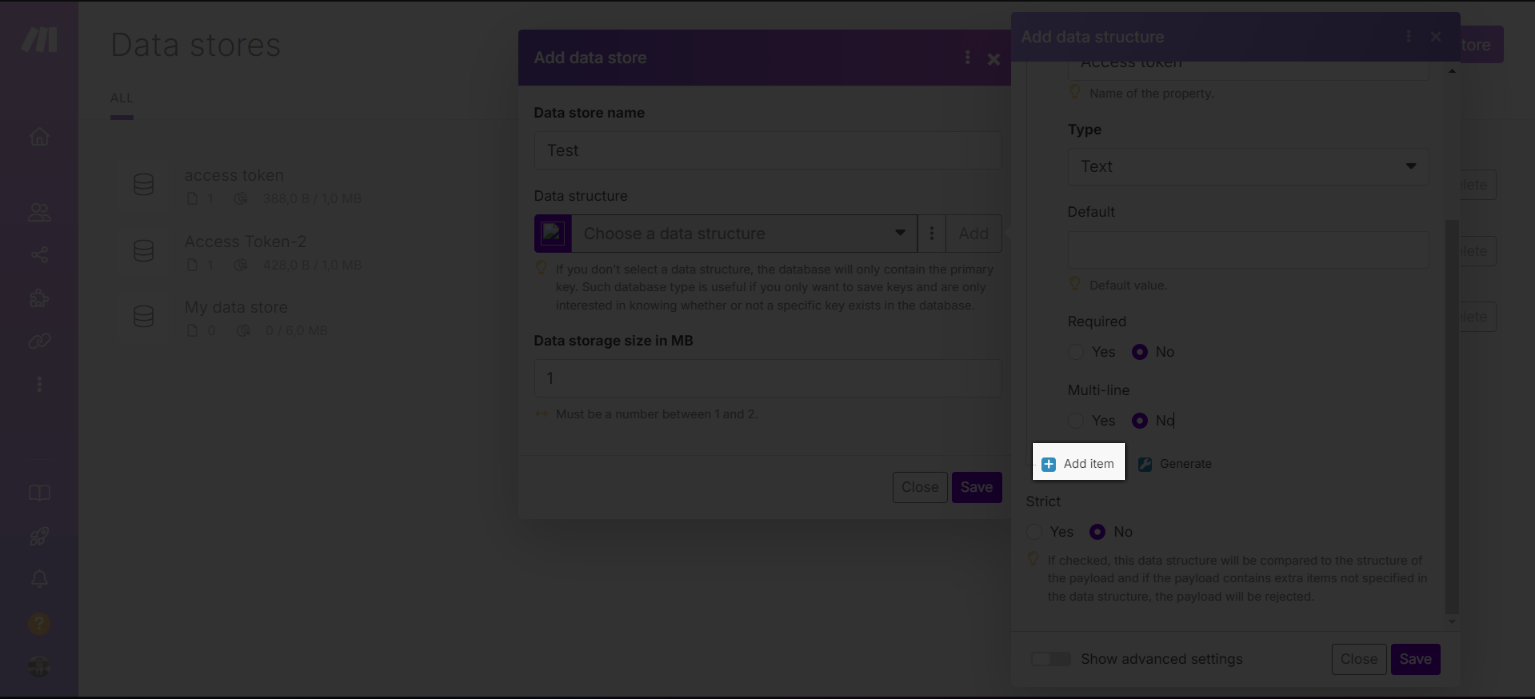
  * Click Add Item and set:
    * Name = “Access Token”
    * Type = Text
    * Required = No
    * Multi-line = No
3. Click Add New Item and set:
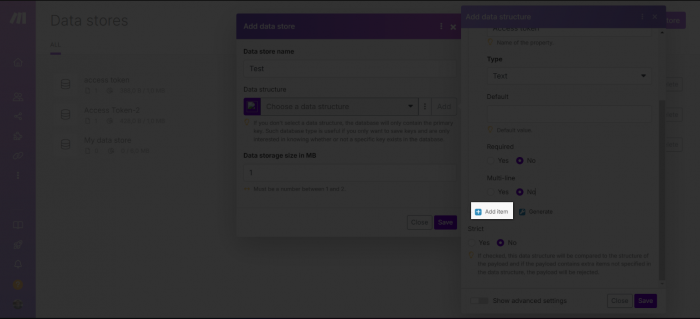
  * Name = "Refresh Token"
  * Type = Text
  * Required = No
  * Multi-line = No
  * Strict = No
4. Click Save to save the data structure and the data store. 5. Now click Browse to find the data store you just created.

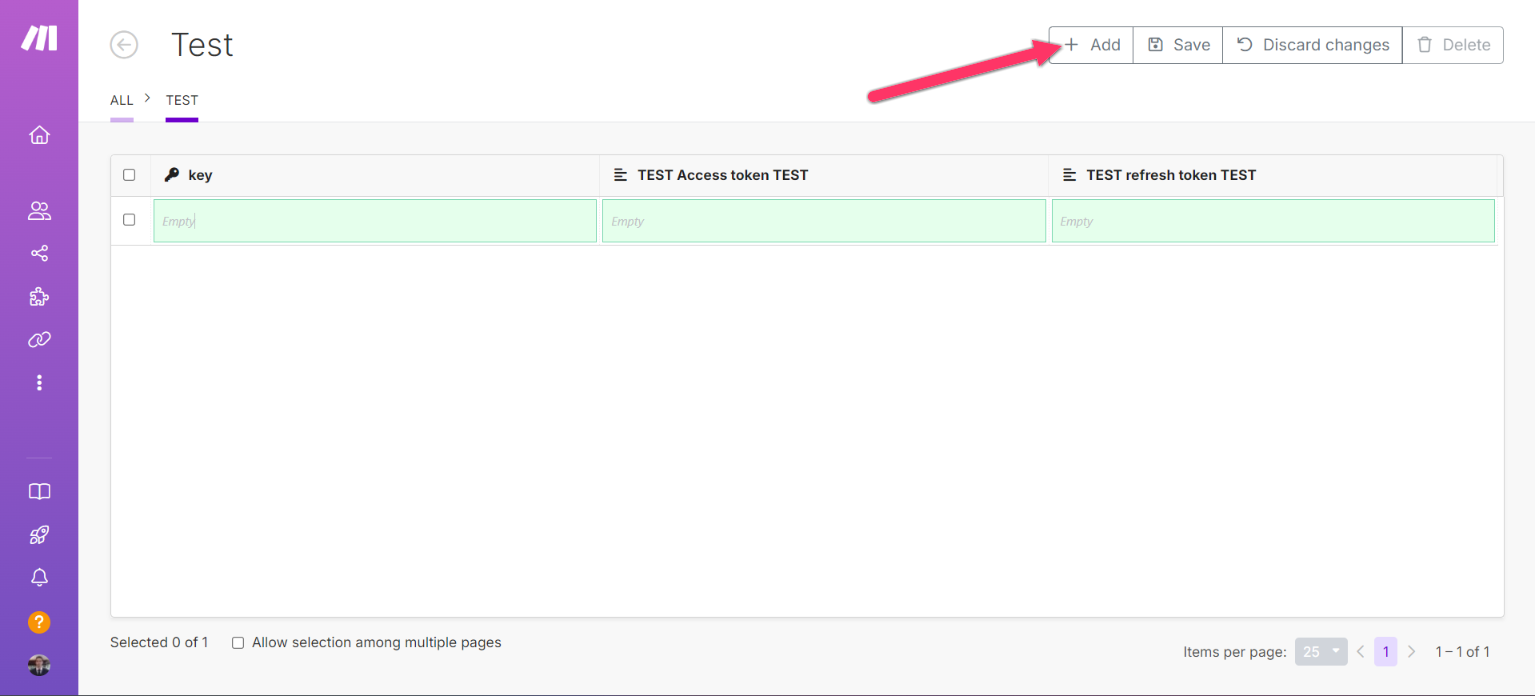
6. Click Add at the top of the screen.

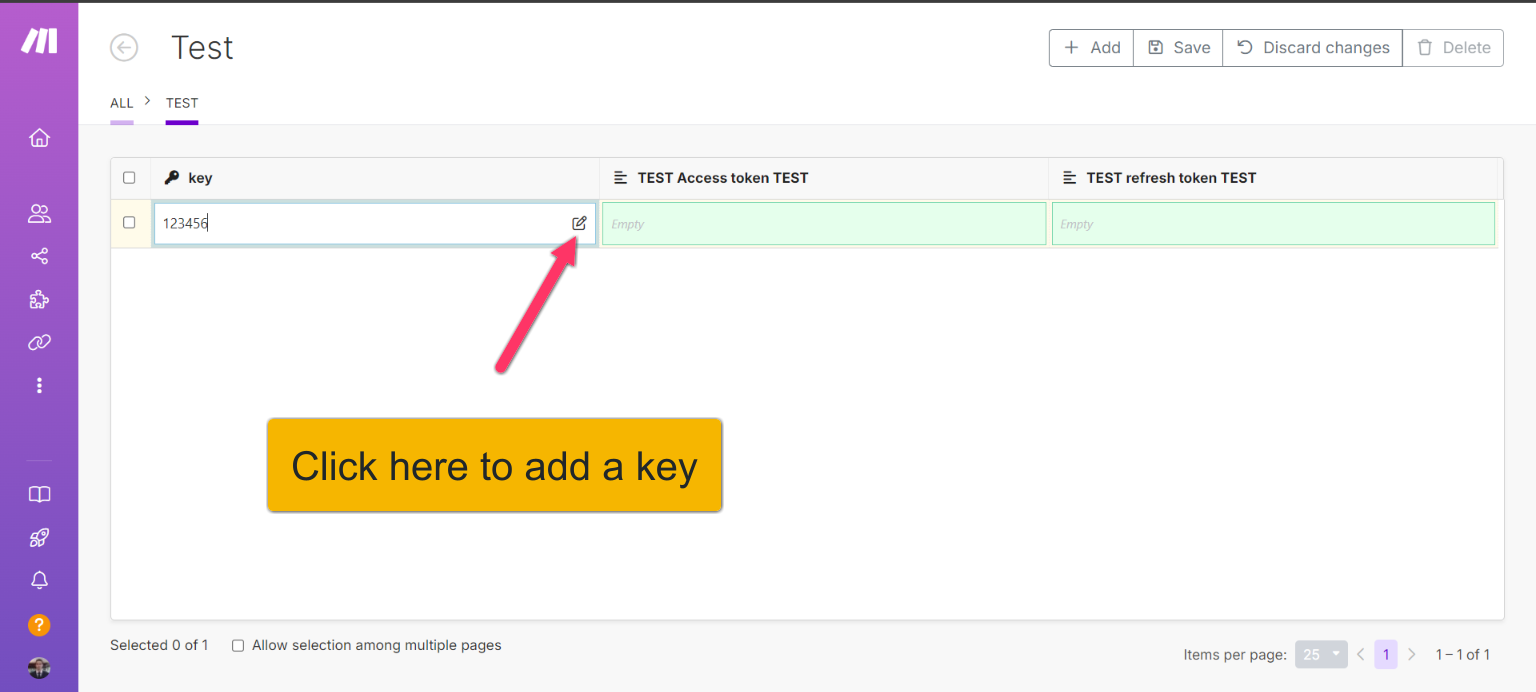
7. You will need to add a key. Click the icon and enter a random number; you will need this number later for your scenario.

Step 2: Get Tokens from Beds24
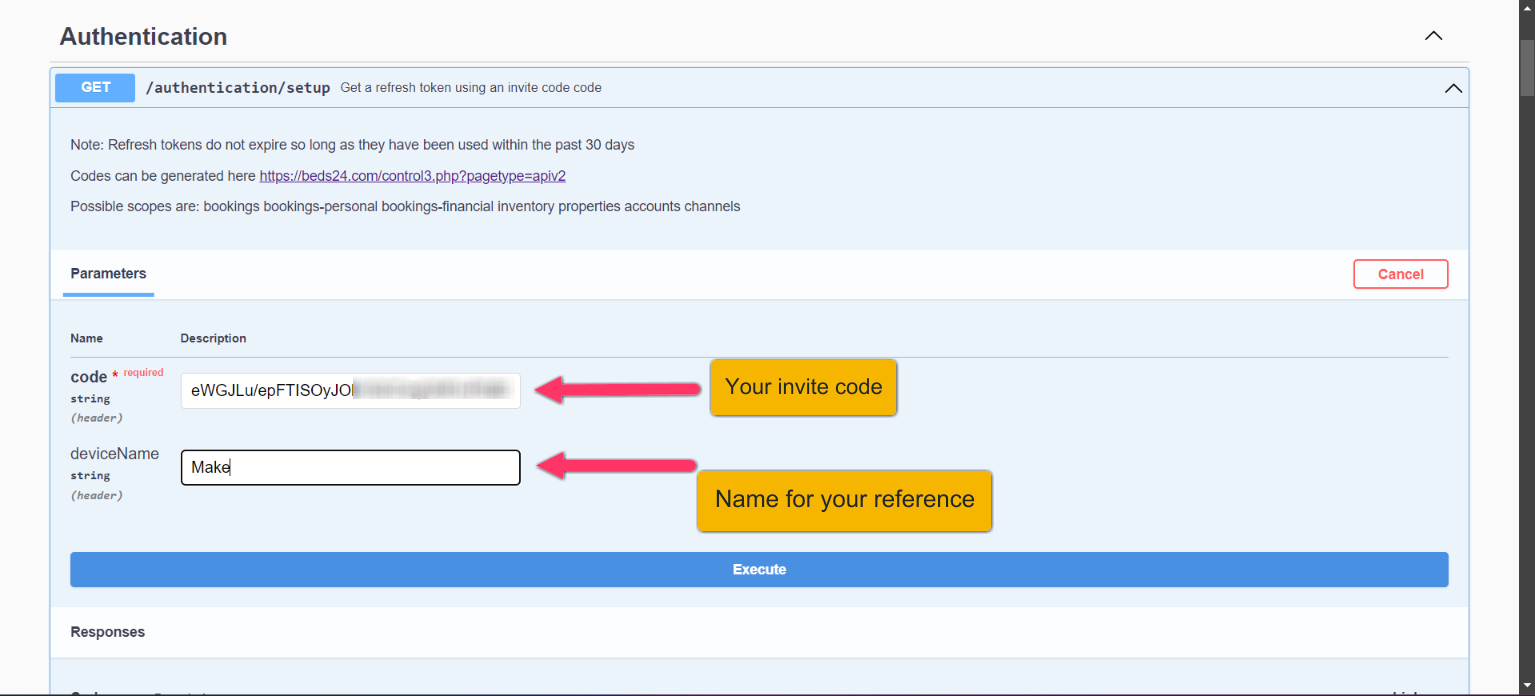
1. Log in to Beds24 and navigate to Settings > MARKETPLACE > API to generate a new invite code. 2. After you have the invite code, visit Beds24 API Authentication Setup. 3. Click Try Out and paste your invite code.

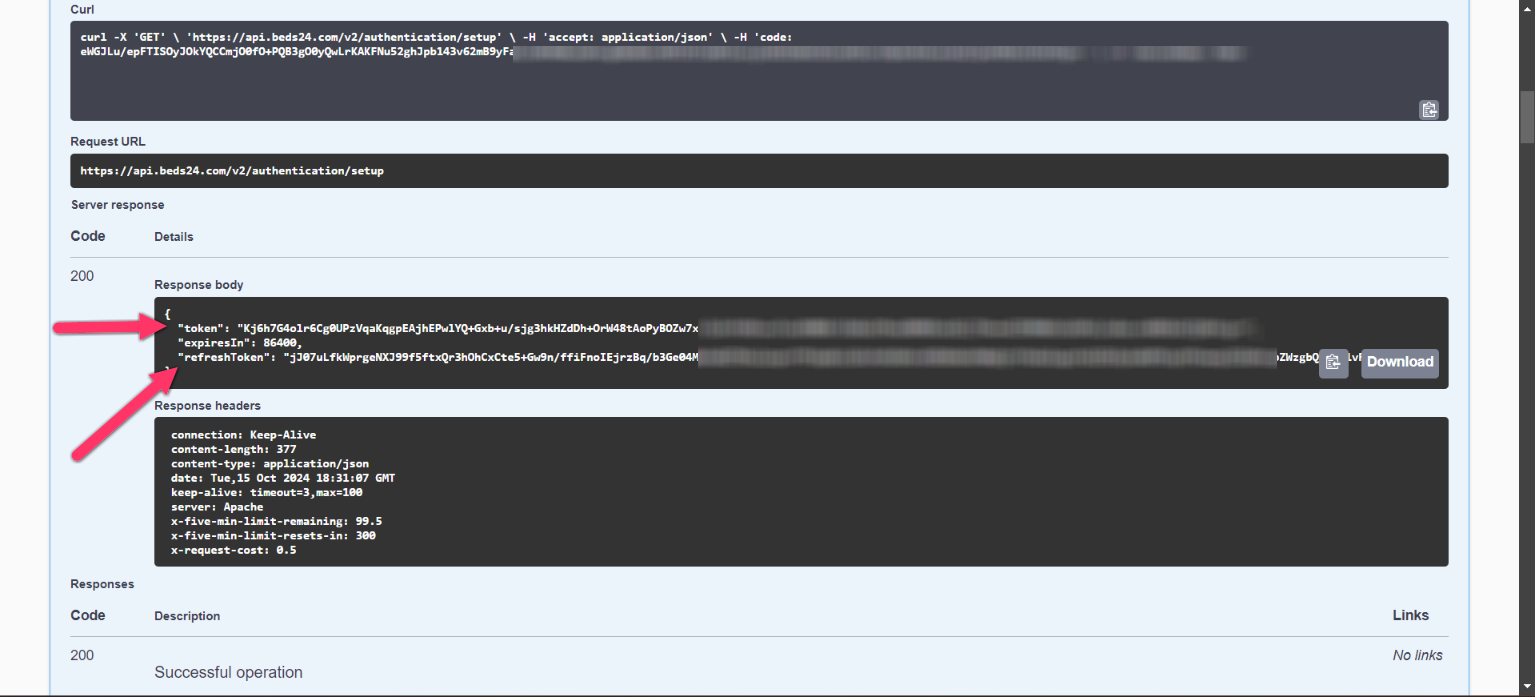
4. Click Execute to retrieve your token and refresh token.
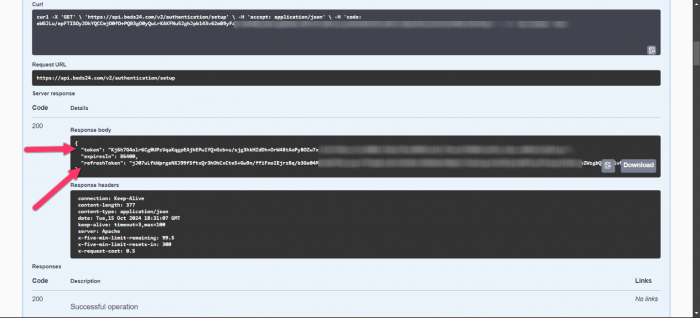
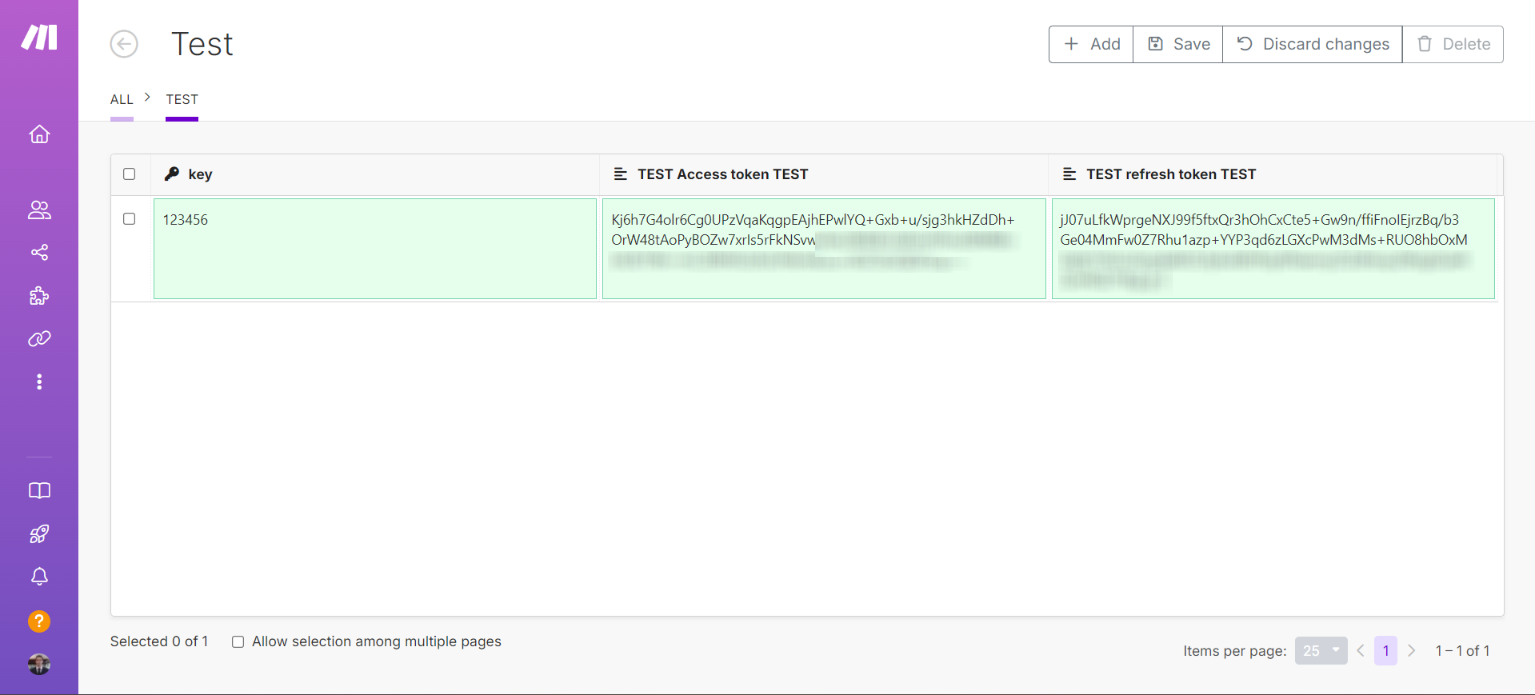
5. Copy the access token and paste it into the "Access Token" field in the data store. 6. Copy the refresh token and paste it into the "Refresh Token" field in the data store.

7. Click Save at the top of the screen. You now have a data store containing your token and refresh token.
Step 3: Create a Scenario to Update the Token Every 24 Hours
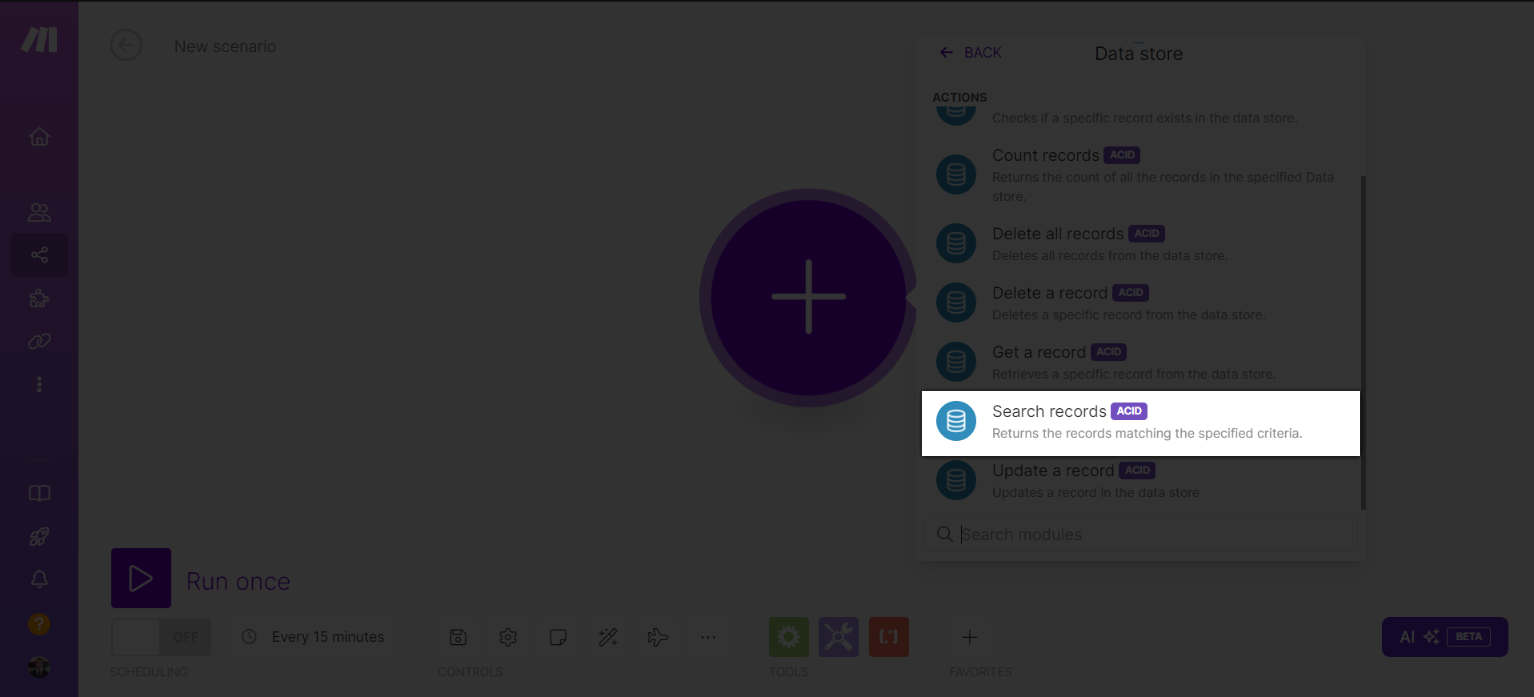
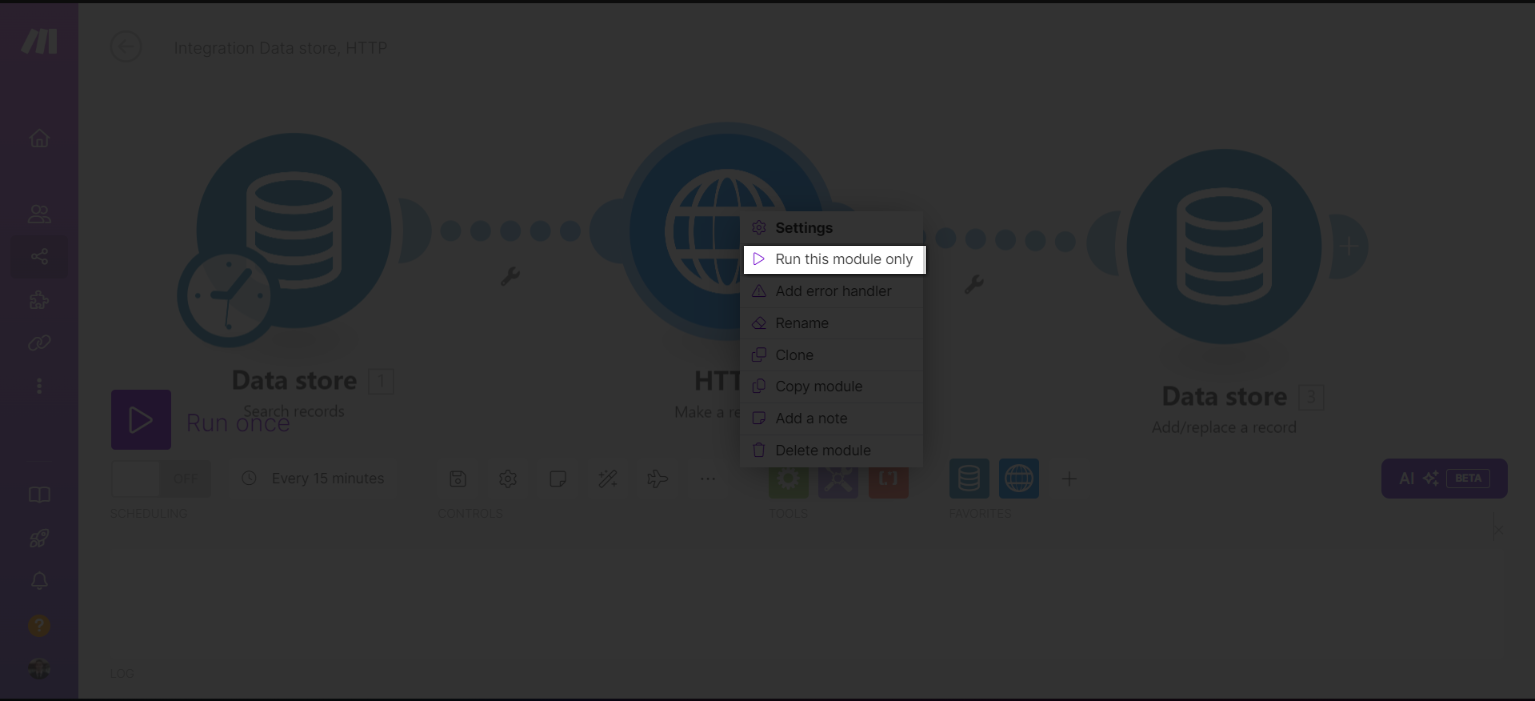
1. Create a new scenario in Make, and add the first module as Data Store – Search Record.

  * Select Browse and choose the data store you created.
  * In the filter, choose the Access Token.
  * Set Basic Operation = Exist (this is important to check if the token exists).
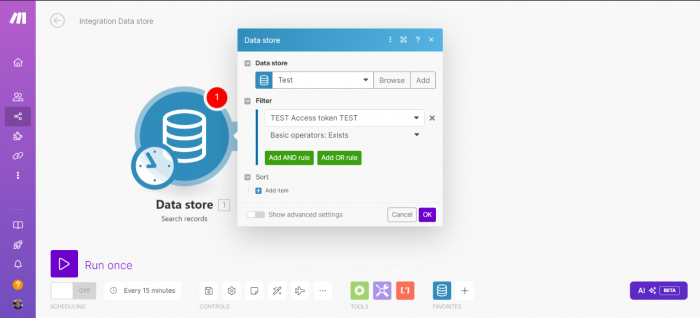
2. Click OK and add the second module.
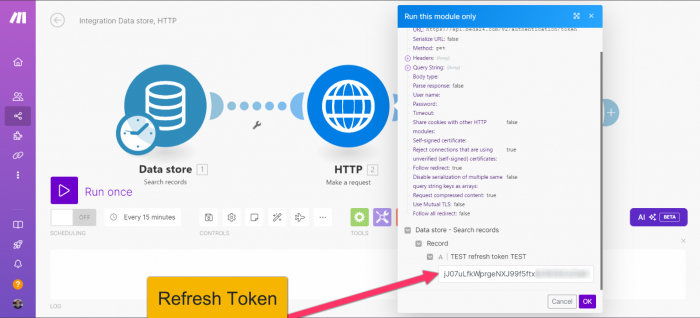
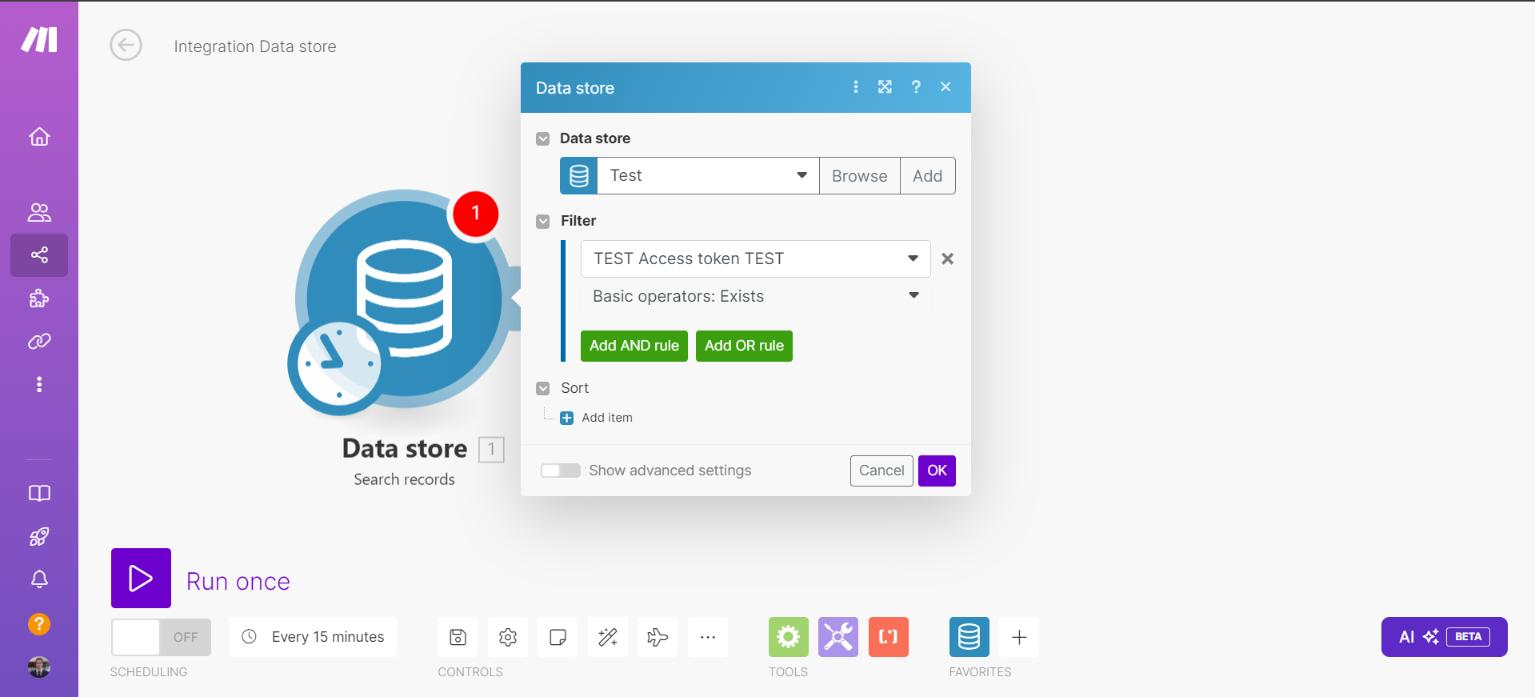
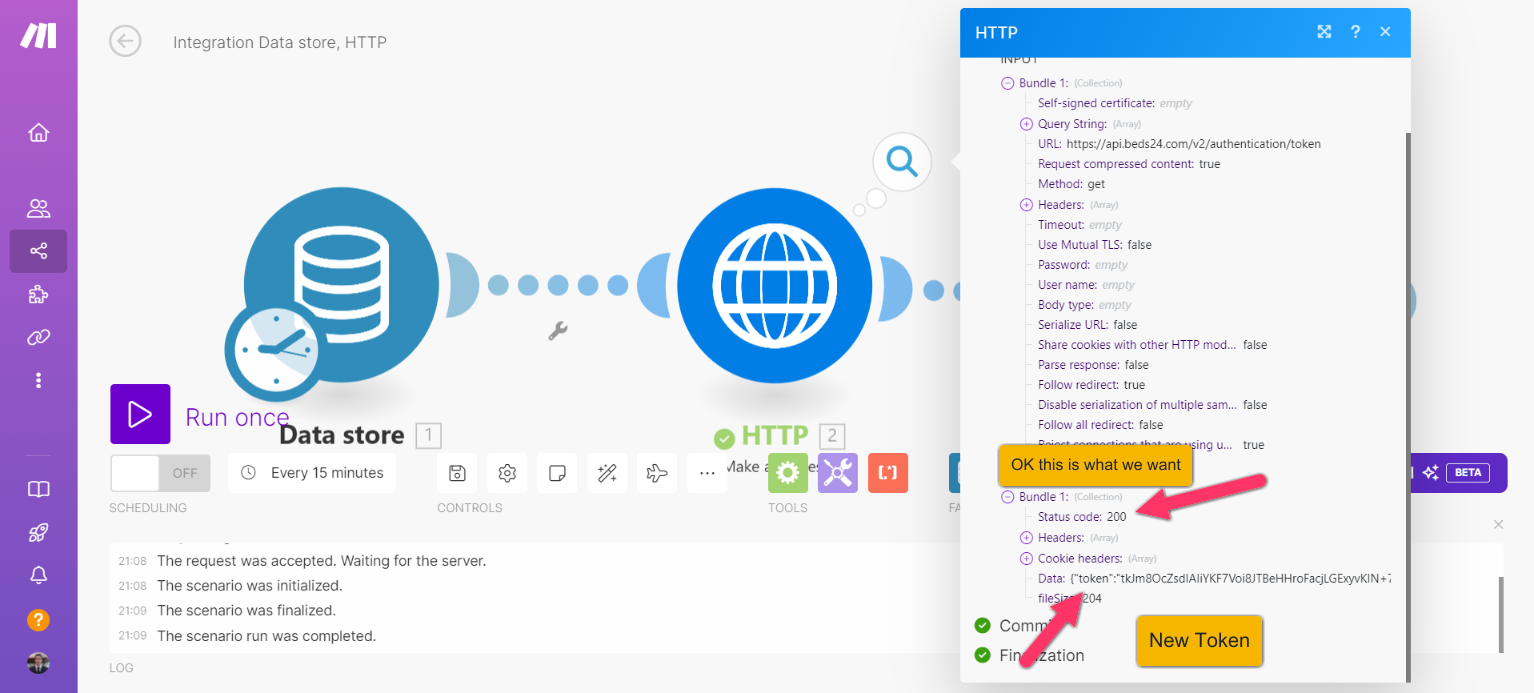
3. Add an HTTP module – Make a Request to request a new token every 24 hours:
  * Set Evaluate all states as errors (except for 2xx and 3xx) = No.
  * URL = https://api.beds24.com/v2/authentication/token.
  * Method = GET.
  * In the headers, add two items:
    * Item 1: Name = refreshToken, Value = map the refresh token from the first module (Data Store module).

* Item 2: Name = accept, Value = application/json.
4. Save the module. 5. Add another module to update the token: Data Store – Add / Replace Record.
  * Select the data store you created.
  * Key = the random number you set earlier.
  * Overwrite an existing record = Yes.
  * Parse response = Yes (this is crucial).
6. You will need to run the HTTP module once before proceeding. Save the data store module as is for now.

7. Copy your refresh token again and paste it into the "Refresh Token" field.
8. Click OK to run the module and update your token.

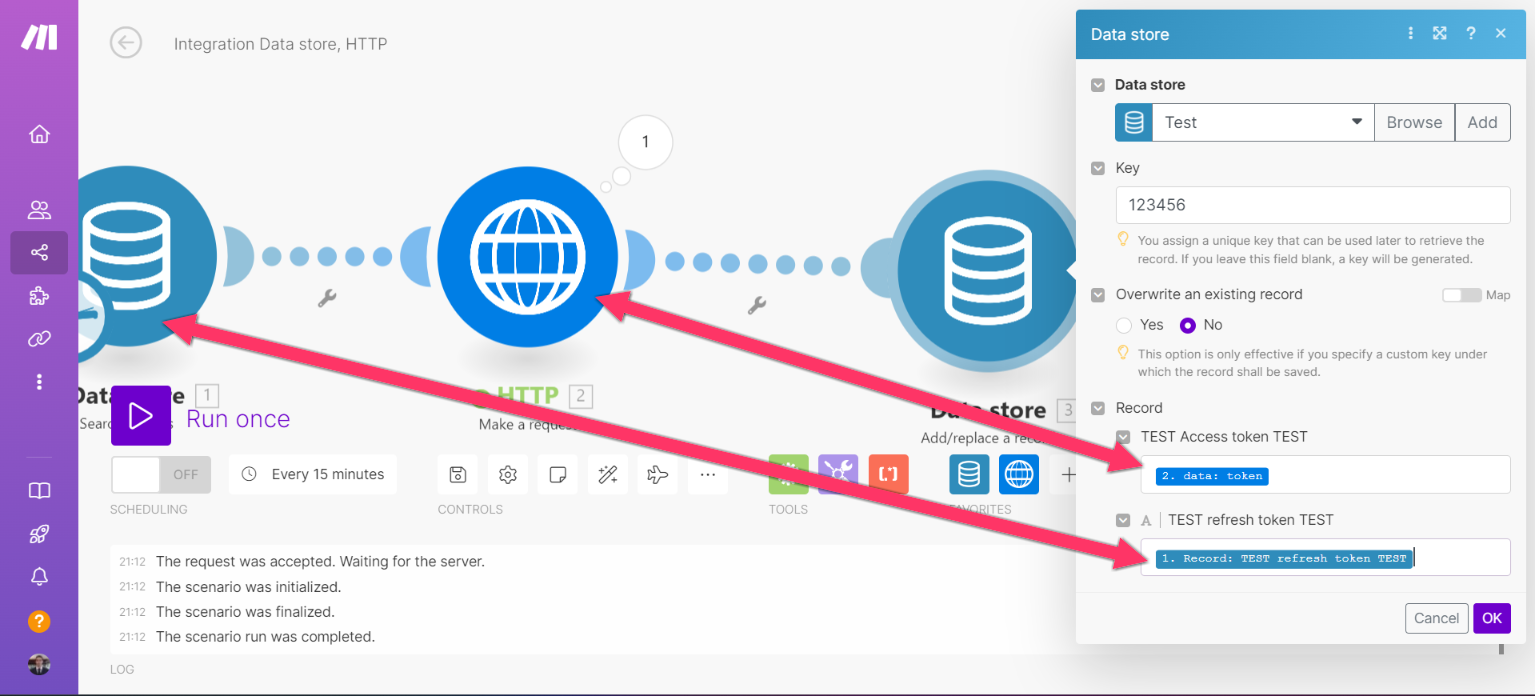
Step 4: Finalize the Scenario
1. Edit the last module (Data Store) again, and map:
  * Access Token = Token from the HTTP module.
  * Refresh Token = Refresh token from the Data Store module.

2. Save the module and set it to trigger every 24 hours. This will make an API call every day to get a new token.
Step 5: Using the Token in API Calls
To make API calls to Beds24, first set the Data Store module – Get a Record. Insert your key (the number you set under Key). When you set up an HTTP module to make an API call, use the token from the data store, which will always be up to date.