Category:Bookings
This page is about the menu BOOKINGS
General
Bookings have a "status" which can be manually changed or changed via an Auto Action.
- "New" are bookings which have not been opened to view. Once you open them and save or update them the status will change to "Confirmed". In (SETTINGS) PROPERTIES > BOOKING RULES > BOOKING STATUS you can set which status you want to apply to new bookings.
- "Confirmed"
- "Request"
- ""Inquiry" bookings do not block the room.
- "Cancelled"
- "Black" bookings are bookings without guests. They can be used to close a room. Black bookings are not considered in reports.
The second selection allows you to add a "sub status". The sub status has no direct effect on the booking. Its purpose is to hold information and allow you create reports according to this information.
For an overview can choose from different views to view all bookings:
- Grid with drag-and-drop function to quickly change rooms
- Sortable list

- Calendar view
- Guests
- Pending payments
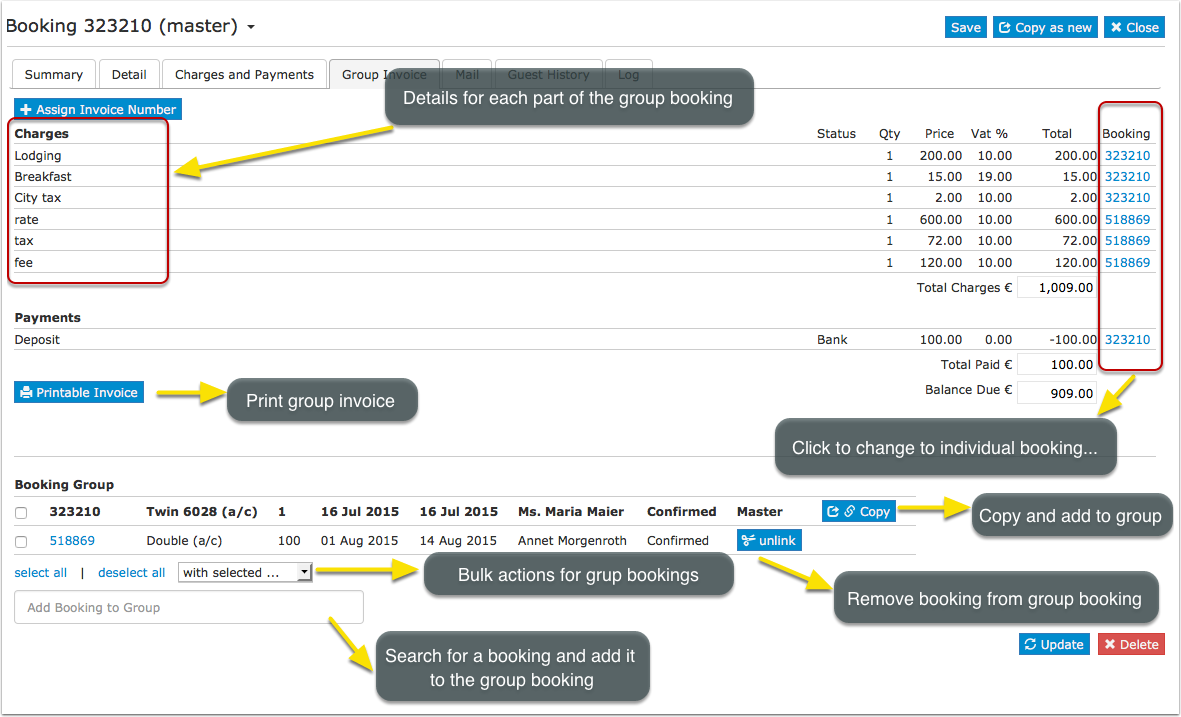
Group bookings
In the calendar group bookings are marked with a icon. For the master booking, the circle is filled.
More information on how to manage group bookings.
Add Bookings
Bookings are entered into the system by the following methods:
- online by your guest using the availability calendars, booking buttons and booking page.
- manually by yourself.
- imported from other channels by the channel manager.
Manually add a new booking
Click on the ADD BOOKING Button on the top right.
To add a booking for multiple rooms or to check for available rooms click on "Price Check"

Add bookings in CALENDAR directly into the room or even the room and the date.

If you want to manually add a booking for a guest who previously stayed use the "Search" field in the booking.
Import existing bookings when you are starting
- For Booking.com, Airbnb and Expedia we have the option to automatically import all upcoming bookings. We recommend to use this method because for bookings imported directly from Booking.com we will then be able to automatically import changes. You can use this function when the channel manager is set up but not activated. The button is available in (SETTINGS) CHANNEL MANAGER->AIRBNB/BOOKING.COM/EXPEDIA.
- Other bookings can be uploaded as a .csv file from in (SETTINGS) PROPERTIES.
Room Assignment
By default the system automatically assigns a room to each booking.
If you generally want to assign rooms manually you can change the setting for "Booking Allocation" in (SETTINGS) PROPERTIES > ROOMS > SETUP.
If you want to rearrange your room assignment you can move the booking
If you have a room type with a quantity of more than one the system will allow a guest to book multiple days as long as one room of the type is a available on each day. If this causes that the guest will have to move during the stay you will need to shuffle the bookings manually.
Prevent Room Changes
If a booking is imported from a channel and you have changed the room in Beds24 you need to change the setting for "Allow Channel Modifications" in the "Details" tab of the booking to prevent the channel to override the room change with the next update.
You can apply a Rule for your channel bookings in (SETTINGS) CHANNEL MANAGER > CONNECTION SUMMARY for the channels you have connected you will see the option 'Allow Channel Modifications' and set = All except room change, this will prevent the channel to override the room change with the next update.
If the info codes LOCKROOM or LOCKUNIT manual room changes by staff are not possible.
If you do not see these in the the drop down list you can manually add them in (SETTINGS) ACCOUNT > PREFERENCES "Booking Info Code Presets "
Check guests in and check guests out
If you are using the components "Arrivals", "Departures" and "Current Guests" you can manage the check-in and check-out process from the dashboard and see which guests are currently checked-in. This video explains how to check guests in and how to check guests out:
Also you can always check a guest in by opening the booking and setting the info code "Checkin" in the "Info" tab.
You can also check a guest out by opening the booking and setting the info code "CHECKOUT" in the "Info" tab.
In (SETTINGS) ACCOUNT > PREFERENCES > BOOKINGS "Check-out rules" you can define which validation checks are performed during check-out.
If "Check-out rules" is set to "Booking balance higher than 0", a pop-up warning will be displayed when a booking with a balance greater than 0 is checked out. The warning shows the booking balance.
The warning is displayed when checking out from the "Departures" component, when adding the "CHECKOUT" info code directly to a booking, or when applying the "CHECKOUT" info code via Group Actions.
The warning is informational only and does not prevent checkout. Beds24 does not automatically collect outstanding balances. Users can choose to continue with the checkout or return to the booking to review charges and payments. In (SETTINGS) ACCOUNT > PREFERENCES "Check-in Rules" you can limit the check-in function for the Dashboard modules.
If you use our integrations with Nuki or Remotelocks guests will be auto checked in when they first open a lock. For more information on self-check-in please see here.
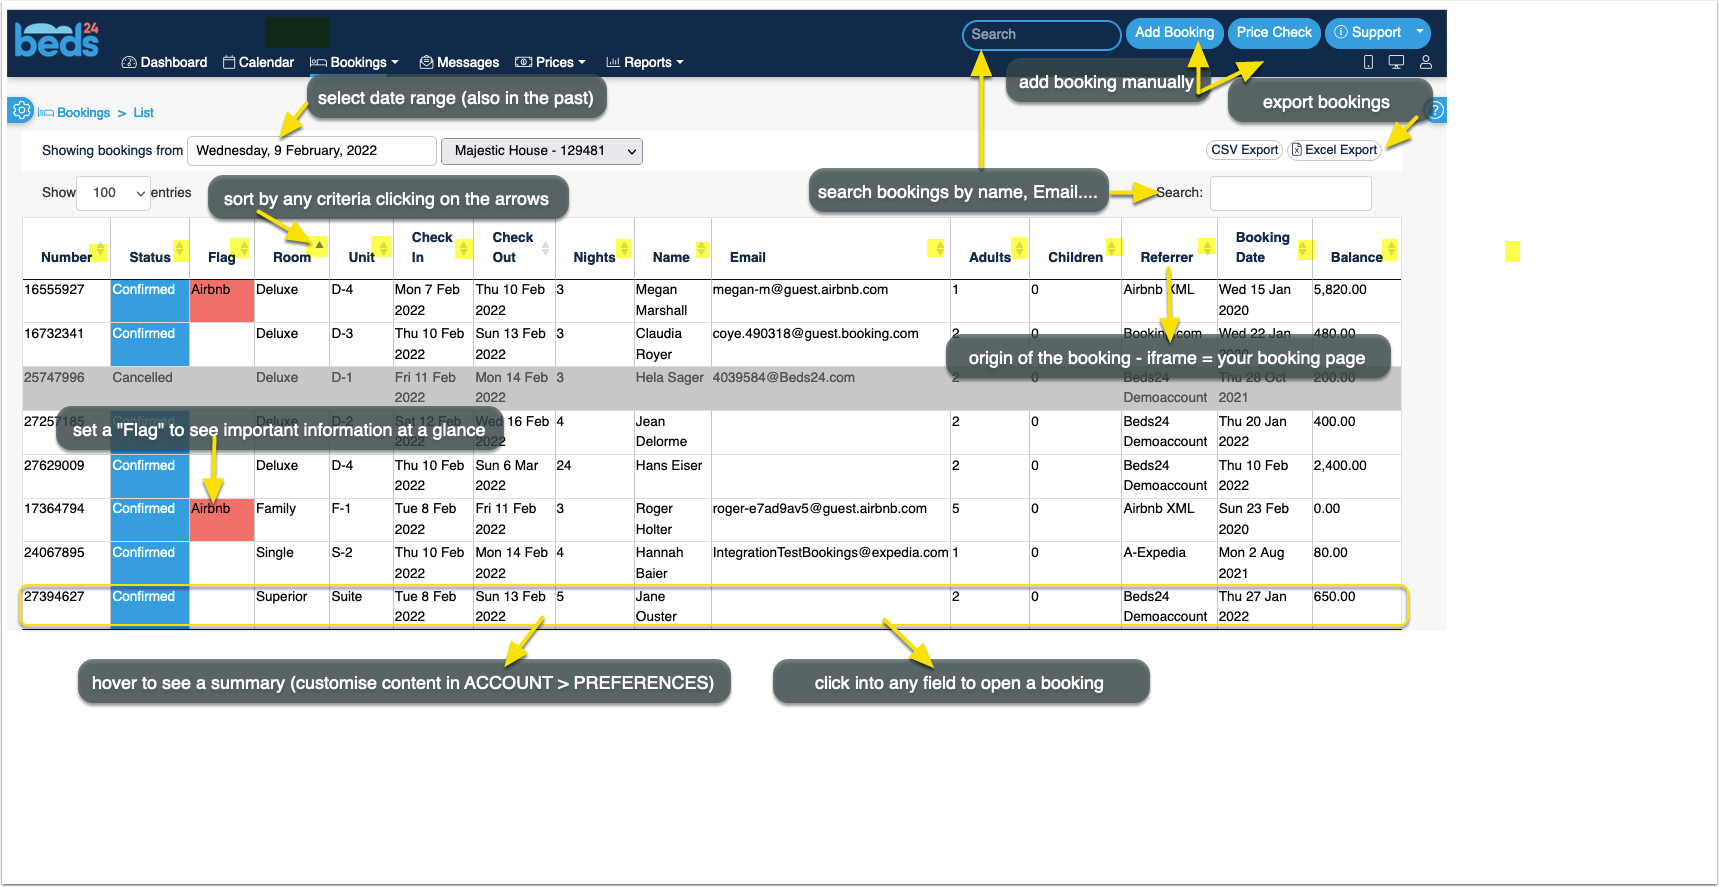
Manage bookings
After clicking on BOOKINGS in the top menu you will see your bookings in a CALENDAR view or LIST view. By default you will see all bookings from today. You can use the selector to view only certain bookings.
You can edit a booking by clicking on it to open the booking in a popup. When you open the booking you see several tabs:
Overview
The most important information from other tabs so you can have the essentials in one view.
The overview opens is read only and opens via the icon. A click on an "Edit" icon will take you to the tab where you can make changes. We are planning to build out the overview which will eventually encorporate all functionality and replace the tabs.
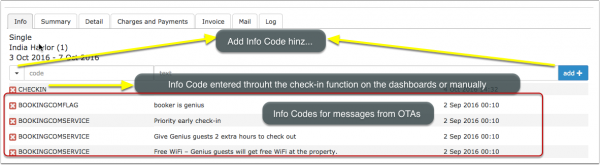
Info
On the Info tab you can add "Info Codes" and internal notes.
The Info tab consists of a customizable summary ("Booking Info Template") of the booking information and a set of info items which can be attached to a booking. Booking Info Templates can contain template variables.
Booking Info Template
The customizable summary can be created in (SETTINGS) ACCOUNT > PREFERENCES "Booking Info Template" using template variables.
If you want to hide the info tab click on the 'User' icon on the top right and then on 'Account Management (in the old control panel SUB ACCOUNT in the top right) then click on "Manage Account" and add the phrase bookedit-info in "Hide menu pages"
Info Items
Info items can be attached to a booking. They consist of an "Info Code" and a freetext filed in which you can add additional notes. They are a powerful function which can be used:
- for reporting in custom reports to show or hide selected bookings
- to trigger auto actions for bookings with certain criteria
- to filter bookings
- to mark certain bookings with icons
| Preset info codes | |
|---|---|
| Code | Use |
| CHECKIN | check-in function |
| CHECKOUT | check-out function |
| LOCKSTATEPIN | Lockstate integration |
| NUKIPIN | Nuki integration |
| LOCKROOM | prevent manual room changes |
| LOCKUNIT | prevent manual room changes |
| AGODACOLLECT | Agoda hotel collect booking |
| AGODACOMSERVICE | Agoda booking with extra service (parking, breakfast) |
| BOOKINGCOMCARD | invalid card reported to Booking.com |
| BOOKINGCOMFLAG | Booking.com general info flag (Genius/no credit card) |
| BOOKINGCOMVIRUTALCARD | Booking.com sent a virtual card |
| BOOKINGCOMBANKTRANS | booking paid via bank transfer from Booking.com |
| EXPEDIACOLLECT | Expedia sent a virtual card |
| HOTELCOLLECT | Expedia hotel collect booking |
| VIRTUALCARD | virtual card was sent from the channel |
| CARDTOSTRIPE | card details were sent to Stripe |
| STRIPEPAYMENT | payment imported from Stripe |
| STRIPEFAIL | card could not sent to Stripe |
| CARDEXPIRES | added when the card expires before check-in |
| DEPOSIT | default value from (SETTINGS) ACCOUNT > PREFERENCES |
| PAID | default value from (SETTINGS) ACCOUNT > PREFERENCES |
| UNPAID | default value from (SETTINGS) ACCOUNT > PREFERENCES |
| CLEAN | default value from (SETTINGS) ACCOUNT > PREFERENCES, used with check-in rules |
| DIRTY | default value, from (SETTINGS) ACCOUNT > PREFERENCES, used with check-in rules |
| REPAIR | default value from (SETTINGS) ACCOUNT > PREFERENCES |
| CANCELLED_BY_OWNER | Homeaway XML to report cancellations |
| CANCELLED_BY_OWNER_INVALID_CARD | Homeaway XML to report cancellations |
| CANCELLED_BY_OWNER_NO_PAYMENT | Homeaway XML to report cancellations |
| CANCELLED_BY_OWNER_UNIT_NOT_AVAILABLE | Homeaway XML to report cancellations |
Example:
If you use the code "CHECKIN" when guests check in and "CHECKEDOUT" when guests check out, you could create a custom report to show bookings with the info code "CHECKEDIN" but without the info code "CHECKOUT" effectively showing only guests who have checked in and haven't checked out yet.
Create your own info codes
Presets for info codes can be defined in (SETTINGS) ACCOUNT > PREFERENCES "Booking Info Code Presets ". Ideas for commonly used info codes:
BREAKFAST
CANCELLED_BY_OWNER
CANCELLED_BY_OWNER_INVALID_CARD
CANCELLED_BY_OWNER_NO_PAYMENT
CANCELLED_BY_OWNER_UNIT_NOT_AVAILABLE
LOCKSTATE_PIN (for customers using our integration with Lockstate lock system)
After you have created an info code will be able to manually add it from the list of presets in the booking or automatically add them via auto actions.
Bedding
You can set up Info Codes with bedding information.
Step 1: Go to (SETTINGS) ACCOUNT > PREFERENCES and add Info Codes for the bed types you have the Info Codes have to start with BED_ Examples:
BED_DOUBLE
BED_TWIN
BED_SINGLE
Step 2: Add the applicable Info Code on the "Info" tab of the booking.
Step 3: Go to the DASHBOARD and add the "Bedding" Column to the modules in which you need this information.
Step 4: If you require a report you can generate a "Group Arrivals" report
Icons
Enhance display of bookings with icons.
1. Go to (SETTINGS) ACCOUNT > PREFERENCES and set "Booking Show Icons" = Show.
2. Go to (SETTINGS) ACCOUNT > PREFERENCES and and create "Booking Info Code Values".
Supported are all free solid Font Awesome icons. Get the name for the icons you want to use from there and enter I- followed by the icon name :
I-money-bill
I-bell
TRANSFER I-money-bill
CHECKIN I-bell
After you have created an info code will be able to manually add it from the list of presets in the booking or automatically add them via auto actions. If you add a text with it will show when you hover on the icon.
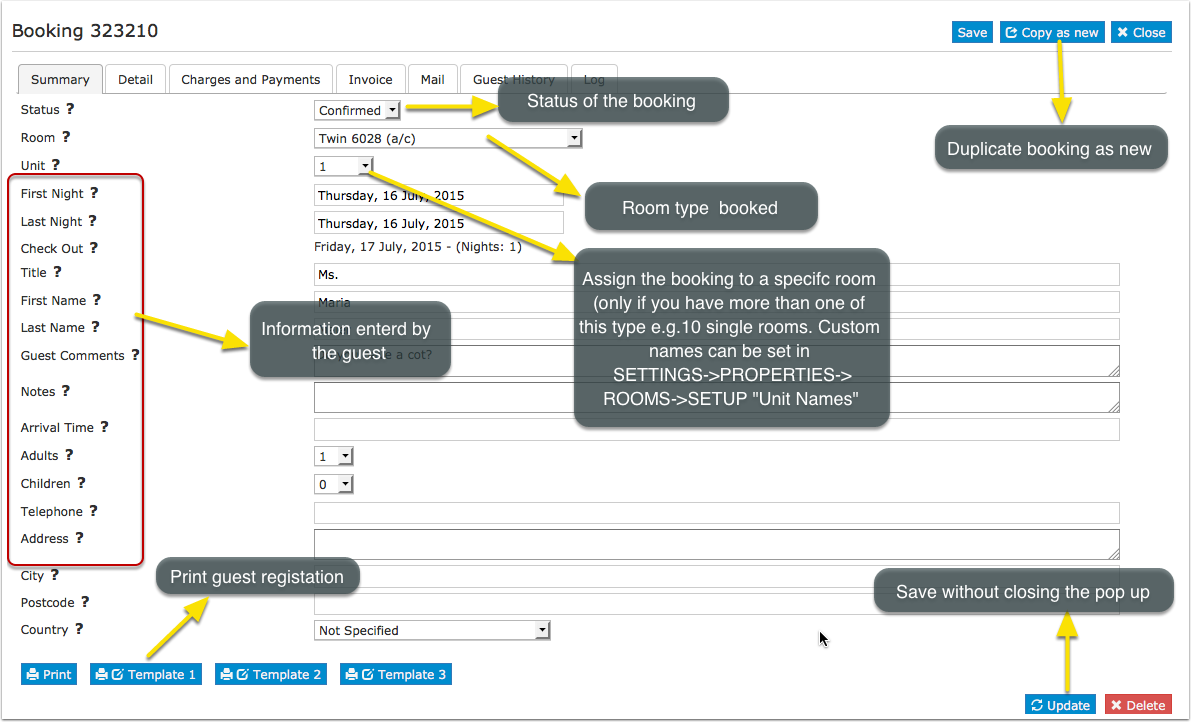
Summary

The "Slice" function allows to divide a booking into individual bookings with different start and end dates. This functions is useful if for example a guest changes rooms during his stay.
When you want to select a different UNIT, if the symbol ® is next to a unit/room, this indicates there is already a booking in this unit, so you should choose another unit.
Which information you see on this tab is defined by the settings activated in (SETTINGS) PROPERTIES > BOOKING QUESTIONS.
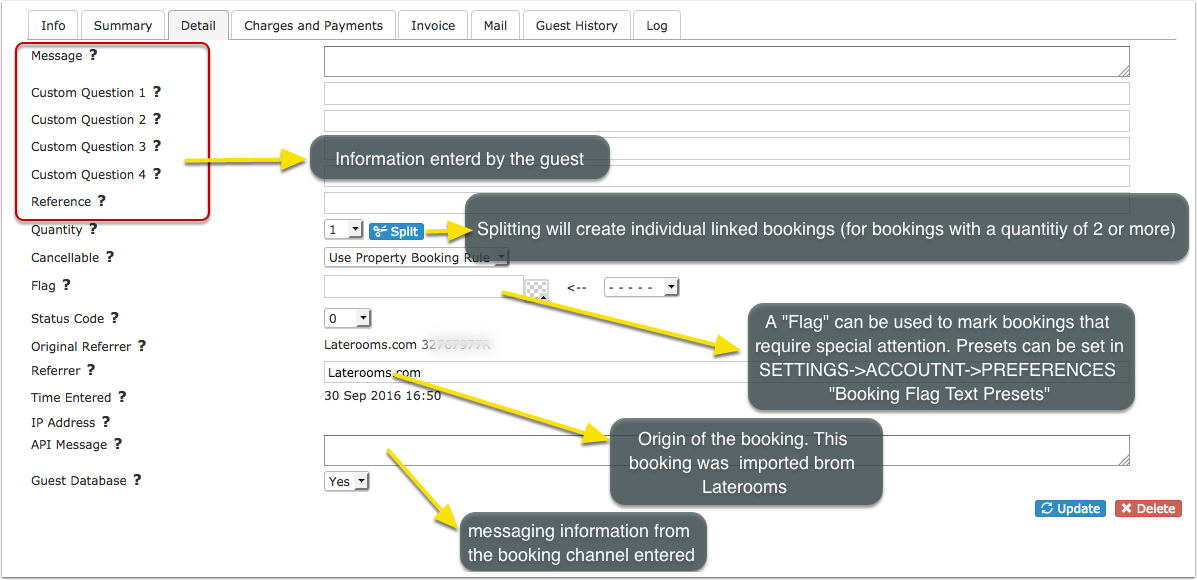
Detail
Split can be used to split a booking for multiple rooms into separate bookings so each can be assigned to an individual room. All split bookings will be linked so they can be easily managed.
FLAG can be used to flag bookings that require special attention. The flag text is displayed with the other booking fields within the control panel and the [FLAG] template variable can be used to display this text as "hovertext" when the mouse cursor is positioned over the flagged booking in the Calendar view. Flags can also be automatically applied via Auto Action which you can set up in (SETTINGS) GUEST MANAGEMENT > AUTO ACTIONS.
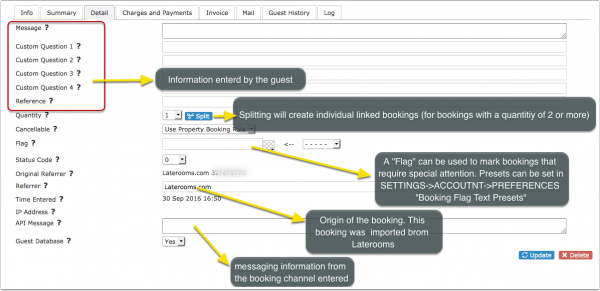
Which information you see on this tab is defined by the settings activated in (SETTINGS) PROPERTIES > BOOKING QUESTIONS.
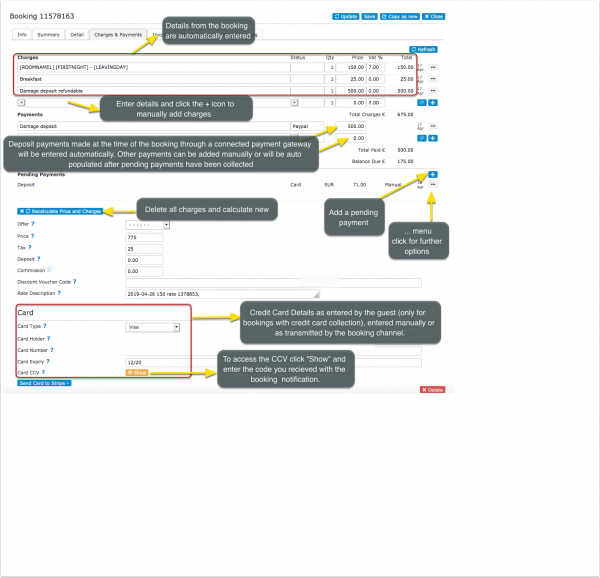
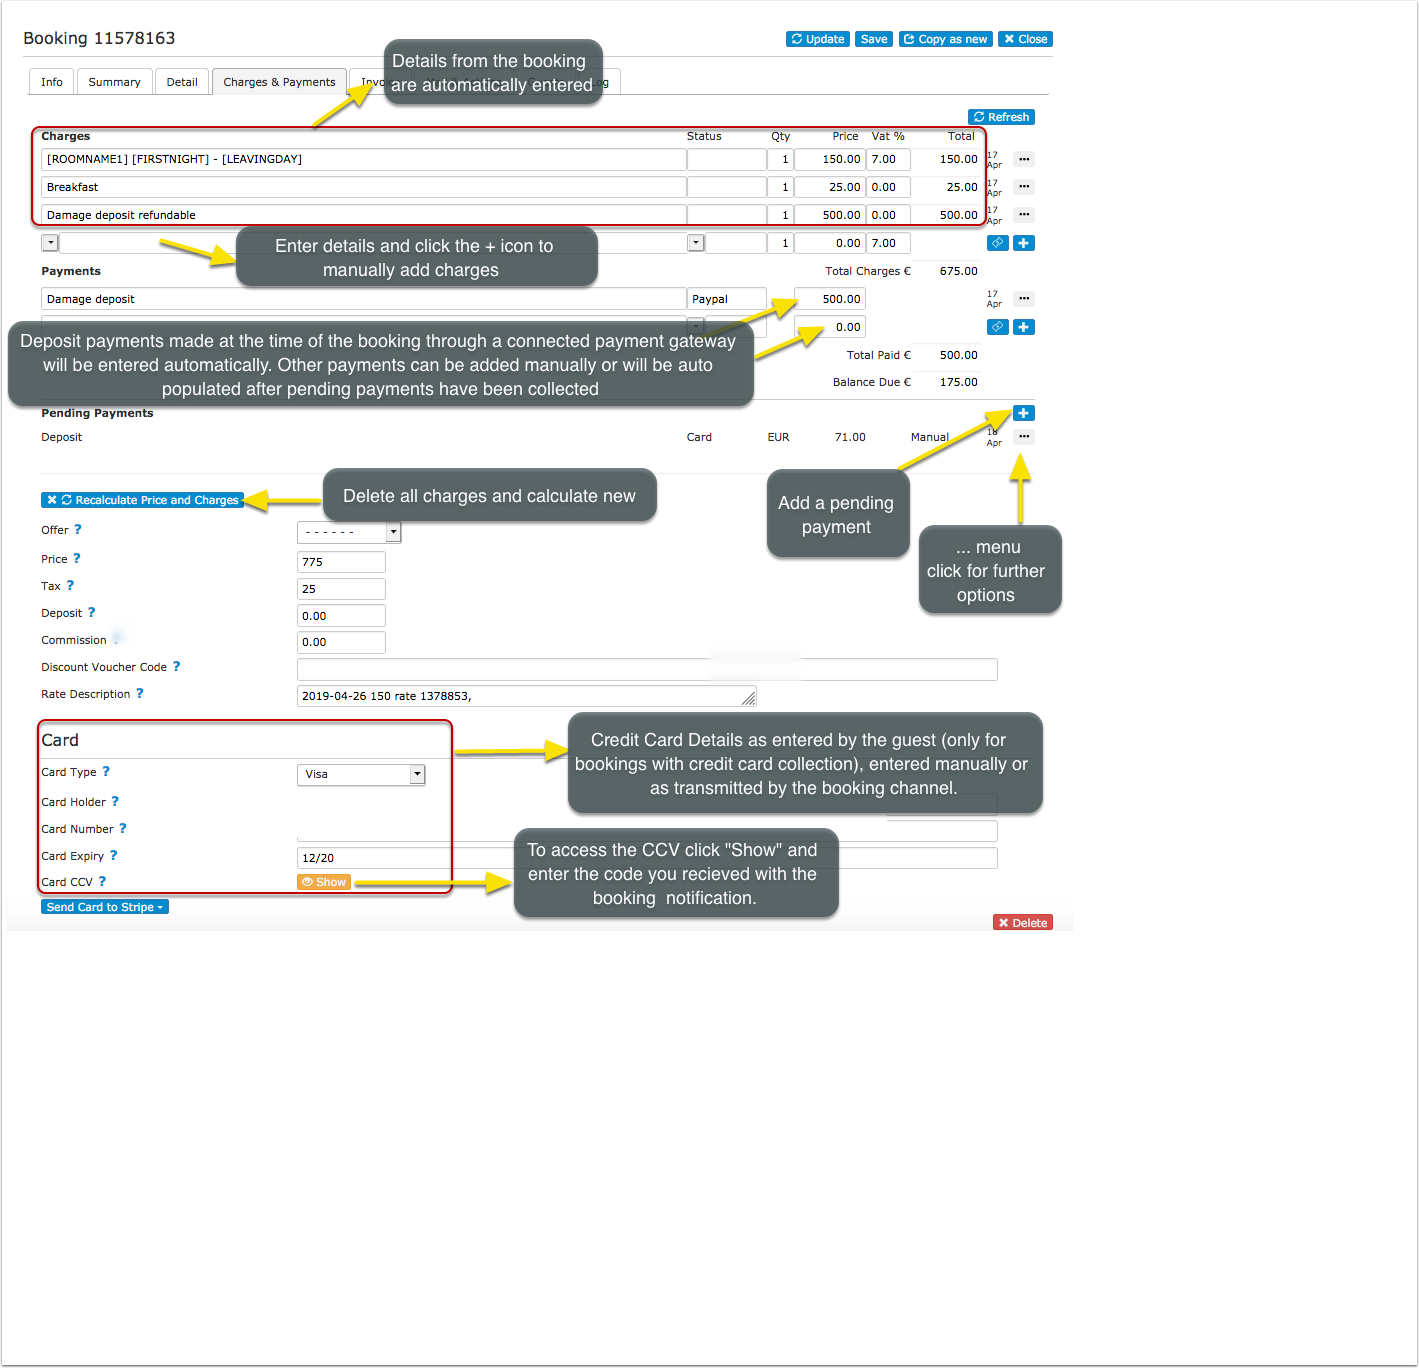
Charges and Payments
In the tab Charges and Payments you can manage guests charges and payments.
Information from your booking page or sent from a channel are automatically entered. For bookings from OTAs you can adjust how the charges and payments are imported in (SETTINGS) CHANNEL MANAGER.
On this tab you can:
- Enter or change chargeable items, payments or pending payments. Click on the + icon to add and enter a blank new row.
- Upsell Items which are created in (SETTINGS) BOOKING ENGINE > UPSELL ITEMS can be automatically selected as charges.
- You can create invoice items for items sold on site in (SETTINGS) GUEST MANAGEMENT > INVOICE "Invoice Items".
- To remove an item click on the ... menu and then choose "Delete".
- Under "Pending Payments" you can schedule outstanding payments. Pending payments can be collected manually or automatically. The option to charge automatically is available for customers who use Stripe only.
- For automatic charging set the "pending payment" to "auto" and enter a due date in the future.
- Channel collect payments with virtual cards can be set to be automatically collected in the respective channel menu.
- A manual charge to a card can be made if the credit card has been sent to Stripe by clicking on the ... menu and then clicking on "charge now".
- In (SETTINGS) GUEST MANAGEMENT > PAYMENT RULES you can create rules and info codes for pending payments.
After the payment was collected you will see a status information on the "Info" tab. Successful collections will be moved from "Pending Payments" to "Payments".
The "Status" field can be used to specify the type of an item. Examples are payment methods or categorizing items for reporting. You can preset your status values in (SETTINGS) GUEST MANAGEMENT -> INVOICE "Invoice Items".
By default the description of the lodging price displays room name, check-in date and check-out date. You can change what is displayed there in (SETTINGS) GUEST MANAGEMENT-> INVOICE "Invoice Item Room Description".
Discount Voucher code
There are two ways to apply a discount code to a back-end booking depending on your workflow:
Option 1: Applying a Voucher Code to an Existing Booking
If the booking has already been created in the calendar:
Open the existing booking.
- Go to the Charges & Payments tab.
- Find the "Voucher Code" field and enter the agent's discount code.
- Click "Recalculate" to apply the discount.
The charges will automatically update to reflect the discounted price.
Option 2: Applying a Voucher Code When Creating a New Booking
If you are creating a brand new booking from scratch:
- Click the "Add Booking" button in the calendar.
- While filling in the booking details form, you will see a "Voucher Code" field.
- Enter the discount code directly into this field.
- Complete the rest of the booking details and save.
The discounted price will be automatically calculated and applied from the start.
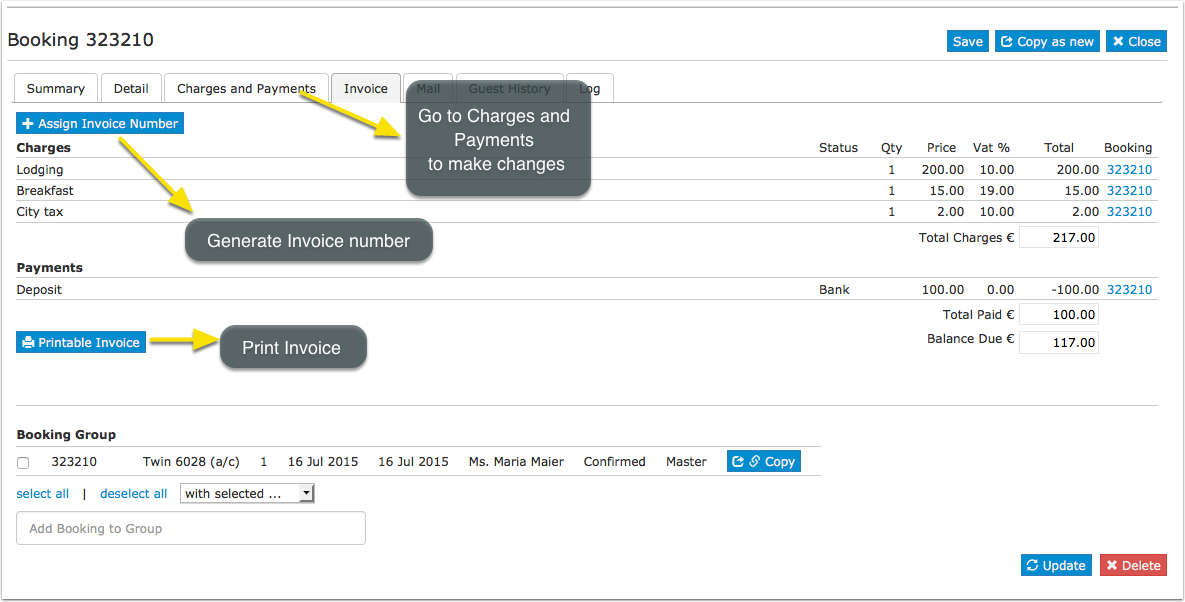
Invoice
In the tab INVOICE you can generate and print an Invoice.
- Customisation for the invoice can be done (SETTINGS) GUEST MANAGEMENT > INVOICE.
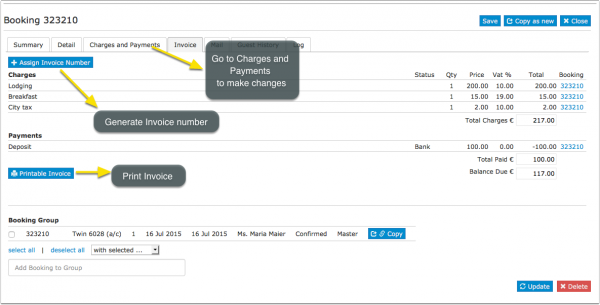
You can also manage and create group bookings.
- Changes have to be made in each individual booking

- If a booking required separate invoices (i.e. room charged to a company, extras charged to the guest) you can use the "Invoicee" function in (SETTINGS) GUEST MANAGEMENT -> INVOICEE.
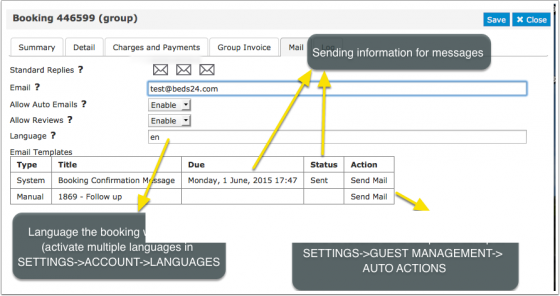
In the tab "Mail" you can send out the standard e-mails you have defined under (SETTINGS) GUEST MANAGEMENT
Messages
If the booking is from a channel which makes messages available you can view and reply to messages from guests in the Messages tab.
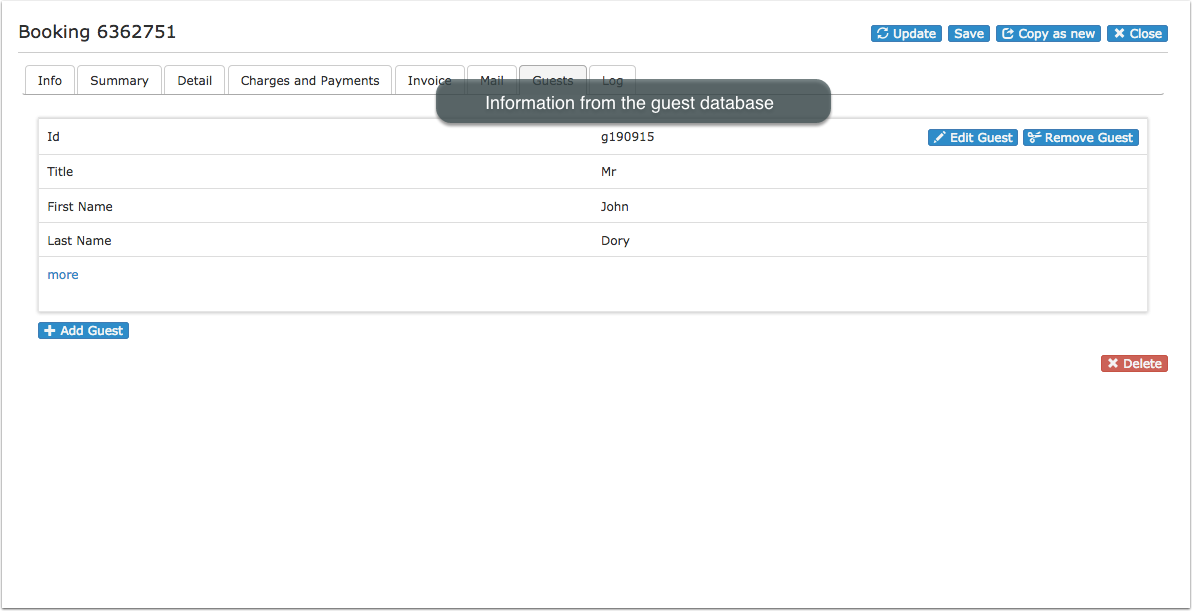
Guests
In the tab "Guests" tab you can see and manage the connection of the booking to the guest database (GUEST in top menu),
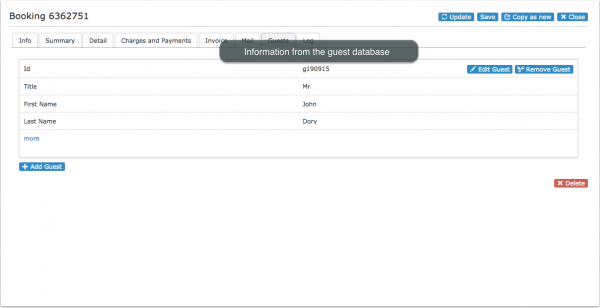
You have the option to add guests to the booking or remove guests. Guests can also be deleted if they are not connected to another bookings.
- Create Guest from Booking : A guest will be created from the information from the "Summary" tab of the booking.
- Create New Guest: A new guest will be added to the database.
- Add Existing Guest: Search the database for an existing guest to add it to the booking.
Updating a guest will not change the content to the "Summary" tab of the booking.
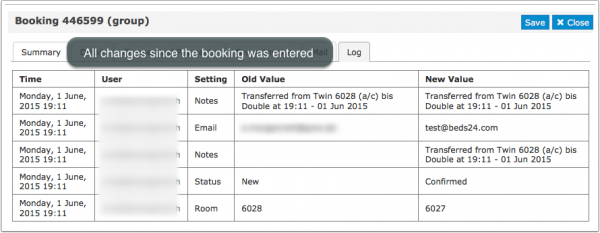
Logs
The logs shows changes which have been made to the booking.
Logs are available until one month after check-out.
Delete Bookings
Deleted bookings are permanently removed from the system and can not be restored.
If you have a booking with a locked invoice you will not be able to delete the booking.
Cancellations
Direct booking can be cancelled by changing the status to "Cancelled". For bookings from channels the cancellation has to be made on the channel either by the guest or by the channel. If this is not possible you can change the status in Beds24 and set "Allow Channel Modifications" = No in the "Details" tab of the booking. This will stop and update from the channel to override the status change but not actually cancel the booking in the channel.
You can allow guests to cancel bookings themselves. By default the system uses the policy you can set under (SETTINGS) BOOKING ENGINE. You have the option to override these settings for offers ( (SETTINGS) PROPERTIES > ROOMS >OFFERS) or individual bookings. If you allow cancellations you can send your guests a link to let them cancel via the system without contacting you. Include the template variable [CANCELURL] into your e-mail confirmation message. When guests cancel a booking they will receive a system notification that the booking was cancelled. If required you can set up an additional Auto Action Email in (SETTINGS) GUEST MANAGEMENT > AUTO ACTIONS.
Bulk Changes
To bulk change bookings click on the 'User' icon on the top right and then on 'Account Management (in the old control panel SUB ACCOUNT in the top right) then click on "Manage Account" then "Manage Property" then "Manage Room". There you can:
- Change the status of bookings.
- Move bookings to another room.
- To bulk delete bookings the status has to be changed to "Cancelled" first.
Archived Bookings
Bookings will periodically be 'Archived' this is to help with performance.
To access Archived bookings, go to BOOKING > LIST
- Edit or create a new 'View' of the list and include column 'Invoice' this gives a print invoice button for bookings and a download a csv file with the invoice data for archived bookings.
- Then set the date and the period for the bookings.
Search Bookings
To search for a booking, use the SEARCH box on the top of any page.
You can search on First name, last name, Beds24 booking number, Channel booking number. You will see the list that match your criteria, if not, then you can click on 'Search More' this will search all guest information in a booking.
Template Variables
Template variable can be used to display information from the booking in confirmation messages to guests, auto action Emails, host notifications or invoices.
Register Guests
Our partner Chekin.io automate the guest identification and legal obligations. For more information please see here
Subcategories
This category has the following 7 subcategories, out of 7 total.
Pages in category "Bookings"
The following 36 pages are in this category, out of 36 total. download this selection of articles as a PDF book
C
S
- Sell a room only if another room is unavailable
- Sell one room as more than one type
- Sell room as dorm and private room
- Sell Rooms with Priority
- Sending data to SEF
- Set Currency
- Stripe Channel Virtual Cards
- Stripe Credit Card
- Stripe deposit and balance
- Stripe full amount
- Stripe Payment Request
- Stripe Payment Schedule
- Stripe Security Deposit capture