Nuki.io
This page is about the menu (SETTINGS) APPS & INTEGRATIONS > NUKI
For Beds24 the normal channel manger fees apply.
Contents
1 Capabilities
- Beds24 can send booking data to Nuki locks.
- Auto-Check-in: when a lock is first opened by the guest the info code "CHECKIN" will be added to the booking.
2 Limitations
- As of 1 September 2023 you will need a Nuki Smart Hosting subscription.
- Nuki smartlocks can store a maximum of 100 entry codes at a time.
- Booking names in Nuki smartlocks have a maximum length of 20 characters and guest names may be cut off. This will not be visible to guests, only users with access to Nuki web will be able to view booking names.
- A given lock can only be used in one property, however it may be used for multiple rooms within that property.
- If using the synchronise code option, all locks must support code entry.
One beds24 account can only connect to one Nuki account. If you want to connect to multiple Nuki accounts you could use Sub accounts (with each Sub account connected to a different Nuki account).
3 What you need
To use this service you will need:
- At least one Nuki Smart Lock.
- A nuki.io account.
- A Nuki Smart Hosting subscription.
Special offer for Beds24 cusotmers: Receive a 10% discount with the voucher code Beds24/10
Using keypad codes requires a Nuki keypad to be setup.
4 Set Up
Step 1: Connect your Nuki Account
- Click on "Connect to Nuki".
- Sign in with your Nuki account if prompted.
- Click "Allow" to let Beds24 view and manage your Nuki account and locks.
Step 2: Set when bookings should send to locks
- The "Start Time" and "End Time" define the earliest Check-in time and latest Check-out time.
- The "Days in Advance" sets the days before check-in that the booking is sent to the lock.
Step 3: Map your locks to your rooms
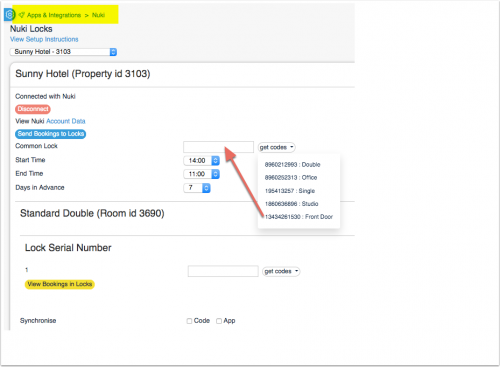
Bookings will be sent to the lock mapped to the room assigned to the booking, if there is no lock mapped for the room the booking will be sent to the common lock (if one is mapped). If both a room lock and a common lock are mapped, the booking will be sent to both. The room lock and the common lock will use the same PIN. Multiple common locks can be specified with a space between each of the lock mapping codes.
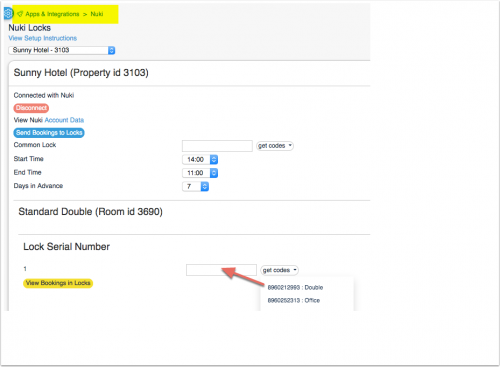
- Click on "Get Codes"
You will see one identifier and name for each lock. Select the correct lock and save.
For each room/unit click on the name of the lock that is associated with the room.
Step 4: Set up an Auto Action Email to send the PIN to guests
- Go to (SETTINGS) GUEST MANAGEMENT > AUTO ACTIONS. A template is available which you can further customize. Use the context help (?Icons) in the Auto Action and on the help page (click on HELP in the top right menu) for further instructions.
- Create an Auto Action Email which includes the template variable for the pin which is [BOOKINGINFOCODETEXT:NUKI_PIN].
Step 5: Activation
- Tick "Code" if you grant access via keypad
- Tick "App" if you grand access via the Nuki app
- Tick "Code" and "App" if you grant access both via keypad and via the Nuki app
5 How it works
5.1 Syncing
Bookings are automatically sent to locks the number of "Days in Advance" prior to check-in which you have selected.
Entry codes/users can only be used during the booking period, they will not provide access before or after.
- Updates to locks are sent periodically. To instantly send updates, click "Send Bookings to Locks".
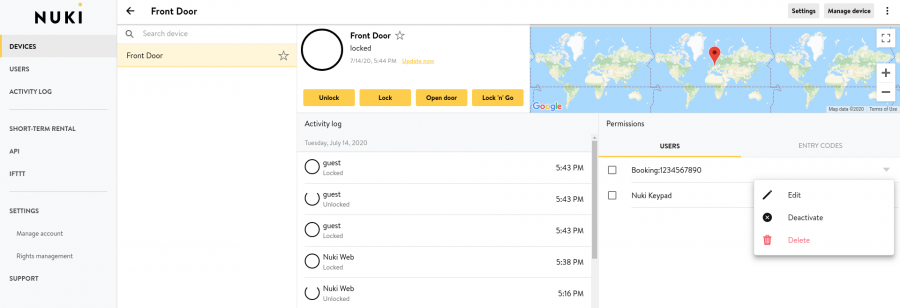
- An entry code/user named Booking:{booking number} is added to the lock. Click on the "View Bookings in Locks" button to check which bookings have already been sent. You can also see bookings on web.nuki.io or in the Nuki app.
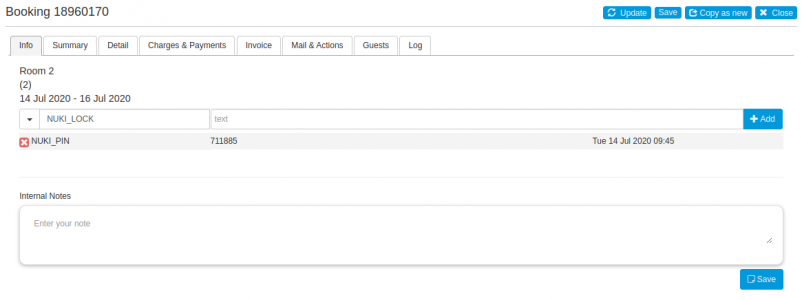
- A booking info code named NUKI_PIN is created on the "Info" tab of the booking, this will show the access code for the booking.
- If a keypad code, booking date, or room changes, those details will be sent to locks.
- If a booking is cancelled, the associated entry code or user will be deleted from locks.
- The associated entry code or user of a booking sent from Beds24 will be removed one day after check-out.
If a Nuki lock is offline when an update is sent, the entry code will not be added until the lock comes online again.
5.2 App and code entry methods
There are two ways bookings can be sent to locks: app and code. You can select one or both methods.
5.2.1 App entry
If the "App' tickbox is selected, bookings will be sent to locks as users.
- Nuki will send guests an email containing an invitation, guests who accept this invitation will be able to unlock the Nuki lock using the Nuki app.
- Guests have 48 hours to accept the invitation.
- There is no way to resend a Nuki app invitation if a guest does not accept it in time. However, you may go to web.nuki.io, select Devices, click the desired smartlock, go to the Users tab, then find the booking and click delete. You can then visit the Beds24 Nuki integration at (SETTINGS) APPS & INTEGRATIONS > NUKI and click "Send bookings to Locks". This will cause Nuki to create a new user and send a new invitation to the guest.
- When the user is deleted from the lock, Nuki will send an email to the guest informing them that they no longer have access to the lock.
5.2.1.1 Allow remote app access
By default guests must be physically close to the lock to unlock it with the app.
The "Allow remote app access" will allow guests to use the app to unlock a lock from anywhere.
- If set to "Yes", all bookings in the room will be allowed to use remote app access.
- If set to "Info code", bookings with the info code "NUKI_REMOTE" will be allowed to use remote app access.
5.2.2 Code entry
If the "Code" tickbox is selected, bookings will be sent to locks as entry codes.
Guests will need to enter these codes on a Nuki keypad to unlock the associated Nuki lock.
5.2.3 Manually changing codes
- Navigate to (SETTINGS) ACCOUNT > PREFERENCES "Bookings" and add "NUKI_PIN" to your Booking Info Code Values.
- You can now manually add a NUKI_PIN info code to your bookings.
Nuki keypad codes must:
- Be exactly six digits long.
- Not contain the number zero.
- Not start with "12".
- Be unique to the lock.
If you manually set an invalid NUKI_PIN, it will be overwritten with a randomly generated pin the next time bookings are sent to locks. Each code can only be used once per lock. Before you can reuse a code it has to be removed from the lock.
5.3 Custom Start and End access times
The access start and end times can be customized per booking using booking info codes.
A booking info code ACCESS_STARTTIME with a time of day (23:59 format) as the text will override the default start time.
A booking info code ACCESS_ENDTIME with a time of day (23:59 format) as the text will override the default end time.
Start and end dates can be set relative to the check in and check out date by defining times greater than 24 or negative.
For example :- ACCESS_STARTTIME = -10:00 will create a start time 10 hours before midnight of the check in day, i.e. 14:00 on the day before check in.
- Booking Info code = ACCESS_STARTTIME
- Booking Info Text = -10:00
For example :- ACCESS_ENDTIME = 34:00 will create an end time of 10:00 one day after checkout (34 = 24 + 10 hours)
- Booking Info code = ACCESS_STARTTIME
- Booking Info Text = 34:00
6 Troubleshooting
Bookings are not being sent to locks and cannot be viewed by clicking the view bookings in locks button
Your account may not be properly authenticated.
1. Click "Disconnect"
2. Click "Connect to Nuki"
3. Sign in to your Nuki account if prompted and allow Beds24 access.
User not found
There is an issue with the email used in Nuki.io, please contact Nuki and ask them to assist with resolving the issue.
Keypad codes are not being generated when I use a common lock
If you are sending bookings to multiple locks and want to use keypad codes, every lock must have a keypad paired to it.
7 Disconnect
Click on "Disconnect" to terminate the connection.


