Category:Sub Account: Difference between revisions
Pierrebecher (talk | contribs) No edit summary |
No edit summary |
||
| (80 intermediate revisions by 4 users not shown) | |||
| Line 2: | Line 2: | ||
[[Category:Agents]] | [[Category:Agents]] | ||
[[Category:Customise_Control_Panel]] | [[Category:Customise_Control_Panel]] | ||
<div class="heading">Account Management</div> | |||
This page is about the menu Account Management (Click on the 'User' icon on the top right and then on 'Account Management, in the old control panel SUB ACCOUNT in the top right) | |||
Each account can have sub accounts with a unique username and password. Sub accounts can be given restricted or full access to other accounts or individual properties. A sub account can also contain | = Multiple user accounts= | ||
Each account can have sub accounts with a unique username and password. Sub accounts can be given restricted or full access to other accounts or individual properties. A sub account can also contain its own properties. | |||
Only one person at a time can log in to any account or sub account. | Only one person at a time can log in to any account or sub account. | ||
A property is always owned by one account or sub account but it can be set up to be accessed from other accounts. It inherits its account level settings from this owner account. Therefore a property should be owned by the account which manages the property and whose Email address is used to send out confirmation messages and other system Emails. | |||
A property is always owned by one account or sub account but it can be set up to be accessed from other accounts. It inherits | |||
*If a property is managed mainly in the master account and the sub account just needs access to see certain information or to perform certain tasks it should be owned by the master account. In this case sub accounts are given access to the property. | *If a property is managed mainly in the master account and the sub account just needs access to see certain information or to perform certain tasks it should be owned by the master account. In this case sub accounts are given access to the property. | ||
| Line 27: | Line 27: | ||
[[Media:Sub-Account-Settings.png|view large]] | [[Media:Sub-Account-Settings.png|view large]] | ||
= Create a Sub Account = | |||
Click on the 'User' icon on the top right and then on 'Account Management (in the old control panel SUB ACCOUNT in the top right) | Click on the 'User' icon on the top right and then on 'Account Management (in the old control panel SUB ACCOUNT in the top right) | ||
*"CREATE NEW SUB ACCOUNT". | |||
*Enter username password and Email. | |||
* | You can also [[Integromat.com#Create_a_Subaccount_from_a_Google_Form|create a subaccount via MAKE]]. | ||
*Scroll down to 'Account Settings' | |||
*Assign the ROLE for Sub Account | *Assign the ROLE for Sub Account | ||
| Line 38: | Line 41: | ||
The "Role" determines access rights: | The "Role" determines access rights: | ||
*Admin: all rights | *Admin: all rights | ||
*Accountant: Access to REPORTS - > STANDARD REPORTS "Financial Reports" and read only access to the bookings in the CALENDAR. | |||
*Agent: Access to the CALENDAR only and can change their password. In BOOKINGS they can see the list and the calendar but no financial information in the booking. Can add and manage own bookings if he has write access to a property. Bookings from other sources only show as blocked dates. Any rooms with a sell priority less than 10 are hidden. This allows the creation of rooms "hidden" from the agent. | |||
*Agent 2: Access to the CALENDAR and BOOKINGS only and can change their password. In BOOKINGS they can see the list and the calendar but no financial information in the booking. Can add and manage own bookings and prices if he has write access to a property. Bookings from other sources only show as blocked dates. Any rooms with a sell priority less than 10 are hidden. This allows the creation of rooms "hidden" from the agent. | |||
*Agent 3: Access to the DASHBOARD, CALENDAR, and BOOKINGS only and can change their password. Can add and manage own bookings and prices if he has write access to a property. Bookings from other sources only show as blocked dates. Any rooms with a sell priority less than 10 are hidden. This allows the creation of rooms "hidden" from the agent. | |||
*Back Office: All parts of the control panel can be seen and edited except for "SETTINGS" . | |||
*Back Office 2: All parts of the control panel can be seen and edited. "SETTINGS" are "read only". | |||
*Channelmanager: Access to DASHBOARD, CALENDAR, BOOKINGS, PRICES, in SETTINGS they can see property setting, room setting, channel settings and marketplace . | |||
*Cleaner: Read only access to bookings in the CALENDAR and the DASHBOARD. Access to standard reports "Cleaning", "Daily Activity", "Cleaning Brief" and "Daily Unit Activity". | |||
*Cleaner Manager: Read only access to bookings in the CALENDAR and the DASHBOARD. Can open the booking and see details. Access to standard reports "Arrival", "Departure", "Current Guests", "Cleaning", "Daily Activity", "Cleaning Brief" and "Daily Unit Activity". | |||
*Co Master: all rights to the properties which the sub account owns and to which the sub account has access; access to the master accounts sub account menu; can change sub accounts in the master account and create sub accounts in the master account but does not have sub accounts of it own. | *Co Master: all rights to the properties which the sub account owns and to which the sub account has access; access to the master accounts sub account menu; can change sub accounts in the master account and create sub accounts in the master account but does not have sub accounts of it own. | ||
* | *Front Desk: Has read and write rights for BOOKINGS an STANDARD REPORTS. No access to SETTINGS, CUSTOM REPORTS and Standard reports with revenue information. Read only access to all other areas. | ||
*Front Desk 2: Has read only access to all areas of the control panel. Has read and write rights for BOOKINGS. | |||
*Limited Access: Access to SUPPORT only. | |||
*No Access: This role can be used to block a sub accounts access. | |||
*No Credit Card: all rights but no access to credit cards. | *No Credit Card: all rights but no access to credit cards. | ||
* | *Owner: Access to the DASHBOARD, CALENDAR and BOOKINGS only. In BOOKINGS they can see the list and the calendar but no financial information in the booking. Can add and manage own bookings if he has write access to a property. Bookings from other sources only show as blocked dates. Any rooms with a sell priority less than 10 are hidden. This allows the creation of rooms "hidden" from the owner. | ||
*Read Only: All parts of the control panel can be seen but not changed. | *Read Only: All parts of the control panel can be seen but not changed. | ||
* | *Sub Master: all rights to the properties which the sub account owns and to which the sub account has access; can have sub accounts of its own. | ||
*Sub Reseller: A Sub Master who can also resell. Send a support ticket if you want to use this role. | |||
* | |||
<span style="color: #f3e504; font-size: 250%;" >{{#fas:lightbulb}} </span> The following roles have access to credit card details: "Admin", "Read Only", "Back Office" and "Front Desk". Credit card access is set per property. See further down how to allow credit card access for a property. To prohibit credit card access enter the word ''creditcard'' in "Hide menu pages". | |||
| Line 113: | Line 118: | ||
* Guest Management > Auto Actions (visible when you select the account to clone from) | * Guest Management > Auto Actions (visible when you select the account to clone from) | ||
* Guest Management > Invoicee (visible when you select the account to clone from) | * Guest Management > Invoicee (visible when you select the account to clone from) | ||
===Specify Access Rights=== | ===Specify Access Rights=== | ||
| Line 140: | Line 125: | ||
*Booking Linking: defines if the bookings from the property are hidden, visible in read-only mode or visible with write access. | *Booking Linking: defines if the bookings from the property are hidden, visible in read-only mode or visible with write access. | ||
<span style="color:#fe746c;“ >{{#fas:exclamation-triangle}} </span> If you include bookings from another property you will also need to allow "Booking Linking" from the property which owns the booking to see them. | |||
=== Hide Menus and/or Settings from Sub Account or make them read only=== | === Hide Menus and/or Settings from Sub Account or make them read only=== | ||
| Line 152: | Line 137: | ||
To apply the limitations to all sub accounts use the "Global Sub Account Settings" under "Account List" | To apply the limitations to all sub accounts use the "Global Sub Account Settings" under "Account List" | ||
<span style="color: #f3e504; font-size: 250%;" >{{#fas:lightbulb}} </span> If you limit settings for all sub account you can make them visible and/or readable selected sub account by adding a ! symbol in front of the page/setting which is globally hidden. You might need to enter the code in both "Read Only Menu Pages" and "Hide Menu Pages" to make them visible and writeable. | |||
Example: The entry '''dashboard''' in "Hide menu pages" in "Global Sub Account Settings" will hide the dashboard page from all sub accounts. If you enter '''!dashboard''' in the "Hide menu pages" for an individual sub account they will see the dashboard. | Example: The entry '''dashboard''' in "Hide menu pages" in "Global Sub Account Settings" will hide the dashboard page from all sub accounts. If you enter '''!dashboard''' in the "Hide menu pages" for an individual sub account they will see the dashboard. | ||
| Line 168: | Line 153: | ||
<i>settings</i> - hides the menu 'Settings' | <i>settings</i> - hides the menu 'Settings' | ||
<i>settings,rates</i> - hides the menus 'Settings' | <i>settings,rates,messages</i> - hides the menus 'Settings', 'Fixed Prices' and 'Messages' | ||
<i>reports</i> - hides the sub menu 'Standard Reports' from the drop-down menu 'Reports' | <i>reports</i> - hides the sub menu 'Standard Reports' from the drop-down menu 'Reports' | ||
| Line 177: | Line 160: | ||
<i>reportlogs2</i> - hides the sub menu 'Booking Page Log' from the drop-down menu 'Reports' | <i>reportlogs2</i> - hides the sub menu 'Booking Page Log' from the drop-down menu 'Reports' | ||
<i>reportactivity</i> - hides the sub menu 'Activity Log' from the drop-down menu 'Reports' | |||
<i>messages</i> - hides the menu 'Messages' | |||
==== Hide individual settings ==== | ==== Hide individual settings ==== | ||
| Line 185: | Line 172: | ||
*Click on "Hide" | *Click on "Hide" | ||
<span style="color: #f3e504; font-size: 250%;" >{{#fas:lightbulb}} </span> If the copy icon is not available for all settings. Contact us if you want to hide a setting which does not have a copy icon. | |||
==== Hide specific tabs or sub menus from menu pages ==== | ==== Hide specific tabs or sub menus from menu pages ==== | ||
| Line 193: | Line 180: | ||
</i> | </i> | ||
===== | ===== Fixed Prices ===== | ||
<i> | <i> | ||
rates-list | rates-list | ||
| Line 220: | Line 207: | ||
bookedit-mail | bookedit-mail | ||
bookedit-messages | |||
</i> | </i> | ||
===== | ===== Fixed Prices popup ===== | ||
<i> | <i>rateedit-rooms | ||
rateedit-rooms | |||
rateedit-discounts | rateedit-discounts | ||
| Line 232: | Line 221: | ||
rateedit-channels | rateedit-channels | ||
</i> | </i> | ||
==== Hide individual standard reports ==== | ==== Hide individual standard reports ==== | ||
| Line 239: | Line 227: | ||
reports-guestsandhousekeeping - hide all guests and housekeeping report | reports-guestsandhousekeeping - hide all guests and housekeeping report | ||
reports-occupancy - | reports-occupancy - hides all occupancy reports | ||
reports-financial - | reports-financial - hides all financial reports | ||
reports-invoices - | reports-invoices - hides all invoice reports | ||
reports-payments - | reports-payments - hides all payments reports | ||
reports-monthlyrevenue - | reports-monthlyrevenue - hides all monthly reports | ||
reports-charges - hides all charges reports | |||
reports-arrivals | reports-arrivals | ||
reports- | reports-cleaning | ||
reports-cleaningbrief | |||
reports-currentguests | |||
reports-country | |||
reports-dailyactivity | reports-dailyactivity | ||
| Line 259: | Line 255: | ||
reports-dailyunitnotes | reports-dailyunitnotes | ||
reports- | reports-departures | ||
reports-occupancy | reports-occupancy | ||
</i> | </i> | ||
| Line 283: | Line 265: | ||
Log into the sub account, go to the calendar and untick all the options you don't want. Log out and log into the master account. Go to the 'Sub Accounts' menu and click on 'Manage Account' for the sub account. Add the following code in the field "Control panel custom CSS": | Log into the sub account, go to the calendar and untick all the options you don't want. Log out and log into the master account. Go to the 'Sub Accounts' menu and click on 'Manage Account' for the sub account. Add the following code in the field "Control panel custom CSS": | ||
<code>.dashgridshowfilter{display:none;}</code> | |||
This hides the 'Show' drop-down function in the sub account. The user can only see the options that you have left ticked and they can't tick them back on because the drop-down is not there anymore. | This hides the 'Show' drop-down function in the sub account. The user can only see the options that you have left ticked and they can't tick them back on because the drop-down is not there anymore. | ||
| Line 291: | Line 273: | ||
Go to SUB ACCOUNTS and add the following code in the field "Control panel custom CSS" for the sub account: | Go to SUB ACCOUNTS and add the following code in the field "Control panel custom CSS" for the sub account: | ||
<code>.pagetypeajaxbookedit .b24btn_Delete{display: none}</code> | |||
===== Hide the 'Add Booking' button (suitcase icon) in the calendar ===== | ===== Hide the 'Add Booking' button (suitcase icon) in the calendar ===== | ||
Go to SUB ACCOUNTS and add the following code in the field "Control panel custom CSS" for the sub account: | Go to SUB ACCOUNTS and add the following code in the field "Control panel custom CSS" for the sub account: | ||
<code>.icon-suitcase, .b24btn_AddBooking{display:none}</code> | |||
===== Hide the'Add Booking' button at the top of the control panel ===== | |||
=== | Go to SUB ACCOUNTS and add the following code in the field "Control panel custom CSS" for the sub account: | ||
<code>.b24btn_AddBooking{display:none}</code> | |||
===== Hide the'Feedback' button ===== | |||
<code>#feedbackButton {display: none !important;}</code> | |||
<span style="color: #f3e504; font-size: 150%;" >{{#fas:lightbulb}} </span> For more possibilities using custom CSS have a look at this page: [https://wiki.beds24.com/index.php/Custom_CSS Custom CSS] | |||
===== Hide 'Overview tab ===== | |||
Go to SUB ACCOUNTS and add the following code in the field "Control panel custom CSS" for the sub account: | |||
<code> .gotobookingoverview{display:none;}</code> | |||
=== Set Sub Account to send Email from their own Email Address === | === Set Sub Account to send Email from their own Email Address === | ||
*Log into the sub account and go SETTINGS | *Log into the sub account and go {{#fas:cog}} (SETTINGS) ACCOUNT > OUTGOING EMAIL. Set the system up to use the sub accounts Email address following the instructions (click on HELP in the top right menu). | ||
*Go to SUB ACCOUNTS | *Go to SUB ACCOUNTS | ||
*Click on Manage Account | *Click on Manage Account | ||
| Line 326: | Line 316: | ||
When you click on "Manage Account" you can also create messages for individual sub accounts. | When you click on "Manage Account" you can also create messages for individual sub accounts. | ||
=== Delete a Sub Account === | === Delete a Sub Account === | ||
| Line 342: | Line 323: | ||
It is only possible to delete a sub account if they have no Auto Actions. | It is only possible to delete a sub account if they have no Auto Actions. | ||
*Go to SETTINGS | *Go to {{#fas:cog}} (SETTINGS) GUEST MANAGEMENT > AUTO ACTIONS | ||
*Click 'Edit' open the Auto Action | *Click 'Edit' open the Auto Action | ||
*Click 'Delete' | *Click 'Delete' | ||
Once the properties/bookings/auto actions are deleted then | Once the properties/bookings/auto actions are deleted then | ||
*Go to | *Go to ACCOUNT MANAGEMENT (user icon) | ||
*Click on 'Manage Account' for the Sub Account, | *Click on 'Manage Account' for the Sub Account, | ||
*Scroll to the bottom of the page | *Scroll to the bottom of the page | ||
*Click 'Delete' sub account. | *Click 'Delete' sub account. | ||
== Make a Property available in | =Property Access= | ||
== Make a Property available in a related account (sub account) == | |||
*Click on ACCOUNT LIST | *Click on ACCOUNT LIST | ||
*Click on MANAGE ACCOUNT for the | *Click on MANAGE ACCOUNT for the account which owns the property | ||
*Click on MANAGE PROPERTY for the property | |||
*Go to "Make Property Available in Multiple Accounts" | |||
*Scroll down to the sub account. | |||
*Select the access rights, Writeable, Read-only or Hide. | |||
*Click SAVE. | |||
<span style="color:#fe746c;“ >{{#fas:exclamation-triangle}} </span> Required if you have Auto Actions in the Master Account that you want to trigger across multiple accounts/properties. | |||
In Auto Action : Trigger Tab > Property = 'All visible in account' | |||
== Remove access to a property== | |||
*Click on ACCOUNT LIST | |||
*Click on MANAGE ACCOUNT for the account which owns the property | |||
*Click on MANAGE PROPERTY for the property you want to remove access for the sub account. | |||
*Go to "Make Property Available in Multiple Accounts" click 'REMOVE' then SAVE | |||
== Make a Property available in another (external) account which is not related == | |||
*Click on ACCOUNT LIST | |||
*Click on MANAGE ACCOUNT for the account which owns the property | |||
*Click on MANAGE PROPERTY for the Property | *Click on MANAGE PROPERTY for the Property | ||
* | *Go to "Make Property Available in Multiple Accounts" | ||
*In the "Make Property Available With Association Code" field add the "Association Code" of the external accounts which should access the property. | |||
The external account can find their association code in SETTINGS | The external account can find their association code in {{#fas:cog}} (SETTINGS) ACCOUNT. | ||
== Inter Property Linking == | == Inter Property Linking == | ||
* Click on | *Click on ACCOUNT LIST | ||
*Click on MANAGE ACCOUNT for the for the account which owns the property | |||
*Click on MANAGE PROPERTY for the Property | |||
*Go to Property Settings > Room Linking | |||
Certain items like | Certain items like Fixed Prices and room dependency settings can be linked with other rooms. | ||
The Inter Property Linking settings controls the ability of this property to link with other properties. | The Inter Property Linking settings controls the ability of this property to link with other properties. | ||
| Line 371: | Line 375: | ||
* All - The properties rooms can link with all properties available in the owner account. | * All - The properties rooms can link with all properties available in the owner account. | ||
== | == Allow Sub Accounts to View Credit Card Details == | ||
This is set per property. | |||
*Click on MANAGE ACCOUNT for the | |||
*Click on MANAGE ACCOUNT for the Master Account, to see the property list. | |||
In the "Property List" | |||
*click on "MANAGE PROPERTY" and set "View Credit Cards" = Owner and linked accounts. | |||
= Clone Properties or Property Settings = | |||
Settings from one property can be applied to one or more properties in a sub account. | Settings from one property can be applied to one or more properties in a sub account. | ||
Click on "Manage Account" and then on "Clone Property Settings" and select which settings from which property should be copied to others. | Click on "Manage Account" and then on "Clone Property Settings" and select which settings from which property should be copied to others. | ||
Settings from one property can be applied to another property. | Settings from one property can be applied to another property. | ||
| Line 389: | Line 392: | ||
Go to the list of Sub Accounts, | Go to the list of Sub Accounts, | ||
*Click on | *Click on MANAGE ACCOUNT | ||
*Click on | *Click on CLONE PROPERTY SETTINGS | ||
and scroll down through the settings, tick the appropriate settings. | and scroll down through the settings, tick the appropriate settings. | ||
| Line 405: | Line 408: | ||
* Guest Management | * Guest Management | ||
= Move Properties to a different Account = | |||
*Click on ACCOUNT LIST | *Click on ACCOUNT LIST | ||
*Click on MANAGE ACCOUNT for the Master Account | *Click on MANAGE ACCOUNT for the Master Account | ||
| Line 411: | Line 414: | ||
*Change the owner account of the property. | *Change the owner account of the property. | ||
= Move Rooms to a different Property = | |||
*Click on ACCOUNT LIST | *Click on ACCOUNT LIST | ||
*Click on MANAGE ACCOUNT for the | *Click on MANAGE ACCOUNT for the owner account of the property. | ||
*Click on MANAGE PROPERTY for the Property | *Click on MANAGE PROPERTY for the Property | ||
*Click on MANAGE ROOM for the Room | *Click on MANAGE ROOM for the Room | ||
*Select the property to move to (from the list in PROPERTY) | *Select the property to move to (from the list in PROPERTY) | ||
= Delete a Property= | |||
You need to delete the property from the Account that owns the Property | You need to delete the property from the Account that owns the Property | ||
| Line 429: | Line 431: | ||
Please Note : You will need to cancel or move upcoming bookings first. | Please Note : You will need to cancel or move upcoming bookings first. | ||
= Manage Bookings in a Property (Change status/delete/move) = | |||
It is possible to change the status of all bookings in a property. | It is possible to change the status of all bookings in a property. | ||
It is possible to delete all bookings from a property. | It is possible to delete all bookings from a property. | ||
| Line 447: | Line 448: | ||
To delete bookings from a Property, you will have to set to Cancelled first. | To delete bookings from a Property, you will have to set to Cancelled first. | ||
= Delete Fixed Prices in a Property = | |||
* Click on ACCOUNT LIST | * Click on ACCOUNT LIST | ||
* Click on MANAGE ACCOUNT (owner of the property) | * Click on MANAGE ACCOUNT (owner of the property) | ||
* Go to "Property List" click on "MANAGE PROPERTY" | * Go to "Property List" click on "MANAGE PROPERTY" | ||
* Click on Manage Room | * Click on Manage Room | ||
* Scroll to | * Scroll to Fixed Prices | ||
* Delete | * Delete Fixed Price, select the Prices to Delete | ||
= Add Custom Control Panel Menu links= | |||
Click on the {{#fas:user}} 'User' icon on the top right and then on 'Account Management (in the old control panel SUB ACCOUNT in the top right) | |||
You can set Custom Control panel menus for All accounts or individual accounts. | |||
To apply a custom option to all accounts, scroll down to 'Custom Control Panel Menu' | |||
*Click on '</>' symbol | |||
**Enter the name and URL | **Enter the name and URL | ||
**Click Save | **Click Save | ||
To add multiple links, you can show side by side, so enter the details and click link, and then a space and another link. | To add multiple links, you can show side by side, so enter the details and click link, and then a space and another link. | ||
Or enter each link on an individual line, enter the first, then click return and enter the next in the line below. | Or enter each link on an individual line, enter the first, then click return and enter the next in the line below. | ||
== Custom Tab in Bookings | A good option to add to this section is the QR code for the Beds24 App for users that do not have permissions to the Settings > Marketplace menu. | ||
<code><a href="https://beds24.com/control3.php?pagetype=mobileapp">Mobile App</a></code> | |||
The details below is a link to Google translate and the Beds24 Mobile app | |||
<code><a href="http://translate.google.com">Translate</a> <a href="https://beds24.com/control3.php?pagetype=mobileapp">Mobile App</a></code> | |||
If you want to customise the links for specific Sub accounts, first click 'Manage account' for the Sub account, (Account List) then scroll down and you can add a "Custom Control Panel Menu" via a HTML link to the top left of the control panel. | |||
=Add the QR code to the Beds24 Control Panel= | |||
You can incorporate a link into the Control Panel Header, allowing easy access from your account. | |||
Click on the {{#fas:user}} 'User' icon on the top right and then on 'Account Management (in the old control panel SUB ACCOUNT in the top right) > Manage Account for the sub account, then scroll down to Custom Control Panel Menu. Click on the code </> button and paste the following details: | |||
<code><a href="https://beds24.com/control3.php?pagetype=mobileapp">Mobile App</a></code> | |||
The link will show in the top left of the user Control panel. | |||
= Custom Tab in Bookings= | |||
In SUB ACCOUNT (Account List) you can add a custom tab to bookings. | In SUB ACCOUNT (Account List) you can add a custom tab to bookings. | ||
| Line 491: | Line 513: | ||
in "Hide menu pages" | in "Hide menu pages" | ||
===Example for Custom Tab === | |||
Click 'Edit' then add the text and template variables as you want to show on the Custom Tab in the booking. | |||
[GUESTTITLE] [GUESTFIRSTNAME] - [GUESTNAME] | |||
Check in : [FIRSTNIGHT] Checkout : [LEAVINGDAY] | |||
Note: [GUESTARRIVALTIME] | |||
Rooms : [ROOMNAMESNCBR] | |||
Fixed Price Details : [RATEDESCBR] | |||
Invoice Details : [INVOICETABLE2] | |||
Pending Payments : [INVOICEPENDPAY] Due date : [INVOICEPENDPAYNEXTDATE] | |||
Latest revision as of 19:08, 17 September 2025
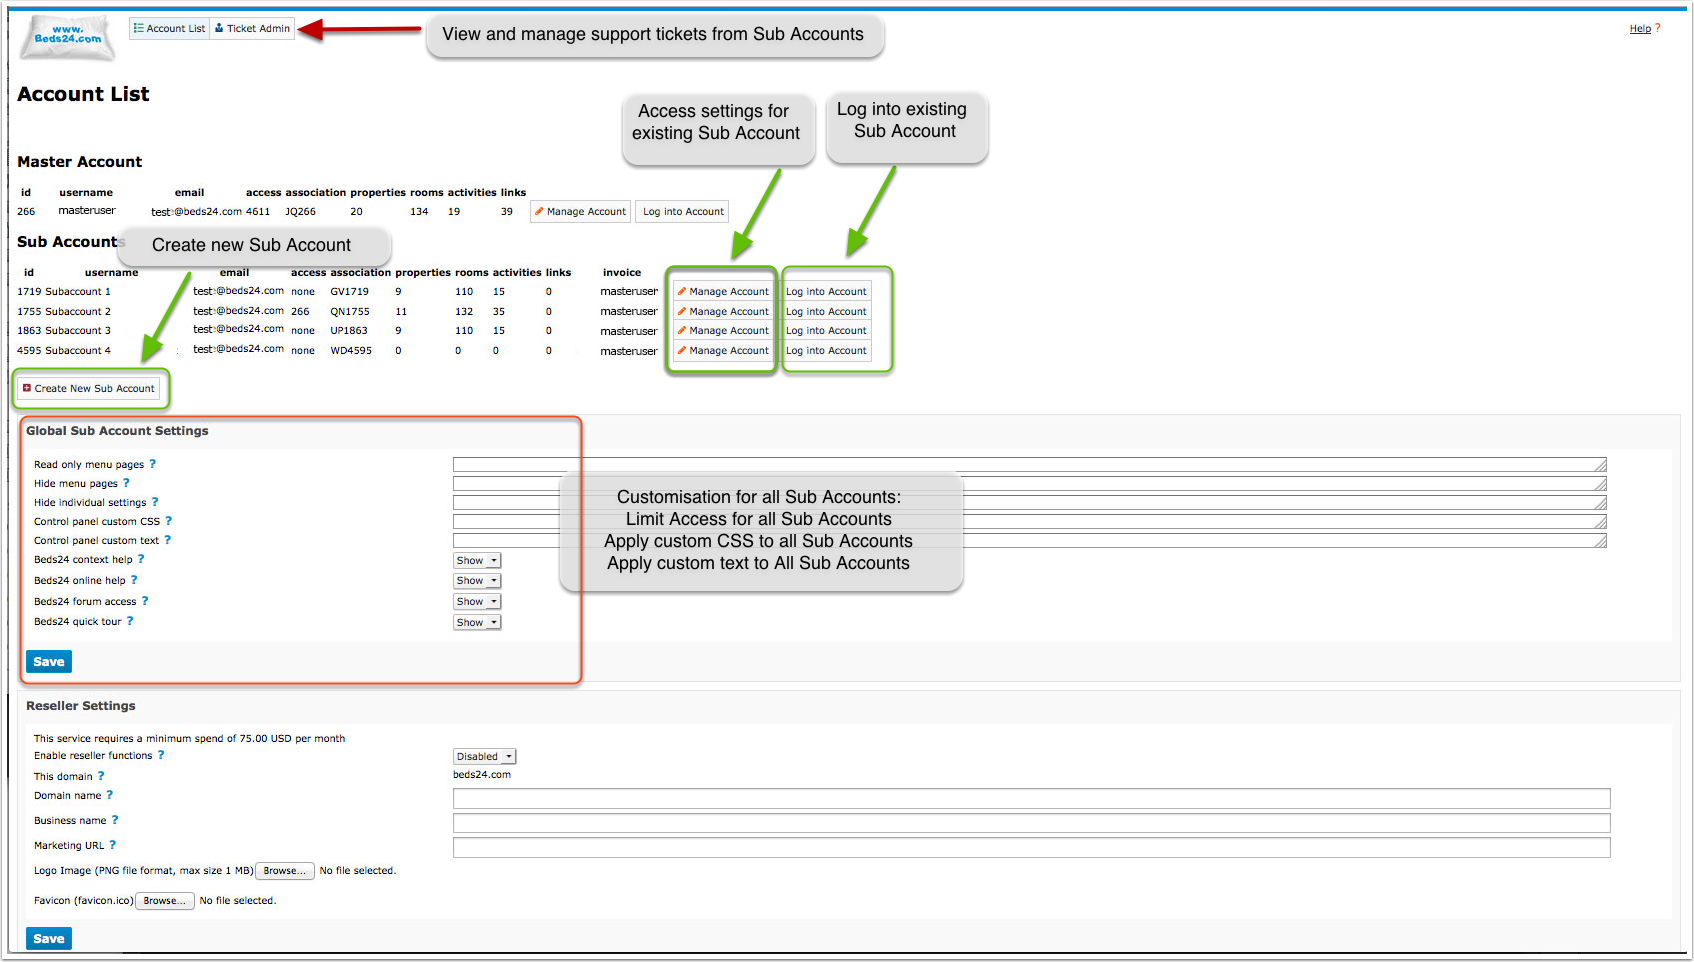
This page is about the menu Account Management (Click on the 'User' icon on the top right and then on 'Account Management, in the old control panel SUB ACCOUNT in the top right)
Multiple user accounts
Each account can have sub accounts with a unique username and password. Sub accounts can be given restricted or full access to other accounts or individual properties. A sub account can also contain its own properties.
Only one person at a time can log in to any account or sub account.
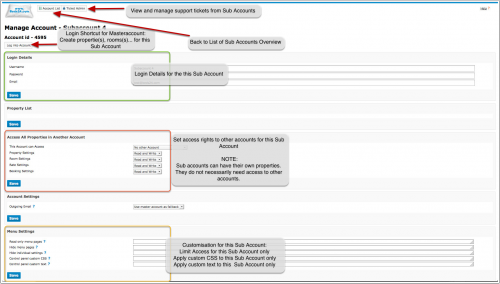
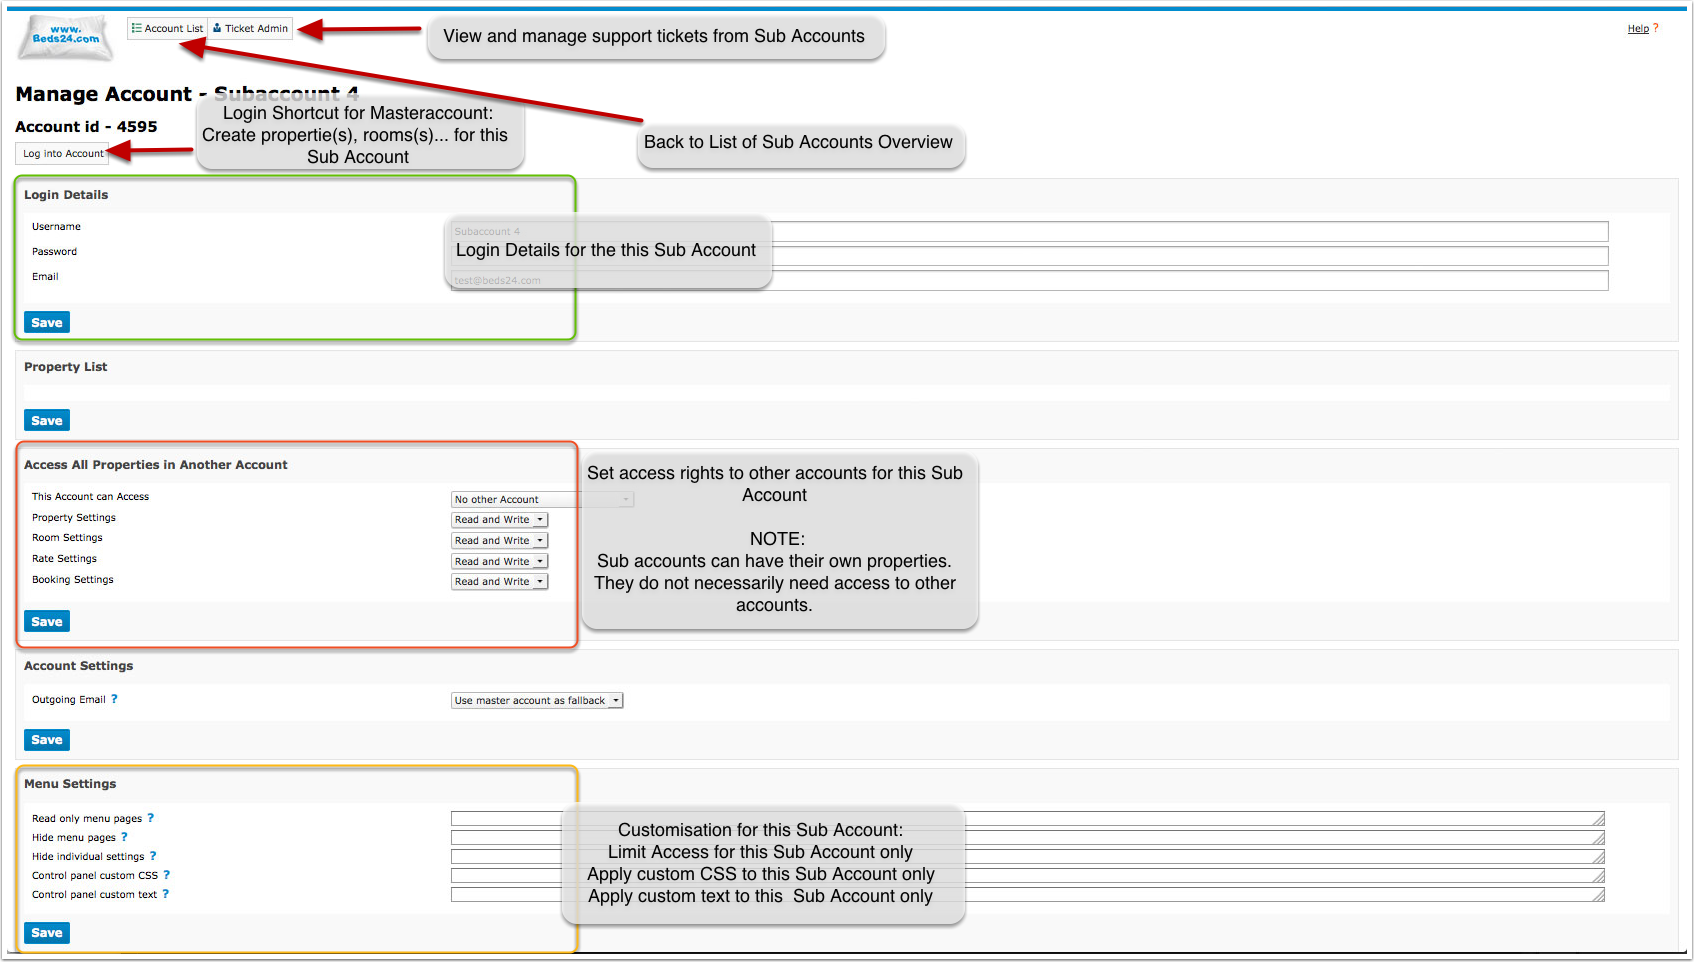
A property is always owned by one account or sub account but it can be set up to be accessed from other accounts. It inherits its account level settings from this owner account. Therefore a property should be owned by the account which manages the property and whose Email address is used to send out confirmation messages and other system Emails.
- If a property is managed mainly in the master account and the sub account just needs access to see certain information or to perform certain tasks it should be owned by the master account. In this case sub accounts are given access to the property.
- If a property is managed mainly by the sub account and the master accounts just needs access it should be owned by the sub account. In this case the master account is given access to the property.
Click on the 'User' icon on the top right and then on 'Account Management (in the old control panel SUB ACCOUNT in the top right) to create new sub accounts or manage existing sub accounts
Global sub account settings apply to all sub accounts in one master account
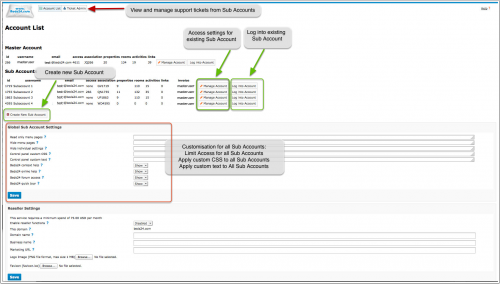
Click on "Manage" to apply settings to an individual sub account
Create a Sub Account
Click on the 'User' icon on the top right and then on 'Account Management (in the old control panel SUB ACCOUNT in the top right)
- "CREATE NEW SUB ACCOUNT".
- Enter username password and Email.
You can also create a subaccount via MAKE.
- Scroll down to 'Account Settings'
- Assign the ROLE for Sub Account
The "Role" determines access rights:
- Admin: all rights
- Accountant: Access to REPORTS - > STANDARD REPORTS "Financial Reports" and read only access to the bookings in the CALENDAR.
- Agent: Access to the CALENDAR only and can change their password. In BOOKINGS they can see the list and the calendar but no financial information in the booking. Can add and manage own bookings if he has write access to a property. Bookings from other sources only show as blocked dates. Any rooms with a sell priority less than 10 are hidden. This allows the creation of rooms "hidden" from the agent.
- Agent 2: Access to the CALENDAR and BOOKINGS only and can change their password. In BOOKINGS they can see the list and the calendar but no financial information in the booking. Can add and manage own bookings and prices if he has write access to a property. Bookings from other sources only show as blocked dates. Any rooms with a sell priority less than 10 are hidden. This allows the creation of rooms "hidden" from the agent.
- Agent 3: Access to the DASHBOARD, CALENDAR, and BOOKINGS only and can change their password. Can add and manage own bookings and prices if he has write access to a property. Bookings from other sources only show as blocked dates. Any rooms with a sell priority less than 10 are hidden. This allows the creation of rooms "hidden" from the agent.
- Back Office: All parts of the control panel can be seen and edited except for "SETTINGS" .
- Back Office 2: All parts of the control panel can be seen and edited. "SETTINGS" are "read only".
- Channelmanager: Access to DASHBOARD, CALENDAR, BOOKINGS, PRICES, in SETTINGS they can see property setting, room setting, channel settings and marketplace .
- Cleaner: Read only access to bookings in the CALENDAR and the DASHBOARD. Access to standard reports "Cleaning", "Daily Activity", "Cleaning Brief" and "Daily Unit Activity".
- Cleaner Manager: Read only access to bookings in the CALENDAR and the DASHBOARD. Can open the booking and see details. Access to standard reports "Arrival", "Departure", "Current Guests", "Cleaning", "Daily Activity", "Cleaning Brief" and "Daily Unit Activity".
- Co Master: all rights to the properties which the sub account owns and to which the sub account has access; access to the master accounts sub account menu; can change sub accounts in the master account and create sub accounts in the master account but does not have sub accounts of it own.
- Front Desk: Has read and write rights for BOOKINGS an STANDARD REPORTS. No access to SETTINGS, CUSTOM REPORTS and Standard reports with revenue information. Read only access to all other areas.
- Front Desk 2: Has read only access to all areas of the control panel. Has read and write rights for BOOKINGS.
- Limited Access: Access to SUPPORT only.
- No Access: This role can be used to block a sub accounts access.
- No Credit Card: all rights but no access to credit cards.
- Owner: Access to the DASHBOARD, CALENDAR and BOOKINGS only. In BOOKINGS they can see the list and the calendar but no financial information in the booking. Can add and manage own bookings if he has write access to a property. Bookings from other sources only show as blocked dates. Any rooms with a sell priority less than 10 are hidden. This allows the creation of rooms "hidden" from the owner.
- Read Only: All parts of the control panel can be seen but not changed.
- Sub Master: all rights to the properties which the sub account owns and to which the sub account has access; can have sub accounts of its own.
- Sub Reseller: A Sub Master who can also resell. Send a support ticket if you want to use this role.
The following roles have access to credit card details: "Admin", "Read Only", "Back Office" and "Front Desk". Credit card access is set per property. See further down how to allow credit card access for a property. To prohibit credit card access enter the word creditcard in "Hide menu pages".
Settings below can be left as default and updated in sub account if ROLE has permissions, otherwise can be set by the Master Account.
- Allow Delete Bookings - set if you allow the sub account to delete bookings
- Outgoing Email - Set whether this sub account can use the master account outgoing email settings for sending email. Required if you want the sub account to send auto action emails.
- Support Tickets - Specify if the account can send support tickets and if so, who will answer them.
- Write Access Bookings - Set if this account can modify bookings created by other accounts
- Invoicee visibility - Invoicee visibility within bookings (all in Property owner or only those created in sub account)
- Include actions from - Include auto actions from another account, they will be visible in Bookings with 'Manual' trigger.
- Maximum Google Ads Commission = 999999 (default)
- Account
- Check Account Info
- Account Template Variables
- Preferences
- Control Panel
- Control Panel Calendar
- Bookings
- Highlight Colours
- Outgoing Email
- Setup the outgoing email service for the sub account, required to send emails from the sub account.
- Host Notifications
- can be set by Master account or in each Sub Account if ROLE allows access.
- Account Access
- Update Sub Account email address
- Required if sub account will be using API
Clone Account Settings
Click on "Clone Account Settings" button to select settings to apply from one account to another account/sub account.
It is possible to clone settings from one Account to a Sub Account
- Dashboard
- Account
- Account Access
- Account Preferences
- Outgoing Email
- Host Notifications
- Booking Page > Multiple Properties
- Booking Page > Internationalization
- Channel Manager
- Custom Reports
- Guest Management > Auto Actions (visible when you select the account to clone from)
- Guest Management > Invoicee (visible when you select the account to clone from)
Specify Access Rights
In ACCOUNT LIST-MANAGE ACCOUNT for the specific sub account you can specify the access rights:
- Control Panel: defines if the property is visible in the controls read-only mode or visible with write access.
- Inventory Linking: controls if the prices and availability can be linked. Values are visible in read-only mode or visible with write access.
- Booking Linking: defines if the bookings from the property are hidden, visible in read-only mode or visible with write access.
If you include bookings from another property you will also need to allow "Booking Linking" from the property which owns the booking to see them.
Hide Menus and/or Settings from Sub Account or make them read only
You can
- make whole pages "read only"
- hide whole pages
- hide individual settings
If you want to limit individual sub accounts click on "Manage Account" and use the settings there.
To apply the limitations to all sub accounts use the "Global Sub Account Settings" under "Account List"
If you limit settings for all sub account you can make them visible and/or readable selected sub account by adding a ! symbol in front of the page/setting which is globally hidden. You might need to enter the code in both "Read Only Menu Pages" and "Hide Menu Pages" to make them visible and writeable.
Example: The entry dashboard in "Hide menu pages" in "Global Sub Account Settings" will hide the dashboard page from all sub accounts. If you enter !dashboard in the "Hide menu pages" for an individual sub account they will see the dashboard.
- To find out the identifier of a page you can look at the URL. The identifier is the word after 'pagetype='.
- Enter the identifier here: Accounts Menu > Account List > Manage Account > Menu Settings > Hide menu pages
EXAMPLES:
synchroniser - hides ALL Channel Manager pages
syncroniserbookingcomxml - hides only the Booking.com channel manager page.
settings - hides the menu 'Settings'
settings,rates,messages - hides the menus 'Settings', 'Fixed Prices' and 'Messages'
reports - hides the sub menu 'Standard Reports' from the drop-down menu 'Reports'
reports2 - hides the sub menu 'Custom Reports' from the drop-down menu 'Reports'
reportlogs2 - hides the sub menu 'Booking Page Log' from the drop-down menu 'Reports'
reportactivity - hides the sub menu 'Activity Log' from the drop-down menu 'Reports'
messages - hides the menu 'Messages'
Hide individual settings
- Click on "Manage" for the sub account
- Click on "Login"
- Go to the setting you want to hide
- Click on the copy icon next to the setting
- Click on "Hide"
If the copy icon is not available for all settings. Contact us if you want to hide a setting which does not have a copy icon.
Bookings
bookings-calendar
Fixed Prices
rates-list
rates-calendar
rates-channels
Booking popup
bookedit-info
bookedit-summary
bookedit-detail
bookedit-charges
bookedit-invoice
bookedit-guest
bookedit-log
bookedit-mail
bookedit-messages
Fixed Prices popup
rateedit-rooms
rateedit-discounts
rateedit-upsell
rateedit-channels
Hide individual standard reports
Enter the following phrases in "Hide menu pages".
reports-guestsandhousekeeping - hide all guests and housekeeping report
reports-occupancy - hides all occupancy reports
reports-financial - hides all financial reports
reports-invoices - hides all invoice reports
reports-payments - hides all payments reports
reports-monthlyrevenue - hides all monthly reports
reports-charges - hides all charges reports
reports-arrivals
reports-cleaning
reports-cleaningbrief
reports-currentguests
reports-country
reports-dailyactivity
reports-dailyunitactivity
reports-dailyunitnotes
reports-departures
reports-occupancy
Hide certain functions
Hide the 'Show' options in the Calendar
Log into the sub account, go to the calendar and untick all the options you don't want. Log out and log into the master account. Go to the 'Sub Accounts' menu and click on 'Manage Account' for the sub account. Add the following code in the field "Control panel custom CSS":
.dashgridshowfilter{display:none;}
This hides the 'Show' drop-down function in the sub account. The user can only see the options that you have left ticked and they can't tick them back on because the drop-down is not there anymore.
Hide the 'Delete' button in the booking popup
Go to SUB ACCOUNTS and add the following code in the field "Control panel custom CSS" for the sub account:
.pagetypeajaxbookedit .b24btn_Delete{display: none}
Hide the 'Add Booking' button (suitcase icon) in the calendar
Go to SUB ACCOUNTS and add the following code in the field "Control panel custom CSS" for the sub account:
.icon-suitcase, .b24btn_AddBooking{display:none}
Hide the'Add Booking' button at the top of the control panel
Go to SUB ACCOUNTS and add the following code in the field "Control panel custom CSS" for the sub account:
.b24btn_AddBooking{display:none}
Hide the'Feedback' button
#feedbackButton {display: none !important;}
For more possibilities using custom CSS have a look at this page: Custom CSS
Hide 'Overview tab
Go to SUB ACCOUNTS and add the following code in the field "Control panel custom CSS" for the sub account:
.gotobookingoverview{display:none;}
Set Sub Account to send Email from their own Email Address
- Log into the sub account and go (SETTINGS) ACCOUNT > OUTGOING EMAIL. Set the system up to use the sub accounts Email address following the instructions (click on HELP in the top right menu).
- Go to SUB ACCOUNTS
- Click on Manage Account
- Go to Account Settings and set "Outgoing Email"= Never use Master Account or Use Master Account as Fallback.
Block Sub Accounts from sending SMS
Hide the menu pages by adding
automail.smsenable,owners.smsenable,owners.smsenable2
in "Hide menu pages".
Messages and Pop-up news to Sub Accounts
The function "Message to Account" allows to send information to all sub accounts.
When you click on "Manage Account" you can also create messages for individual sub accounts.
Delete a Sub Account
It is only possible to delete a sub account if the property they own has no future bookings, see the details in 'Manage Bookings in a Property' for more details.
It is only possible to delete a sub account if they have no Auto Actions.
- Go to (SETTINGS) GUEST MANAGEMENT > AUTO ACTIONS
- Click 'Edit' open the Auto Action
- Click 'Delete'
Once the properties/bookings/auto actions are deleted then
- Go to ACCOUNT MANAGEMENT (user icon)
- Click on 'Manage Account' for the Sub Account,
- Scroll to the bottom of the page
- Click 'Delete' sub account.
Property Access
- Click on ACCOUNT LIST
- Click on MANAGE ACCOUNT for the account which owns the property
- Click on MANAGE PROPERTY for the property
- Go to "Make Property Available in Multiple Accounts"
- Scroll down to the sub account.
- Select the access rights, Writeable, Read-only or Hide.
- Click SAVE.
Required if you have Auto Actions in the Master Account that you want to trigger across multiple accounts/properties. In Auto Action : Trigger Tab > Property = 'All visible in account'
Remove access to a property
- Click on ACCOUNT LIST
- Click on MANAGE ACCOUNT for the account which owns the property
- Click on MANAGE PROPERTY for the property you want to remove access for the sub account.
- Go to "Make Property Available in Multiple Accounts" click 'REMOVE' then SAVE
- Click on ACCOUNT LIST
- Click on MANAGE ACCOUNT for the account which owns the property
- Click on MANAGE PROPERTY for the Property
- Go to "Make Property Available in Multiple Accounts"
- In the "Make Property Available With Association Code" field add the "Association Code" of the external accounts which should access the property.
The external account can find their association code in (SETTINGS) ACCOUNT.
Inter Property Linking
- Click on ACCOUNT LIST
- Click on MANAGE ACCOUNT for the for the account which owns the property
- Click on MANAGE PROPERTY for the Property
- Go to Property Settings > Room Linking
Certain items like Fixed Prices and room dependency settings can be linked with other rooms. The Inter Property Linking settings controls the ability of this property to link with other properties.
Possible values are:
- None - The properties rooms can only link with rooms in the same property.
- Same Owner Account - The properties rooms can only link with other properties owned by the same account.
- All - The properties rooms can link with all properties available in the owner account.
Allow Sub Accounts to View Credit Card Details
This is set per property.
- Click on MANAGE ACCOUNT for the Master Account, to see the property list.
In the "Property List"
- click on "MANAGE PROPERTY" and set "View Credit Cards" = Owner and linked accounts.
Clone Properties or Property Settings
Settings from one property can be applied to one or more properties in a sub account.
Click on "Manage Account" and then on "Clone Property Settings" and select which settings from which property should be copied to others.
Settings from one property can be applied to another property.
Go to the list of Sub Accounts,
- Click on MANAGE ACCOUNT
- Click on CLONE PROPERTY SETTINGS
and scroll down through the settings, tick the appropriate settings.
- Properties
- Booking Rules
- Booking Questions
- Upsell Items Note: pictures will not copy and need to be assigned manually
- Payment Collection
- Credit Cards
- Confirmation Messages
- Booking Page
- Guest Management
Move Properties to a different Account
- Click on ACCOUNT LIST
- Click on MANAGE ACCOUNT for the Master Account
- Click on MANAGE PROPERTY for the Property
- Change the owner account of the property.
Move Rooms to a different Property
- Click on ACCOUNT LIST
- Click on MANAGE ACCOUNT for the owner account of the property.
- Click on MANAGE PROPERTY for the Property
- Click on MANAGE ROOM for the Room
- Select the property to move to (from the list in PROPERTY)
Delete a Property
You need to delete the property from the Account that owns the Property
- Click on ACCOUNT LIST
- Click on MANAGE ACCOUNT (owner of the property)
- Go to "Property List" click on "MANAGE PROPERTY" for the property you want to delete
- Scroll to "Delete Property" select 'Delete property and All its rooms and bookings"
Please Note : You will need to cancel or move upcoming bookings first.
Manage Bookings in a Property (Change status/delete/move)
It is possible to change the status of all bookings in a property. It is possible to delete all bookings from a property. It is possible to move all bookings from a property.
- Click on ACCOUNT LIST
- Click on MANAGE ACCOUNT (owner of the property)
- Go to "Property List" click on "MANAGE PROPERTY"
- Click on Manage Room
- Choose the booking(s) - tick individual booking or 'select all'
You can Change the Status, delete and/or Move the bookings to another Property
- Scroll to "Delete Property" select 'Delete property and All its rooms and bookings"
To delete bookings from a Property, you will have to set to Cancelled first.
Delete Fixed Prices in a Property
- Click on ACCOUNT LIST
- Click on MANAGE ACCOUNT (owner of the property)
- Go to "Property List" click on "MANAGE PROPERTY"
- Click on Manage Room
- Scroll to Fixed Prices
- Delete Fixed Price, select the Prices to Delete
Add Custom Control Panel Menu links
Click on the 'User' icon on the top right and then on 'Account Management (in the old control panel SUB ACCOUNT in the top right)
You can set Custom Control panel menus for All accounts or individual accounts.
To apply a custom option to all accounts, scroll down to 'Custom Control Panel Menu'
- Click on '</>' symbol
- Enter the name and URL
- Click Save
To add multiple links, you can show side by side, so enter the details and click link, and then a space and another link.
Or enter each link on an individual line, enter the first, then click return and enter the next in the line below.
A good option to add to this section is the QR code for the Beds24 App for users that do not have permissions to the Settings > Marketplace menu.
<a href="https://beds24.com/control3.php?pagetype=mobileapp">Mobile App</a>
The details below is a link to Google translate and the Beds24 Mobile app
<a href="http://translate.google.com">Translate</a> <a href="https://beds24.com/control3.php?pagetype=mobileapp">Mobile App</a>
If you want to customise the links for specific Sub accounts, first click 'Manage account' for the Sub account, (Account List) then scroll down and you can add a "Custom Control Panel Menu" via a HTML link to the top left of the control panel.
Add the QR code to the Beds24 Control Panel
You can incorporate a link into the Control Panel Header, allowing easy access from your account.
Click on the 'User' icon on the top right and then on 'Account Management (in the old control panel SUB ACCOUNT in the top right) > Manage Account for the sub account, then scroll down to Custom Control Panel Menu. Click on the code </> button and paste the following details:
<a href="https://beds24.com/control3.php?pagetype=mobileapp">Mobile App</a>
The link will show in the top left of the user Control panel.
Custom Tab in Bookings
In SUB ACCOUNT (Account List) you can add a custom tab to bookings.
For content you can use HTML and template variables to include information from the booking.
To change the name of the tab enter the following in the Control Panel Custom Text setting:
- Custom Tab|New Name
replacing New Name of the Tab with your preferred name.
Each sub account can have its own custom tab. If a sub account has a custom tab defined, this will be shown instead of the global custom tab.
If there is no custom tab for a sub account, the global custom tab (if used) will be shown.
To hide the custom tab from individual sub accounts go to ACCOUNT LIST then
- click on "Manage Account" and enter
bookedit-custom
in "Hide menu pages"
Example for Custom Tab
Click 'Edit' then add the text and template variables as you want to show on the Custom Tab in the booking.
[GUESTTITLE] [GUESTFIRSTNAME] - [GUESTNAME]
Check in : [FIRSTNIGHT] Checkout : [LEAVINGDAY] Note: [GUESTARRIVALTIME]
Rooms : [ROOMNAMESNCBR]
Fixed Price Details : [RATEDESCBR]
Invoice Details : [INVOICETABLE2]
Pending Payments : [INVOICEPENDPAY] Due date : [INVOICEPENDPAYNEXTDATE]
Subcategories
This category has the following 2 subcategories, out of 2 total.
Pages in category "Sub Account"
This category contains only the following page. download this selection of articles as a PDF book