Difference between revisions of "Category:Sub Account"
| Line 46: | Line 46: | ||
*Click on ACCOUNT LIST | *Click on ACCOUNT LIST | ||
*Cick on MANAGE ACCOUNT for the Master Account | *Cick on MANAGE ACCOUNT for the Master Account | ||
| − | *in the "Property List" click on "MANAGE | + | *in the "Property List" click on "MANAGE PROPERTY" for the property you allow the sub account to access |
| − | *in "Make Property Available in | + | *in "Make Property Available in Multiple Accounts" set "Available in Account" to the master account "Status" to enable and set "Access Rights" |
*if required block sub accounts from selected pages in "Menu Settings" | *if required block sub accounts from selected pages in "Menu Settings" | ||
Revision as of 19:09, 27 January 2016
This page is about the menu SUB ACCOUNTS
Each account can have sub accounts with a unique username and password. Sub accounts can be given restricted or full access to other accounts or individual properties. A sub account can also contain it's own properties.
Only one person at a time can log in to any account or sub account.
Contents
- 1 Before you create a Sub Account
- 2 Create a Sub Account
- 3 Give Sub Account Access to all Properties in the Master Account
- 4 Give Sub Accounts Access to Selected Properties in the Master Account
- 5 Make Sub Account Properties available in the Master Account
- 6 Make a Property available in another Account or Sub Account
- 7 Inter Property Linking
- 8 Make one Account access Another Account
- 9 Hide Menus and/or Settings from Sub Account
- 10 Set Sub Account to send Email from their own Email Address
- 11 Messages to Sub Accounts
- 12 Move Properties to a different Account
- 13 Move Rooms to a different Property
1 Before you create a Sub Account
A property is always owned by one account or sub account but it can be set up to be accessed from other accounts. It inherits it's account level settings from this owner account. Therefore a property should be owned by the account which manages the property and whose Email address is used to send out confirmation messages and other system Emails.
- If a property is managed mainly in the master account and the sub account just needs access to see certain information or to perform certain tasks it should be owned by the master account. In this case sub accounts are given access to the property.
- If a property is managed mainly by the sub account and the master accounts just needs access it should be owned by the sub account. In this case the master account is given access to the property.
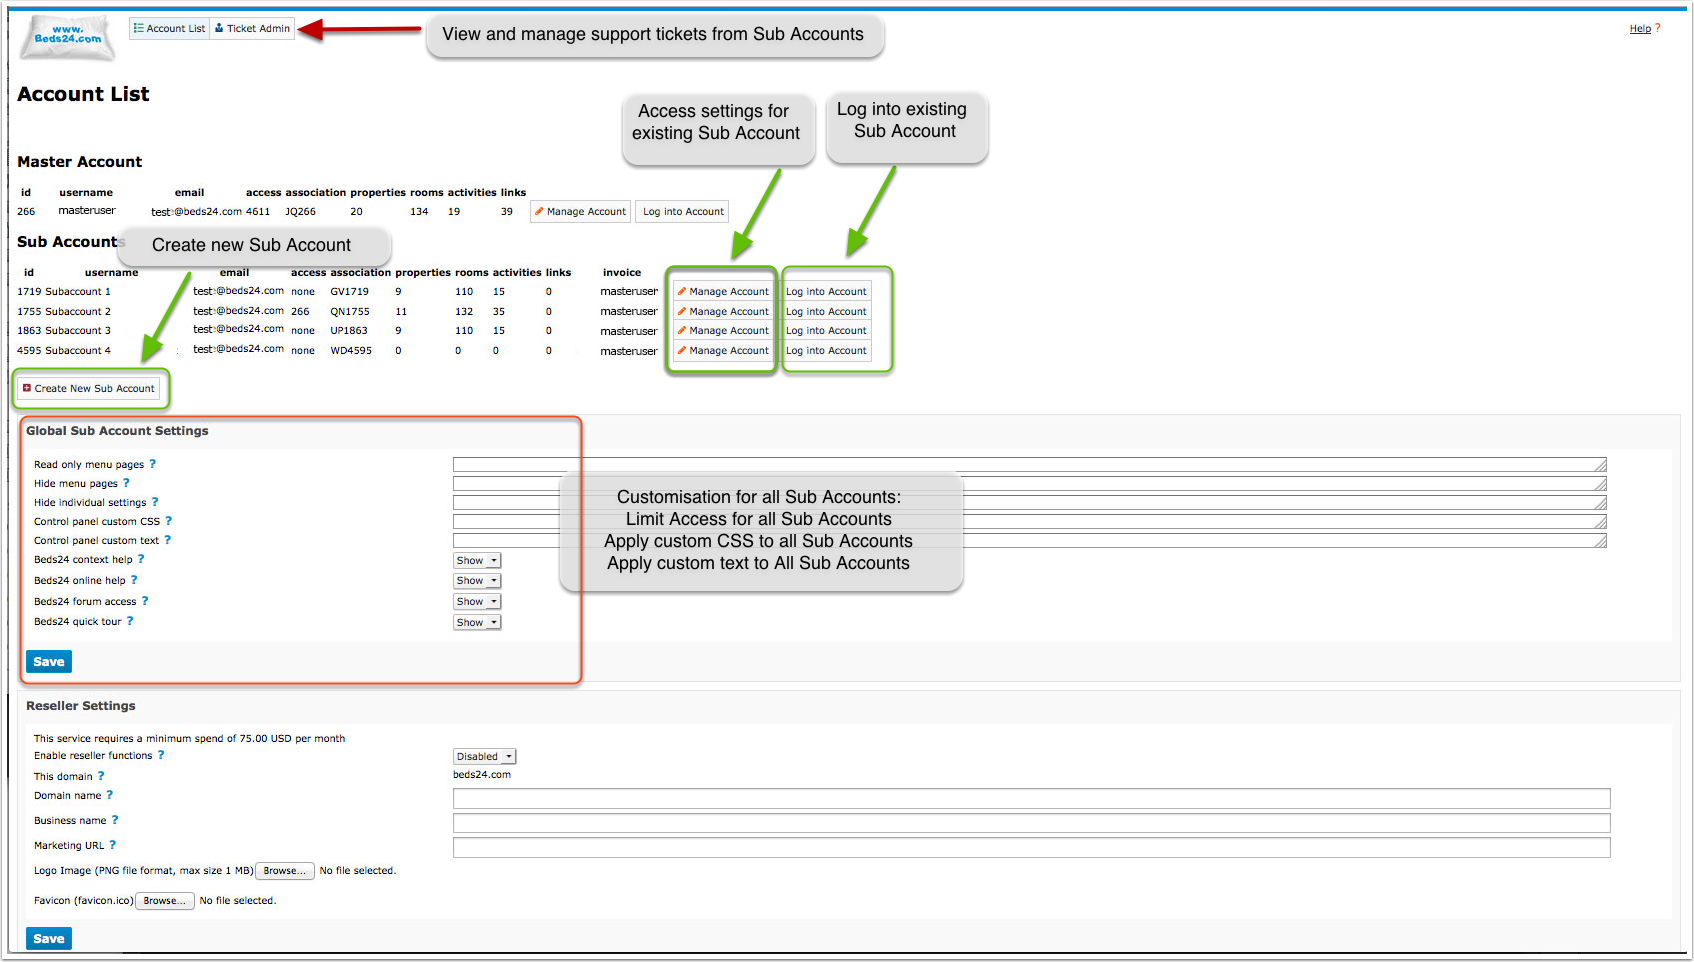
Go to SUB ACCOUNTS to create new sub accounts or manage existing sub accounts
Global sub account settings apply to all sub accounts in one master account
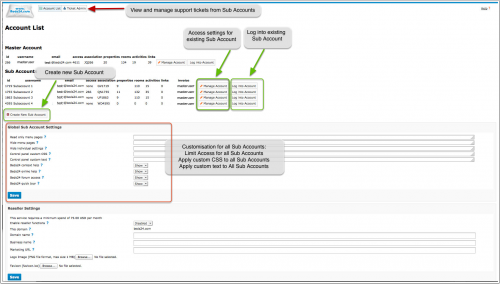
Click on "Manage" to apply settings to an individual sub account
2 Create a Sub Account
Click on SUB ACCOUNTS then on "CREATE NEW SUB ACCOUNT". Enter username password and Email.
The "Role determines the access rights":
- Admin: all rights
- Read Only: All parts of the control panel can be seen but not changed.
- Back Office: All parts of the control panel can be seen and edited except for "SETTINGS" .
- Front Desk: Has read and write rights for "bookings" and "guests". No access to SETTINGS and reports with revenue information. Read only access to all other areas.
- Cleaner: Read only access to bookings in the CALENDAR. Access to standard reports "Cleaning", "Daily Activity" and "Daily Unit Activity".
3 Give Sub Account Access to all Properties in the Master Account
- Click on ACCOUNT LIST
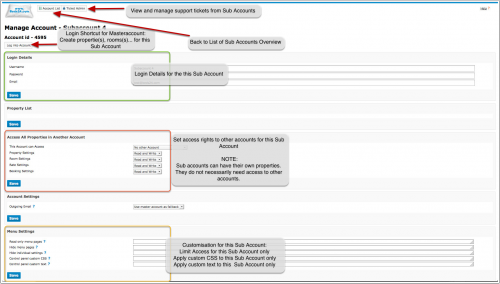
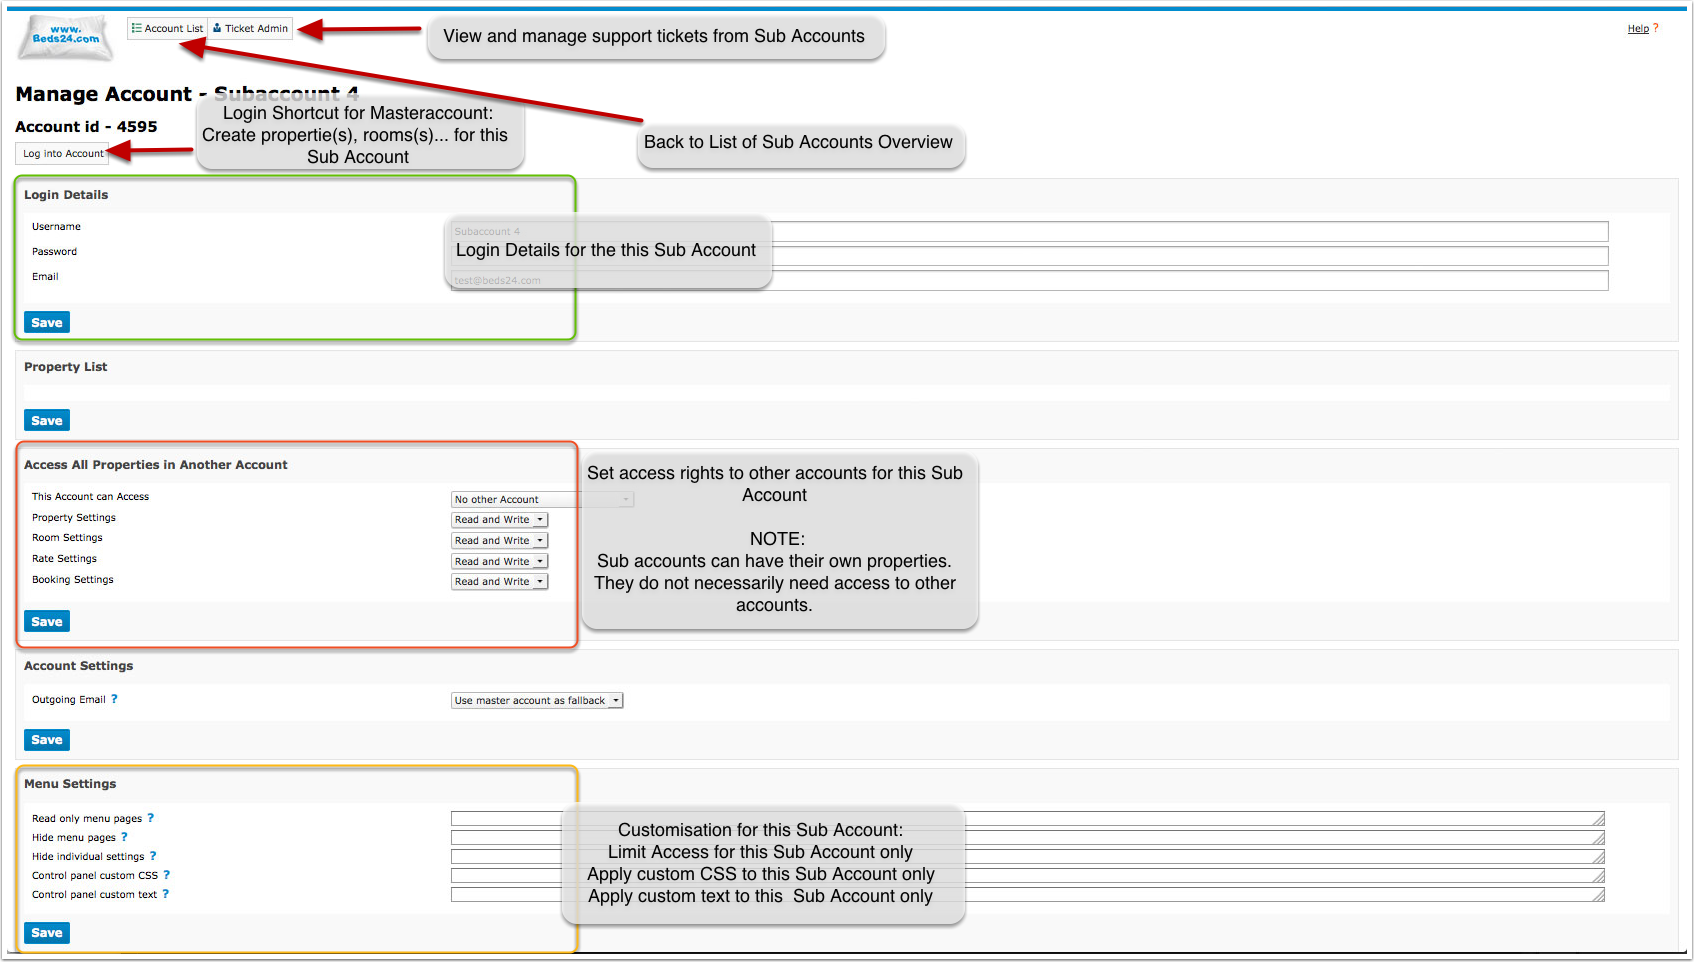
- Click on MANAGE ACCOUNT for the Sub Account
- in "Access All Properties in Another Account" select the account that can be accessed. Set which areas the sub account can access "read only" and which "read and write"
- if required block sub accounts from selected pages in "Menu Settings"
4 Give Sub Accounts Access to Selected Properties in the Master Account
- Click on ACCOUNT LIST
- Cick on MANAGE ACCOUNT for the Master Account
- in the "Property List" click on "MANAGE PROPERTY" for the property you allow the sub account to access
- in "Make Property Available in Multiple Accounts" set "Available in Account" to the master account "Status" to enable and set "Access Rights"
- if required block sub accounts from selected pages in "Menu Settings"
5 Make Sub Account Properties available in the Master Account
- Click on ACCOUNT LIST
- Click on MANAGE ACCOUNT for the Sub Account
- Click on MANAGE PROPERTY for the Property
- Set "Available in Master Account" to enable.
6 Make a Property available in another Account or Sub Account
- Click on ACCOUNT LIST
- Click on MANAGE ACCOUNT for the Sub Account
- Click on MANAGE PROPERTY for the Property
- Add the Accounts which should access the property in the "Make Property Available in Multiple Accounts" menu.
Sub accounts will appear in a selector list. Other accounts can be added by entering the other accounts "Association Code".
7 Inter Property Linking
- Click on Manage Property
Certain items like rates and room dependency settings can be linked with other rooms. The Inter Property Linking settings controls the ability of this property to link with other properties.
Possible values are:
- None - The properties rooms can only link with rooms in the same property.
- Same Owner Account - The properties rooms can only link with other properties owned by the same account.
- All - The properties rooms can link with all properties available in the owner account.
8 Make one Account access Another Account
- Click on ACCOUNT LIST
- Click on MANAGE ACCOUNT for the Sub Account.
- Use the "Access All Properties in Another Account" menu to allow this account access to another account.
This will only allow access to properties "owned" by the other account but not properties owned by a third account which are visible in the account.
9 Hide Menus and/or Settings from Sub Account
- To hide menu pages click on SUB ACCOUNTS and enter the names of the pages you want to hide in "Hide menu pages". The context help gives a detailed explanation. EXAMPLE: To hide all channel manager pages you need to enter: synchroniser, to hide all settings enter: settings.
- If you only want to hide individual settings send us a support ticket for the code required here to hide the particular setting.
If you want to hide the "Delete" button in booking add the following code in the "Control panel custom CSS" for the sub account:
.pagetypeajaxbookedit .btn-danger{ display: none }
10 Set Sub Account to send Email from their own Email Address
- Log into the sub account and go SETTINGS->ACCOUNT->OUTGOING EMAIL. Set the system up to use the sub accounts Email address following the instructions (click on HELP in the top right menu).
- Go to SUB ACCOUNTS click on "Manage Account" and set "Outgoing Email"=Never use Master Account or Use Master Account as Fallback.
11 Messages to Sub Accounts
The function "Message to Account" allows to send information in the same style as Beds24 News to all sub accounts. When you click on "Manage Account" you can also create messages for individual sub accounts. .
12 Move Properties to a different Account
- Click on ACCOUNT LIST
- Click on MANAGE ACCOUNT for the Sub Account
- Click on MANAGE PROPERTY for the Property
- Change the owner account of the property.
13 Move Rooms to a different Property
- Click on ACCOUNT LIST
- Click on MANAGE ACCOUNT for the Sub Account
- Click on MANAGE PROPERTY for the Property
- Click on MANAGE ROOM for the Room
- Select the property to move to
Subcategories
This category has the following 2 subcategories, out of 2 total.
Pages in category "Sub Account"
This category contains only the following page. download this selection of articles as a PDF book